In this game, you take the roles of adventurous dwarfs living reclusively in caves where you dig for ore and rubies and furnish caverns to become living and working areas.
You need ore to craft weapons to undertake expeditions in search of adventure and loot. Rubies are a valuable and highly flexible good: you can trade them for other goods and landscape tiles at any time.
Outside your caves, you will look after your sustenance by felling trees, raising farm animals and doing some agriculture.
At the end of the game, the wealthiest dwarf will win.
Components
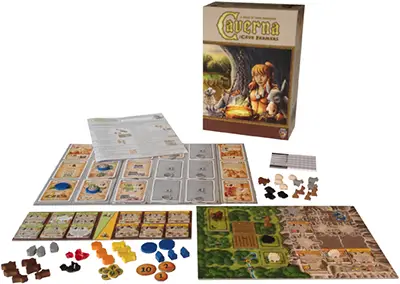
- 300+ wooden pieces for animals, resources and dwarfs
- 60+ acrylic nuggets for ore and ruby
- 7 large Home boards
- 1 small and large basic game board
- 1 small and large additional game board
- 1 two-sided basic game board
- 4 longish supply boards
- 16 punchboards with over 400 pieces
- 30 cards
- 1 score sheet
- 1 rulebook
- 1 appendix
Setup
Your Personal Playing Areas
Each player chooses a color and takes the Home board and the 5 Dwarfs and 3 Stables of that color.
Place 2 of the 5 Dwarfs side by side in the "Entry- level dwelling" on your Home board. Keep the remaining 3 Dwarfs and Stables next to your Home board as your personal supply.
(Return the Dwarfs, Stables and Home boards of the leftover colors to the game box).
Then take one of each of the 2 different Overview cards.
Randomly determine the player who gets the Starting player token. The Starting player and the player to his left each get 1 Food. The third player gets 2 Food. Each other player gets 3 Food.
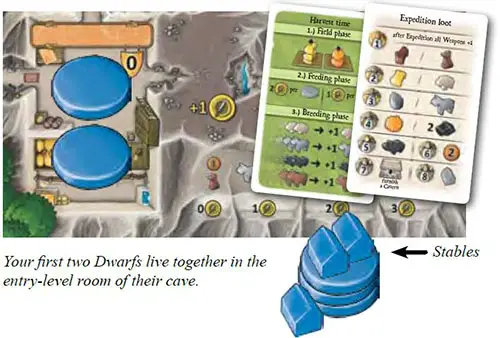
We recommend you cover the Dwarfs in your supply with Stables to avoid using them by accident before you are allowed to.

Players get a different number of Food depending on their position in the turn order.
The Game Boards With Action Spaces
Place the two single -sided basic game boards with Round spaces 1 to 3 and 4 to 12 next to each other.
Shuffle the 7 Harvest markers and place them face -down (with the grey rune symbol facing up) on the Round spaces 6 to 12, one marker per space. Place the "Harvest events" card next to the game boards.
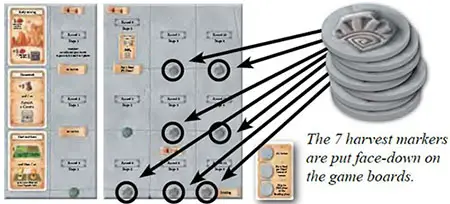
In a 2-player game, remove one of the Harvest markers with a green leaf from the game. Then distribute the remaining 6 markers among the Round spaces 6 to 12 leaving space 9 empty.
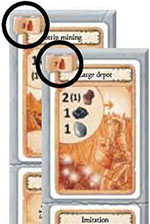
Place the third basic game board to the left of the first two. Turn it to the appropriate side depending on the number of players (1 to 3, or 4 to 7 players).
There are two additional game boards.
In games with 5 to 7 players, the larger additional game board is used. Turn it to the appropriate side depending on the number of players (5, or 6 to 7 players).
The smaller additional game board is used in games with 3 or 7 players.
Place the required additional game boards to the left of the basic ones.

The Supply Boards and Furnishing Tiles
The supply boards are double-sided. One side is used in the Introductory game, the other side is used in the Full game. The Full game comes with a larger variety of Furnishing tiles. (Put the unused Furnishing tiles back into the game box when playing an Introductory game).
When playing with 6 or 7 players, we recommend that you start with the Full that you start with the Full game to make sure that there is a sufficient number of Furnishing tiles in play.
Place the Furnishing tiles on the appropriate spaces on the supply boards. There is more than one ordinary "Dwelling" tile. Place some of them on the appropriate space on the supply board and keep the rest next to it as a reserve.
There is a sufficient number of ordinary "Dwelling" tiles (costing 4 wood and 3 stone). You do not need to put all of them on the supply board. Replenish them incrementally from time to time when needed.

The Action Space Cards
Shuffle the 12 Action space cards. Keep them face-down while shuffling.
In the 2-player game, only 11 Action space cards are used. Remove the "Exploration" card with the "Level 4 expedition" from the game. (Cover the unused Round space 9 with a Dwarf card).
Rearrange the shuffled Action space cards into a face-down stack as follows without looking at them.
The 12 Action space cards rearranged after shuffling. You can fan them out or keep them in a stack.

Put the three stage 4 cards at the bottom of the stack, on top of them the three (or two) stage 3 cards, and on top of those the two ordinary stage 2 cards.
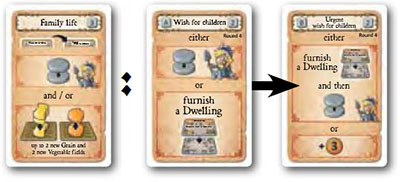
Put the card for round 4 on top of these. (This card says "Wish for children " on one side and "Urgent wish for children" on the other side. Right now it does not matter which side faces up).
Finally, put the three stage 1 cards on top of the stack.
The Landscape Tiles
Sort the landscape tiles by type and put them in separate stacks. There are 3 types of both, single tiles and twin tiles.
The Building Materials, Animals and Weapon Strength Markers
Separate the remaining components and keep them in separate piles next to the game boards. All the animals may be kept in one pile and all the building materials in another. You do not need to sort the Weapon strength markers by number.
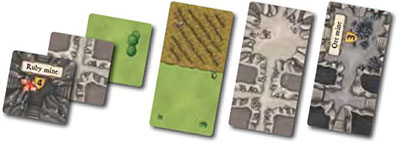
You will place single and twin tiles on your Home boards during the course of the game. Fields and Meadows (which can be further upgraded to Pastures) can be placed on Forest spaces; Caverns and Tunnels (which can be further upgraded to Mines) can be placed on Mountain spaces.
Object of the Game
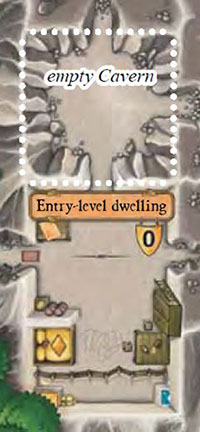
Your Home board consists of two parts (see below). On the left side, there is a Forest that you will cut down during the course of the game.
On the right side, there is a Mountain with an entrance to your cave system, which currently consists of two Caverns.
One of these is the "Entry-level dwelling" and has been furnished for 2 Dwarfs and a pair of animals. The other Cavern is still empty, but is ready to be furnished.
Your first two Dwarfs live in the entry-level room of your cave system. If you want to grow your Dwarf family, you will need to add more Dwellings. There are Furnishing tiles for this purpose as you have already seen during setup.
Each of your Dwarfs may take one action per round - the available actions are displayed on the game boards. You will place your Dwarfs, one at a time, in clockwise order on Action spaces until all players have placed their Dwarfs on the game boards.
The goal of your actions is to collect Food for your Dwarfs and to develop your Home board to be worth a lot of Gold points at the end of the game. Let us have a look at what you can do with your Home board and what you get Gold points for.
Caverns can be furnished like the one at the bottom of this illustration or they can be empty like the one at the top. Dwellings are special types of furnished Caverns. There are a lot of other ways to furnish a Cavern.
When placing your Dwarfs on the game boards, you will eventually get in one another's way. Each Action space may only be occupied by a single Dwarf. The Dwarfs only return home after they have all been placed. Then they are placed again in the next round.
While reading the rules, you may come back to the following section every now and then to get a better view of the context. This section is not required for understanding the rules. Any information found here is also explained elsewhere in the rule book.
To get a grasp of what happens on your home boards
You cut the Forest on your Home board to get Wood and cut through the Mountain to get Stone. You need these building materials to furnish the hollowed out spaces of your Mountain. Outside the Mountain, you can use the cleared Forest land to do agriculture and raise Farm animals to feed your little family.
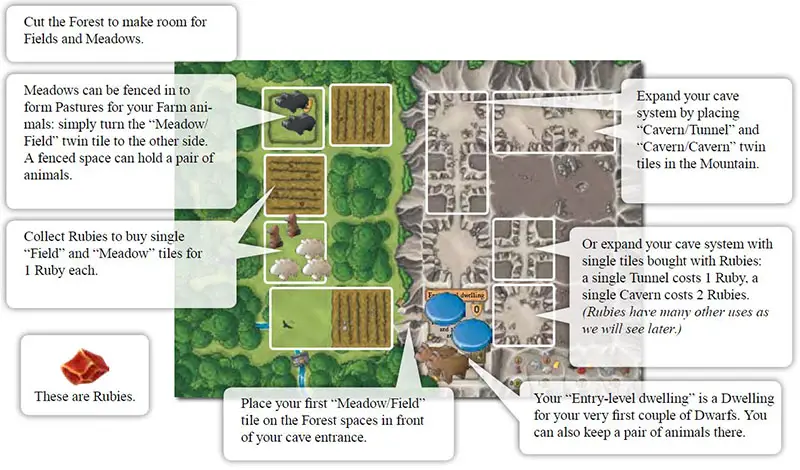
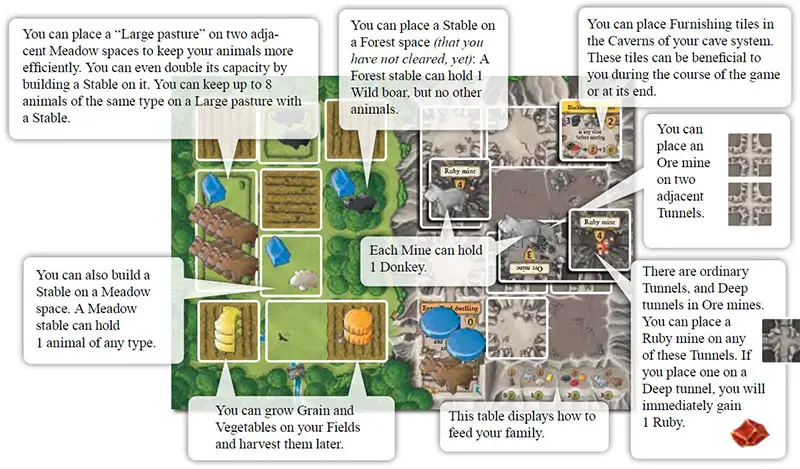
Weapons And Expeditions
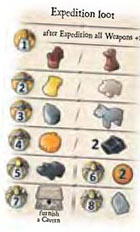
Veteran "Agricola" players may be highly interested in what the Weapons are for. In Caverna, your Dwarfs gather Ore to forge Weapons. The strength of a Weapon is determined by the amount of Ore used in the process and is increased by 1 after each Expedition.
Depending on its level, an Expedition may yield 1 to 4 loot items. What these items will be depends on the strength of the Weapon that has been used (see the Overview card).
A newly forged Weapon can only have an initial strength equal to or lower than 8. This strength can be increased over the course of the game to the maximum strength value of 14.

The special thing about the 'Cave Farmers' is the two groups that emerge when playing with a lot of players: one group goes after Weapons, the other one pursues the peaceful route.
Members of the same group, of course, will compete for the same resources. Be vigilant about the competition within your group, so you do not lose against the other one.
Number Of Components
The only components that are purposely limited in number (apart from the unique Furnishing tiles) are the 5 Dwarfs and 3 Stables of each player. Any other components are considered to be unlimited. If you run out of any such component, use the Multiplication markers or improvise. Put a good token on a Multiplication marker to indicate 4 tokens of that type.
There are markers depicting 8 animals of a specific type. These can be used on Large pastures with a Stable. Also, there are markers for 10 units of a specific type of building material or for 5 Rubies.
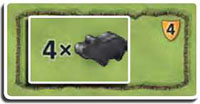
You can "multiply" animals as well. This Large pasture is currently holding 4 Wild boars.
Let us have a look at the Scoring Pad
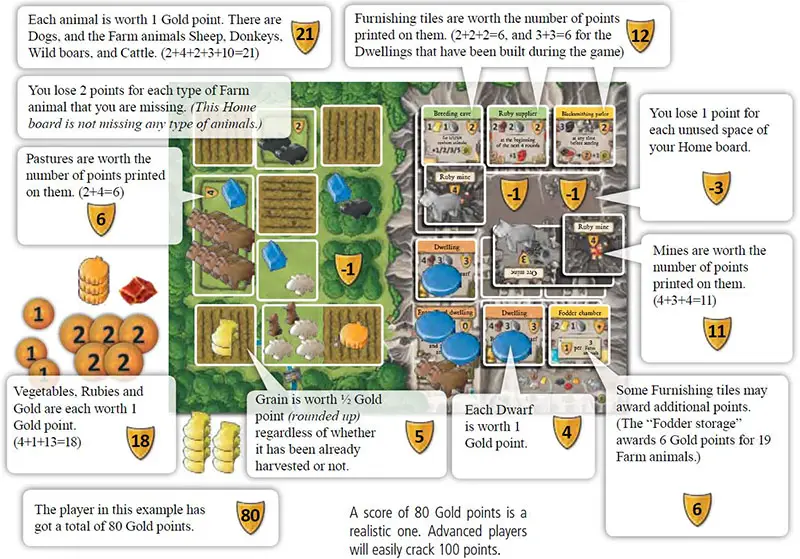
At the end of the game, the player with the most Gold points wins. In the following example, we will have a look at the ways you can score points. The numbers in parentheses are the points gained in the example.
Game Play
This section consists of two parts. At first, we will look at the course of a round. Then we will explain the actions.
Game Turn
Each of the 12 rounds goes through five phases that are played one after another in the order described here.
In the 2-player game, there are only 11 rounds to play.
Players who have already played 'Agricola' only need to read the brown sentences. All the other rules are the same in both 'Caverna' and 'Agricola'.
The five phases of a turn are:
-
Add a new Action space
At the beginning of each round, turn over the top Action space card and put it on the appropriate space on the basic game boards.
This is where you will place the first Action space card in Round 1.
-
Replenish accumulating spaces
Place goods from the general supply on the Action spaces that require them. These Action spaces show an arrow.
-
Work phase
In clockwise order, take turns to place 1 Dwarf per turn on an Action space on the game boards. Then carry out the actions on that space. Each Action space may only be occupied by a single Dwarf.
-
Return home
After all Dwarfs have been placed on Action spaces, return your Dwarfs to their Dwellings.
-

Harvest time
At the end of most of the rounds, there is a harvest: collect Grain and Vegetables, feed your family, and breed your animals.
1. Add a New Action Space
Turn over the top Action space card from the stack and put it on the empty Round space with the lowest number. (The Round spaces are numbered 1 to 12).
The new Action space adds to the number of available actions. It can be used by any player in the Work phase of this and all subsequent rounds.
From the start of round 6, you must also turn the Harvest marker on the Round space where the new Action space card is placed face-up. Leave the marker on the grey rune space.
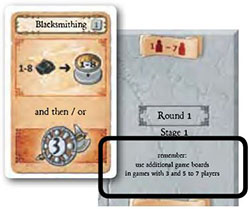
The first Round space reminds you to check if you need additional game boards
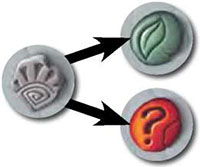
There is a grey rune symbol on the back side of each Harvest marker, and a green leaf or red question mark on the front side.
If the Harvest marker shows a green leaf, there will be a normal harvest at the end of the round.
If it shows a red question mark, the harvest will be played differently.
Special Cases When Adding A New Action Space
The "Wish for children" Action space card will always come into play in round 4. Initially, place it with the "Wish for children" side facing up on the game board. Turn it to the other side that says "Urgent wish for children" as soon as you add the "Family life" Action space card in stage 3.
That's the way it is with small families: Over time a wish for children will become an urgent wish.
In the 2-player game, the last round of stage 3 - round 9 - is skipped, as the "Exploration" Action space card was removed from the game.
2. Replenish Accumulating Spaces
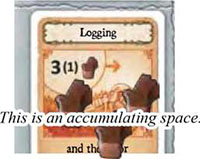
On many Action spaces, there is a special arrow and a background illustration indicating that this space has to be replenished with goods every round. These Action spaces are called "accumulating spaces".
Accumulating spaces have to be replenished even if there are goods left on them from previous rounds. "3 Wood" and an arrow, for instance, indicate that you put 3 Wood on that Action space every round.
There is an exception: "3 (1) Wood" and an arrow, for instance, indicate that you put 1 Wood on that Action space every round - unless that Action space is empty, in which case you put 3 Wood on it. Read the icons of other Action spaces accordingly. "1 Grain (1 Vegetable)" on the "Sustenance" Action space, for instance, means you have to put 1 Grain on that space if it is empty, and 1 Vegetable instead if not.
Details on replenishing accumulating spaces:
- When replenishing, take the required goods from the general supply.
- There is no upper limit for the number of goods on an accumulating space.
- If you run out of a specific good, use the Multiplication markers or improvise (see page 5)
3. Work Phase

Beginning with the Starting player and in clockwise order, take turns to pick up a single Dwarf from your cave and place it on an unoccupied Action space. Then carry out the depicted action immediately. Play continues until all Dwarfs of all players have been placed in this fashion.
Please note the play order of Dwarfs: You have to place your Dwarfs in ascending order of their Weapon strength, beginning with your unarmed Dwarfs (i.e. those without a Weapon) and followed by your armed ones (i.e. those bearing a Weapon).

Each Action space can only be used by one Dwarf in a round.

Whenever you take building materials, Grain, Vegetables, Food or Rubies, the tokens are placed in your personal supply in view of the other players. Animals may not be placed in your supply; they must be placed directly on your Home board.
Details on the Work Phase
Animals that you gain during the Work phase but that you cannot or do not want to accommodate on your Home board may be converted into Food immediately (according to the conversion table on your Home board).
You can only place Dwarfs from your cave. You may not use the Dwarfs in your personal supply (as they have not been born yet, if you will, but they can be introduced later).
On your turn, you can only ever place one Dwarf at a time.
You may not place a Dwarf on an Action space without performing at least one of its actions.
Due to the "Family growth" action (see page 15), some players may have fewer Dwarfs than others in their caves. If a player runs out of Dwarfs during a round, this player is skipped. Only the players that have Dwarfs left in their caves continue to play them one by one as described.
On some Action spaces you have to choose one out of several options ("either ... or").
Other Action spaces allow you to take any number of the available actions ("and/or", "and then/or").
There are two Action spaces that have a mandatory primary action and an optional follow-up action ("and then"). In case of the "Urgent wish for children" Action space, you have to use the first action in order to use the second one at all.
4. Return Home
Remove your Dwarfs from the game boards and return them to their Dwellings.
Details on Returning Home
It does not matter how you distribute the Dwarfs among the Dwellings in your cave system.
You may never have more Dwarfs in play than available room in your cave. This is why each of your tired Dwarfs will always find a place to sleep.
It is best to place your Dwarfs side by side in your cave so that your opponents can easily see which of your Dwarfs have a Weapon and what strengths these Weapons have.
5. Harvest Time
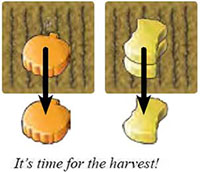
During the Harvest time, players have to sustain their families. Some rounds do not end with a harvest, others do. A harvest goes through three sub-phases that are played in the following order.
-
Sub-phase 1: The Field phase.
Remove 1 Grain or Vegetable token from each sown Field on your Home board and place it in your personal supply. (See page 14 for information on how to grow crops).
-
Sub-phase 2: The Feeding phase.
In the Feeding phase, you have to feed your Dwarfs by paying 2 Food per Dwarf in your cave. Offspring that were born during the current round from a "Family growth" action only consume 1 Food for this round, but will require 2 Food in future harvests.
If you do not have enough Food, you may convert goods into Food or you will have to take Begging markers.
Begging Markers
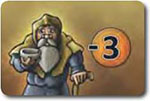
If you cannot or do not wish to produce the required Food, you must take 1 Begging marker for each missing Food. You may not give up Dwarfs to avoid the need to feed them.
At the end of the game, you will lose 3 Gold points for each Begging marker. There is no way to return Begging markers once you have taken them.
-
Sub-phase 3: The Breeding Phase.
If you have at least 2 Farm animals of the same type, you get exactly 1 additional (baby) animal of that type - but only if the new animal can be accommodated on your Home board.
Baby animals and parent animals may not be converted into Food immediately after the birth. You have to accommodate them on your Home board first.
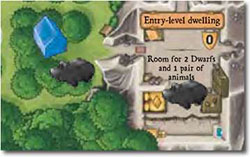
The player in this example has built a Stable in the Forest just outside his cave. Now he is able to keep up to 3 Wild boars.
Therefore, his Wild boars can breed a piglet (despite the fact that they currently do not seem to be interested in each other at all).
Details On Breeding
You get all of your baby animals at the same time, not one by one.
You can only get at most one animal per type in each harvest.
Dogs are not considered Farm animals. They do not breed.
The animals breed regardless of where the parent animals are placed on your Home board. The parents may be in separate areas.
Which Rounds end with a Harvest?
-
Rounds 1 To 4
In the first four rounds, there is only one harvest: at the end of the third round. The first two rounds do not have a harvest at all. At the end of round 4, there is no harvest but instead you have to pay 1 Food per Dwarf in your cave (even for offspring Dwarfs). There is no Field or Breeding phase at this time.
-
Rounds 5 To 12
By default there will be a harvest at the end of rounds 5 to 12.
This may change if a Harvest marker shows a red question mark. (Harvest markers have been placed on Round spaces 6 to 12 during setup). The change depends on the number of question marks that have already been revealed.
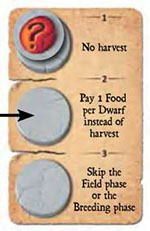
As explained on the "Harvest events" card, there is no harvest at the end of the round in which the first question mark is revealed (like at the end of rounds 1 and 2).
At the end of the round when the second question mark is revealed, instead of a harvest, you have to pay 1 Food per Dwarf in your cave (even for offspring Dwarfs; like at the end of round 4).
When the third question mark is revealed, you have to decide individually whether you want to play the Field phase or the Breeding phase of the Harvest time at the end of the round.
You cannot play both these phases, but you must still play the Feeding phase. Each player may choose differently.
To keep track of how many question marks have been already revealed, place them on the "Harvest events" card (from top to bottom) after they have been resolved.
You will need a lot of Food for your hungry Dwarfs due to the high number of harvests in this game.
On the other hand, you will collect crops more frequently and your animals will breed more often. If you take the right steps to feed your family early on, it will not be as hard as it seems.
In this example, the first question mark has already been resolved. When the next one is revealed, all players will have to pay 1 Food for each of their Dwarfs.
Food Conversion Rules
To feed your Dwarfs, you may convert goods into Food at any time (without constraints). There is a Food conversion table at the bottom right of your Home board that summarizes the following Food conversion rules:
-
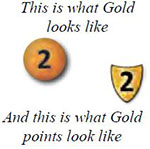
You can buy Food with Gold. Pay one more Gold than the amount of Food you wish to get. (For instance, 1/2/3/.. Food cost 2/3/4 Gold, respectively. Gold is available in denominations of 1, 2 and 10.
You may change your Gold at any time. You cannot spend the Gold points that are awarded at the end of the game for things like Mines or Meadows. Keep in mind that each Gold is worth 1 point at the end of the game).
In addition, you can convert animals and crops into Food.
-
Sheep are each worth 1 Food, Wild boars 2 Food, and Cattle 3 Food. A single Donkey is worth 1 Food, but 2 Donkeys are worth 3 Food.
-
Each Grain is worth 1 Food, and Vegetables are worth 2 Food.
-
Rubies could be exchanged for goods like Wild boars and Vegetables that are each worth 2 Food; therefore, you can convert Rubies into 2 Food directly.
-
Dogs and the building materials Wood, Stone and Ore are not worth any Food. (Nor are Dwarfs, by the way).
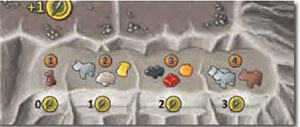
The Food conversion table on your Home board summarizes the Food conversion rules.
Now you know how to play a round. If you go back to pages 4 to 6, you might notice what we have not talked about yet: which actions you can take to become a wealthy dwarf. Let us have a look at the remaining rules by explaining the Action spaces.
As most of the following rules will be new to veteran 'Agricola' players as well, we will now stop using brown color to mark new stuff.
The Actions
Some Action spaces are already available at the beginning of the game, others will become available later. Some Action spaces are only available with a certain number of players.
We will now explain the Action spaces grouped by type in the following order.
- Action spaces for twin tiles
- Action spaces for family growth
- Action spaces for goods and mines
- Action spaces for animals
- Action spaces for weapons
- Starting player
- Imitation
Check here all detailed information about the actions.
End of the Game
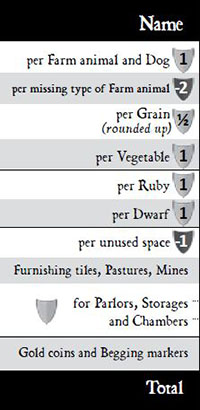
The game ends at the end of round 12. Use the scoring pad to determine the final scores. There are several different categories for which you can get Gold points. The player who has the most Gold points wins the game. (In case of a tie, there are multiple winners).
1 Gold per Farm animal and Dog: Each animal is worth 1 Gold point at the end of the game, even Dogs. (Dogs are not considered Farm animals).
-2 Gold per missing type of Farm animal: At the end of the game, you should have at least 1 Sheep, 1 Donkey, 1 Wild boar and 1 Cattle. You lose 2 Gold points for each- of these types that you do not have on your Home board. (You do not need to have any Dogs).
1/2 Gold per Grain (rounded up): Count all of your Grain tokens - both those in supply and those still left on Fields. Divide this number by 2 and round it up. This is the number of Gold points you get for Grain.
1 Gold per Vegetable: Count all of your Vegetable tokens - both those in your supply and those still left on Fields. You get this number of Gold points for Vegetables.
1 Gold per Ruby: At the end of the game, each Ruby is worth 1 Gold point.
1 Gold per Dwarf: At the end of the game, each of your Dwarfs is worth 1 Gold point.
1 Gold per unused space: Count the number of spaces on your Home board that have no tile or Stable on them. You lose 1 Gold point for each such space. The two pre-printed Caverns of your cave system are considered used. (Unfurnished Caverns are also considered used).
Gold for Furnishing tiles, Pastures and Mines: Add up the Gold point values on all of your tiles. Small pastures are worth 2 Gold points, Large pastures are worth 4 Gold points (regardless of the type and number of animals on those tiles).
Ore mines are worth 3 Gold points, Ruby mines are worth 4 Gold points (regardless of whether they hold a Donkey or not). The value of a Furnishing tile is printed on the right of the tile, right under the name of the tile.Bonus points for Parlors, Storages and Chambers: Most of the Furnishing tiles called Parlors, Storages and Chambers (indicated by the yellow name tag) may be worth Bonus points depending on the condition they impose.
The scoring pad has multiple lines for Bonus points. You can use one line per Furnishing tile that you get Bonus points for. (Details on the Furnishing tiles can be found on page A3 of the appendix).Gold coins and Begging markers: Add up the values on your Gold coins and subtract 3 Gold points from that for each Begging marker you have.
Details on Bonus Points
Bonus points for the Weaving parlor, Milking parlor, Fodder chamber, Food chamber and Treasure chamber are awarded as "Bonus points" (even though you could add them to other categories).
Minus points prevented by the Writing chamber have to be adjusted in the respective categories.
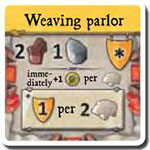
If you have the Weaving parlor, you will get points for Sheep twice: in the category "1 Gold per Farm animal" and in the category "Bonus points for Parlors".
As with the Writing chamber, Bonus points for the Hunting parlor, Beer parlor, Blacksmithing parlor and Spare part storage are not awarded as "Bonus points" on the scoring pad.
These tiles allow you to exchange goods for Gold before scoring. (If you forgot to do so but notice it just before scoring, you may still do it).
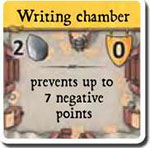
If you have the Writing chamber, your minus points in the "-2 Gold per missing type of Farm animal", "-1 Gold per unused space" and "Begging markers" categories will be reduced.
Continue Reading
