
The dream world is under siege! The terrifying Menace, an entity of many faces wants nothing more than to ravage everything in its path. Only you can stop it, as commander of Castellion, the majestic shape-changing fortress.
But, before you encounter the Menace itself, you may wish to learn what is taught at the School of Architects, or submit to- training at the ^Admiral s ^Academy. ..
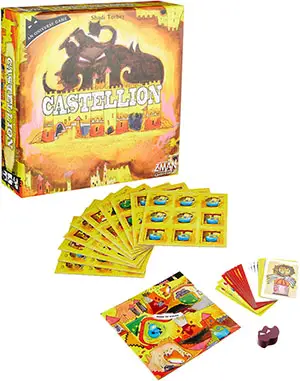
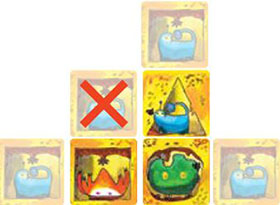
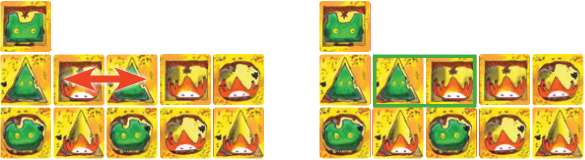
Components
- 72 Defender tiles
- 12 Traitor tiles
- 24 Ordeal cards
- 2 player aids
- 1 Champion of the Oniverse card
- 1 Menace pawn
- Rulebook
Object of the Game
Castellion is a tile game that may be played solitaire or co-operatively with a second player. The game presents three successive levels of play:
The School of Architects: an introductory level that will familiarize you with the rules of construction.
The Admiral's Academy: the base level that incorporates the Defense tiles' special powers.
The Menace: the more difficult expert level that adds special powers to the different defensive formations.
To win the game (regardless of the selected level of play), you must overcome three ordeals. To overcome an ordeal, you must build your castle according to the instructions on the Ordeal cards, while making sure that your castle's foundation is complete.
As time is short, you must build your castle as efficiently as possible, carefully choosing where to place each Defense tile.
With the exception of the Ordeal cards, the components used in each level of play are identical.
Note: The rules of the base level are presented in a way that presumes you have read the rules of the introductory level. Likewise, the rules of the expert level presume that you have read the rules for the introductory and base levels.
Therefore, regardless of which level you wish to play, you will still need to read the rules from the beginning.
The School of Architects: Introductory Level
Setup
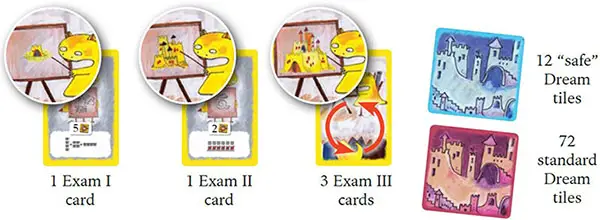
Place Exam I card and Exam II card faceup on the table.
Shuffle the 3 remaining Exam III cards and choose 1 at random. Place the chosen card next to cards I and II, and return the remaining 2 cards to the box (they are no longer needed).
Shuffle the 12 "safe" Dream tiles (blue back) and the other 72 Dream tiles (brown back) separately.
Game Play
Each turn, you must draw a Dream tile. You may decide whether to draw from the regular pile or from the "safe" pile.
Note: The "safe" pile contains 12 Defender tiles (no Traitors). Once it is depleted, you must always draw from the regular pile. Use this limited resource wisely.
There are two tile types which lead to three possible actions:
- It is a Defender tile. You may A) place it, or B) discard it.
- It is a Traitor tile. You must C) place it.
A. Place a Defender Tile
You may add a Defender tile to your castle, thereby increasing its resistance to the ordeals that await you, most notably by creating defensive formations (page 8). A tile placed in your castle remains there until it destroyed or moved, or until the game ends.
When placing a tile, you must follow these 4 placement rules:
-
With the exception of the first tile, each tile must be placed orthogonally adjacent to another tile in your castle.
-
With the exception of the 6 tiles that make up the bottom row (your foundation), each tile must be placed above another tile (parts of your castle may not simply hang in the air).
Important : you may not place a tile below your foundation (the bottom row), nor may you place a tile directly on top of another tile (so that it covers it).
-
With the exception of the 6 tiles that make up your foundation, you may not place a tile adjacent to another tile that depicts the same shape.
Important : there are three shapes (the triangle, the square, and the circle).
-
The castle may not be greater than 6 tiles wide and 6 tiles tall.

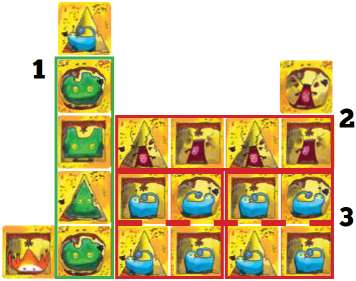
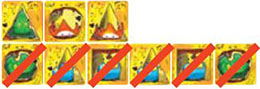
Defensive Formations
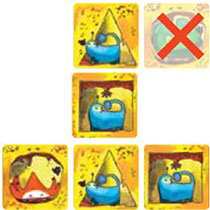
As long as you follow the placement rules above, you may place Defender tiles wherever you wish. However, you will want to do so in such a way that you create defensive formations, which require 4 Defenders of the same faction (as a reminder, the four factions are: Seer, Chameleon, Juggler, and Pyro) placed in a particular pattern.
There are 3 defensive formations:
- The bastion (a square of 4 Defenders of the same faction)
- The line of defense (a horizontal line of 4 Defenders of the same faction)
- The tower (a vertical line of 4 Defenders of the same faction)
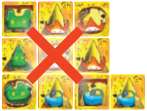
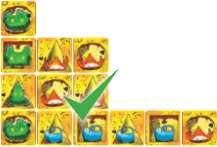
Important: A defensive formation must contain exactly 4 tiles of the same faction; any additional tiles of the same faction cancel the defensive formation.
Note that a defensive formation is not canceled if Defender tiles of a different faction are placed next to it.
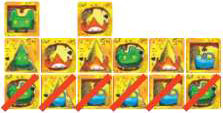
Examples:
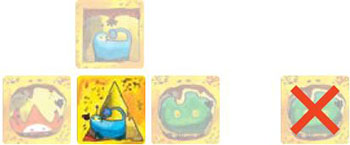
None of the tiles next to the Chameleon tower are of the same faction. The tower remains active.
The Pyro line of defense is canceled by the additional Pyro positioned above it.
The eight Seer tiles nullify each other. They may not be used to create lines of defense or bastions.
Note: The faction used to create a defensive formation does not matter. A tower made of Pyros has the same effect as a tower made of Seers.
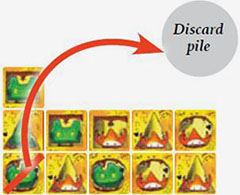
B. Discard a Defender Tile
After drawing a Defender tile, if you cannot place it (because it would violate the placement rules), or you do not wish to place it (because it would compromise your building strategy), you may simply discard it. Place it faceup in the discard pile.
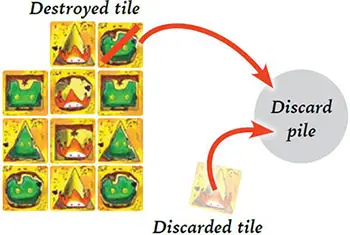
Destroy/discard:
In these rules, destroy means that a tile is removed from your castle and placed in the discard pile. Discard means that you are placing a tile in the discard pile instead of adding it to your castle.
Regardless, destroyed tiles and discarded tiles share the same discard pile.
C. Place a Traitor Tile
Place the Traitor tile to the left of the lowest numbered Ordeal card (note: the black border around certain tiles has no significance in the introductory level). Keep a close eye on the number of Traitor tiles next to an Ordeal card.
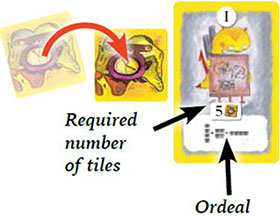
You must encounter an Ordeal when the number of tiles next to it is equal to the traitor number on the Ordeal card.
Special Case - Completed Castle
If you complete your castle (6x6 tiles), you must immediately encounter the lowest numbered Ordeal card, regardless of how many Traitor tiles are next to it. If your castle remains complete after succeeding an encounter with an Ordeal card, you must immediately encounter the next Ordeal card.
Ordeal Card - Exam I
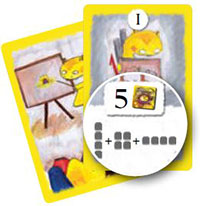
You must encounter this Ordeal once you have five Traitor tiles next to it (or if you complete your castle).
Verify that you have a complete foundation and have built the defensive formations required to pass the Exam (in this case: 1 tower, 1 bastion, and 1 line of defense).
If you have failed to build the required defensive formations, or you do not have a complete foundation (6 tiles on the bottom row), you fail the exam and lose the game!
If you have succeeded in building the formations and your foundation is complete, congratulations! You will continue on to the following exam. Remove the Ordeal card and all Traitor tiles next to it from the game.
Failure: Only 1 formation, AND an incomplete foundation.
Success: The 3 defensive formations AND a complete foundation are present.
Ordeal Card - Exam II
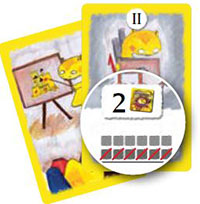
You must encounter this Ordeal once you have two Traitor tiles next to it (or if you complete your castle).
Destroy the 6 tiles that form the foundation of your castle, thereby causing the second row to become the first row (i.e. your new foundation). If, after destroying these 6 tiles, your new foundation is incomplete (has less than 6 tiles), you lose the game!
However, if your foundation still consists of 6 tiles, congratulations! You have passed the second exam.
Remove the Ordeal card and all Traitor tiles next to it from the game.
Special case: if you encounter the first exam by completing your castle and succeed in passing it, you will immediately encounter the second exam (which you are certain to pass). Remove these two exams and all Traitor tiles next to them from the game.
Failure: The new foundation is incomplete.
Success: The new foundation is complete.
Ordeal Card - Exam III
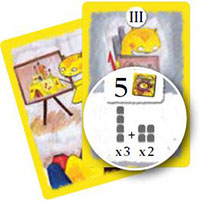
You must encounter this Ordeal once you have five Traitor tiles next to it (or if you complete your castle). Verify that you have a complete foundation (6 tiles) and have built the defensive formations required to pass the Exam.
If you have not, you lose the game!
If you have, you win! The Master Architects grant you their prestigious diploma, and recommend that you advance to the Admiral's Academy before facing off against the Menace.
Failure: One of the required towers is missing AND the foundation is incomplete.

Success: The 3 towers and 2 bastions are present. The foundation has 6 tiles.
The Admiral's Academy: Base Level
All rules of the introductory level apply to the base level, with the following exceptions and additions:
Setup
Place the Simulation I Ordeal card faceup on the table. Shuffle the 3 Simulation II cards, choose 1 at random, and place it faceup on the table (return the other 2 to the box). Do the same with the Simulation III cards.
Note that each of these Simulations must be encountered after 3 Traitor tiles have been placed next to them (or if you complete your castle). If you fail a Simulation, or end with an incomplete foundation, you lose the game.
When you pass a Simulation (and your foundation is complete), remove the Ordeal card and all Traitor tiles next to it from the game. If you pass Simulation III and your foundation is complete, you win.
Game Play
B. Discard a Defender Tile
From now on, whenever you choose to discard a Defender tile instead of placing it, you activate its special power. The effect depends on the faction of the tile you discard.

The Juggler
Change positions of 2 orthogonally adjacent Defender tiles.
Note: You do not need to follow placement rule 3. In other words, tiles of the same shape may be made adjacent using this power.

The Seer
Reveal 4 Dream tiles and place them faceup. These tiles may be revealed from the standard or "safe" piles in any combination.
Important: Whenever there are revealed (faceup) Dream tiles, you may not choose to draw a facedown Dream tile. You must play (place or discard) all the revealed tiles before continuing to draw from the facedown piles.
Important: There may never be more than 4 revealed tiles. If you discard another Seer, you simply reveal Dream tiles until there are a total of 4 revealed tiles.

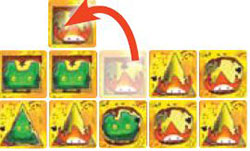
The Chameleon
Recover a Defender tile from the discard pile. The tile you recover must have the same shape as the discarded Chameleon. Then, immediately use (place or discard) the recovered tile.

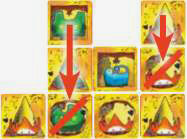
The Pyro
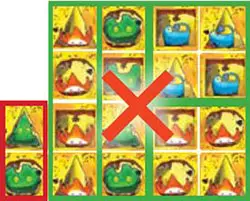
The Pyro has two effects that occur one after the other. First, choose a tile in your castle to destroy.
Note: If the destroyed tile was taken from under one or more tiles, the remaining tiles in that column immediately slide to fill the empty space.
Tiles of the same shape are permitted to become adjacent as a result of this slide. You may not destroy a tile that would separate the castle into two separate structures.
Second, choose a tile in your castle to move to another position in your castle.
This tile must respect all placement rules, except for rule 3. In other words, tiles of the same shape may be made adjacent using this power.
Note: You may not choose to move a tile that is under another tile. You may not move a tile if doing so would separate the castle into two separate structures.
General Note: You are not required to use the power of any tile you discard. However, if you choose to use the power, you must use the full effect.
D. Discard a Traitor Tile

From now on, you may choose to discard a Traitor tile instead of C) placing it next to an Ordeal card, allowing you to prevent an encounter from happening before you are ready.
But this action comes at a price. When you discard a Traitor tile, you must destroy 4 tiles in your castle.
If you have fewer than 4 placed Defender tiles, simply destroy all Defender tiles in your castle. If you have no placed Defender tiles, you may simply discard the Traitor tile without effect.
Important: There are 3 Traitor tiles with a black border. If you draw one of these, it must be placed; you may not choose to discard it.
Note: If the tiles you destroy are under other tiles, the remaining tiles in the affected columns immediately slide to fill empty spaces.
Tiles of the same shape are permitted to become adjacent as a result of a slide. You may not destroy a tile that would separate the castle into two separate structures.
Special cases:
You may choose to prematurely encounter the lowest numbered Ordeal at any time. To do so, simply encounter the Ordeal card as you normally would, then (if you succeed), discard the Ordeal and all Traitor tiles that have been placed next to it.
If all the Dream tiles have been played, immediately resolve all unencountered Ordeals in numbered order.
The Menace: Expert Level
All rules of the base level apply to the expert level, with the following exceptions and additions:
Setup
Shuffle the 4 Assault I Ordeal cards, choose 1 at random, and place it facedown on the table (return the other 3 to the box). Do the same with the Assault II and Assault III cards.
Note that each Assault must be encountered after only 2 Traitor tiles have been placed next to them (or if you complete your castle).
Game Play
From now on, the defensive formations each provide a special power (in addition to being necessary to counteract the effects of the Ordeal cards).
The line of defense (4 adjacent Defender tiles of the same color in a horizontal line) : When you draw a Traitor tile and choose to discard it, you destroy 1 fewer Defender tile than normal for each line of defense in your castle.
If you have 4 lines of defense in your castle, you may discard Traitor tiles without destroying anything.
Reminder: Black-bordered Traitor tiles may not be discarded.
The tower (4 adjacent Defender tiles of the same color in a vertical line) : When you complete a tower (place the 4th tile), choose one facedown Ordeal card and reveal it. If all Ordeal cards have been revealed, this special power has no effect.
The bastion (4 Defender tiles in the same color in a 2x2 square) : For each bastion in your castle, you destroy 4 fewer tiles when you fail to construct the defensive formations required by the Harpy, Behemoth, or Horde Assaults: The four avatars of the Menace). The Bastion does not prevent the destroying of tiles executed by the Earthworm Ordeal cards.
The Four Avatars Of The Menace
Each of the expert level Ordeal cards must be encountered after 2 Traitor tiles have been placed next to them (or if you complete your castle).
Regardless of which avatar is encountered during an Ordeal, your foundation must be complete (6 tiles) in order to continue. Otherwise, you lose.

The Harpy, the Behemoth, and the Horde
Contrary to the rules of the beginner and base levels, failure to satisfy the building requirements of Ordeal cards in the expert level does not result in immediate defeat; instead, you must destroy a number of tiles in your castle.
The number of tiles you must destroy is indicated on the bottom right of the Ordeal card (and is reduced by 4 for each bastion in your castle).
Note that if your castle contains the defensive formations an Ordeal requires, the penalty is not suffered.
The Earthworm
 The Earthworm |
This avatar behaves differently than the others: it forces you to destroy 1 or more of the lower rows of your castle (Assault I - bottom row; Assault II - bottom 2 rows; Assault III - bottom 3 rows).
After the required rows have been destroyed, the bottommost row of those remaining is considered your new foundation (which must be complete, or you lose).
Again, a Bastion cannot reduce the number of tiles destroyed by the Earthworm.
End of the Game
Here is a reminder of the victory conditions, which are the same as those in the introductory and base levels.
Defeat: If you have an incomplete foundation after encountering an Ordeal card, you lose.
Victory: If your foundation remains complete after encountering the third Ordeal card, you win.
Continue Reading
