Peaceful realms, charming neighbors, and restful cemeteries. An idyllic world, but a world of the past.
Skeletons emerge from the cemeteries. They traverse the forests to invade your realm. They are just scouts; teeming hordes are coming.
You quickly realize that your neighbors will not help you - quite the contrary - and that only your traps could ward off the enemy. You build walls, release the dragon, use magic, and even yield the treasure of the realm.
Your best asset is, without doubt, your hero, ready to throw himself into the heart of battle to slay these stupid piles of bones that defile your lands.
None of these measures will hold them off long, and you know it. Your only hope of survival is the collapse of another realm, which would divert the attention of your aggressors. Then they could settle this new territory!
Once charming, your neighbors have transformed into enemies. Only their loss can assure your survival. To arms!
Setup
In the middle of the table, arrange:
- 1 bag
1containing 180 Skeleton tokens (12 skeletons each of 15 different models). Leave the Skeletons with an orange border in the box. - 1 Play Aid board
2, with 1 Tracking token3on it, white side up.
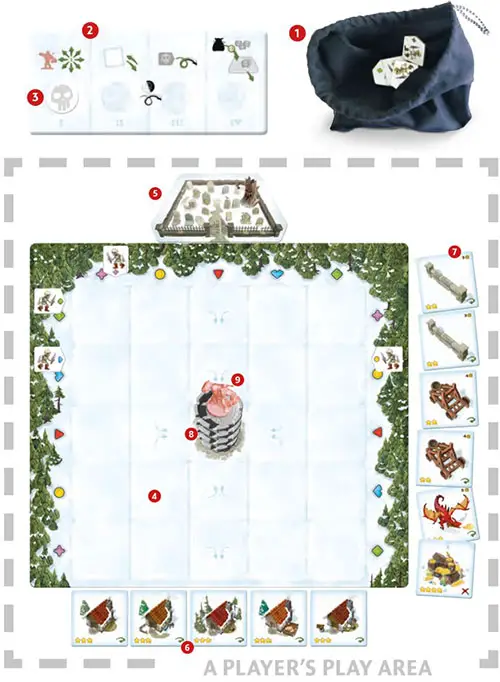
Each player gets the following:
- 1 gameboard
4. - 1 Cemetery tile
5. - 5 House tiles, which together constitute the Village
6. - 6 Trap tiles
7walls, 2 catapults, 1 dragon, and 1 treasure), which constitute your supply of intact traps. - 4 tower floors, which stacked form your tower
8. - 1 Hero figurine, placed atop the tower
9. - 4 Skeleton tokens (one of each symbol
 except
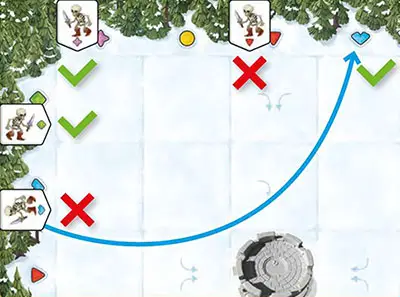
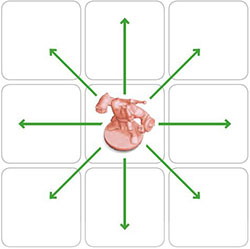
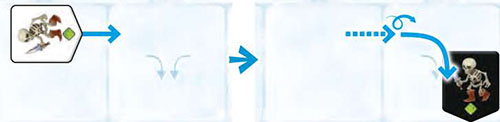
  ) drawn from the bag (return to the bag). Place these Skeleton tokens in the forest beside their symbol, white side up, oriented according to the drawing, with the point of the token aimed toward the middle of the board.
Example: All the points of the Skeleton tokens are correctly pointed into the spaces of the board, and the green and purple skeletons are correctly placed on their feet, from the player's perspective; however, the blue skeleton is lying down, which is wrong (it must be placed vertically in the forest along the top of the board so it is standing up).
The red skeleton cannot be drawn during the setup.
Skeletons enter play
The orientation of the drawing is only used to place the Skeleton tokens in the forest before they enter play. After that, they will become reoriented according to the effects of the traps they encounter, and you can ignore the orientation of the drawing.
Don't Use the wrong side!
The gameboards and play aid are printed double-sided. Be sure to use the sides shown in the examples here. You will use the other side later for the cooperative version of the game.
Leave the unused components in the box during a basic game.
Game Play

After the setup, each game lasts several rounds, each comprising 4 phases (the play aid reminds you of these phases):
- Move your hero.
- Place or retrieve a trap.
- Move the skeletons.
- New skeletons arrive.
You will play these four phases in sequence, but during each phase, everyone plays simultaneously. That is to say that everyone moves their hero, then everyone places/retrieves a trap, then everyone moves the skeletons on their board, then everyone draws new skeletons.
If at least one player is eliminated after all of the skeletons move, the game ends immediately.
1. Move your Hero
Your hero must move one space, which is to say orthogonally or diagonally adjacent to where the hero is now. Your hero can never remain in place.
Your hero cannot leave the 25 spaces of your board.
Your hero can move onto the tower in the middle of your board.
Your hero destroys all skeletons in the space into which he moves. Return all skeletons eliminated this way to the bag.
Your hero can move onto a trap; he never triggers its effect.
2. Place or Retrieve a Trap
You can place traps on your board to move or reorient the skeletons.
Except for the treasure, traps have two different sides: one representing the intact trap (which has not been triggered by any skeletons), and the other representing the damaged trap (which has been triggered by one or more skeletons during a previous round).
During this phase, you must choose one of the following:
- Place a trap.
- Retrieve a trap.
- Do nothing.
Note: The number in the upper-right corner of the Trap tiles is not used in the basic game.

A. Place a trap
Select one of the traps from your supply, and place it, intact side up, in whichever orientation you wish on a space of your board that contains neither a trap, nor your tower, nor any skeletons (unless the trap states otherwise). The forest and village can never contain any traps.
You can, however, place a trap on your hero's space, underneath him, unless he is on your tower.
Once placed, this trap will remain on its space, where it could be triggered, until either it is destroyed or you retrieve it.
B. Retrieve a trap
Retrieve a trap, intact or damaged, from your board, and return it to your supply.
You can retrieve a trap that is under your hero.
Once you retrieve a trap, it becomes intact again upon returning to your supply. Thus, you can reuse it later.
C. Do nothing
Are you sure? It's your choice...
3. Move the Skeletons
During this phase, advance all of the skeletons on your board. This phase requires attention and precision. You choose the order in which you move your skeletons.
Each skeleton advances one space in the direction its point is pointing.
As soon as you move each skeleton, flip it to its other side (white or black). Thus, it is easy to identify which skeletons you have not yet moved: If they were white side up at the beginning of this phase, they will all end the phase black side up; and vice versa.
Thus, at the end of the phase, all skeletons on everyone's boards must have the same side showing. This makes it easy to notice if someone forgot to move a skeleton.
The Tracking token on the play aid is very helpful for knowing which side of the skeletons should be visible at the end of the phase. Make sure you flip it at the beginning of this phase!
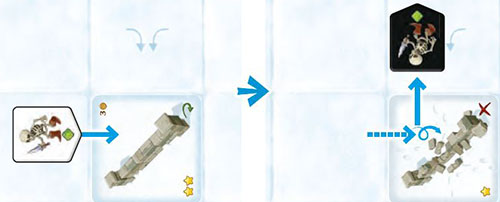
The reorientation arrows printed on your board indicate the allure that the tower or village presents to the skeletons. This attraction is only valid for skeletons that are moving with the arrow; it never applies for those coming from other directions.
Example: This skeleton advances into a space with reorientation arrows, and must turn with the arrow its move matches.
Example: This skeleton, diverted by a trap, advances into a space with reorientation arrows, but they have no effect, because its move does not follow the direction of any of the arrows.
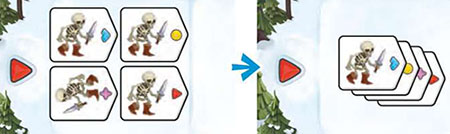
Tip: For better visibility, if several skeletons are on the same space, and are going in the same direction, even if they have different symbols, we recommend stacking them.
Example: These 4 skeletons are going in the same direction, so they can be stacked up.
What Happens if...
....a skeleton leaves my board through a forest?
When a skeleton moves into a forest, it goes to a neighboring player's cemetery:
If the skeleton leaves through the left forest, it immediately goes into your left neighbor's cemetery.
If the skeleton leaves through the right forest, it immediately goes into your right neighbor's cemetery.
If the skeleton leaves through the top forest, it immediately goes into any opponent's cemetery (your choice). If several skeletons leave through the top at the same time, you are welcome to send them to different cemeteries, as you wish.
To be clear, in a 2-player game, all skeletons that leave your board (left, right, or top) go to your one opponent's cemetery.
....a skeleton leaves my board through the bottom?
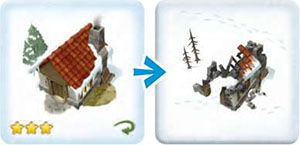
When a skeleton leaves your board through the bottom, it has reached the village. It burns one of the houses - it doesn't matter which one - which you flip to its Destroyed side. Return the skeleton to the bag.
Each skeleton that enters the village destroys one house.
If your last house is destroyed, the game will end at the end of the skeleton movement phase.
...a skeleton enters my tower?
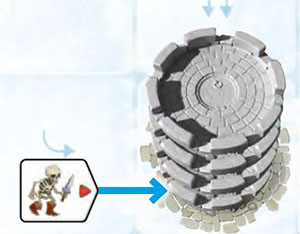
When a skeleton ends its move on the space with your tower, one of its floors is destroyed. Remove the tower floor from the game, and return the skeleton to the bag.
Each skeleton that enters your tower destroys one floor.
If the last floor of your tower is destroyed, the game will end at the end of the skeleton movement phase.
Important: Even if your hero is on your tower, he has no effect on the skeletons that enter it! Each one will still destroy a floor of the tower.
...a skeleton moves onto my hero (outside the tower)?
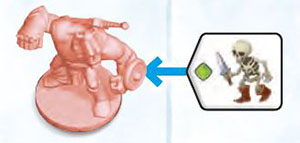
The skeleton is immediately destroyed by your hero, and it neither triggers nor damages whatever trap might be in his space.
The skeleton also does not steal the treasure your hero may have been protecting in that space. Return the skeleton to the bag.
...a skeleton steps on a trap?
The trap applies its effect to all skeletons that trigger it during a single skeleton movement phase, even if they come from different spaces.
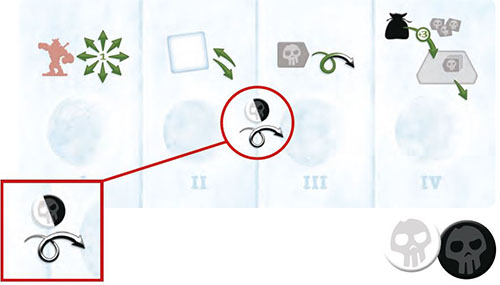
After all of the skeletons have been moved, the icon in the corner of the trap reminds you what to do:
 The trap is now damaged. Flip it to its Damaged side.
 The trap is now destroyed. Remove it from the game (return it to the box).
List of Traps and their Effects
-
Wall
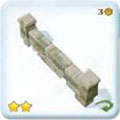
When skeletons step onto a space with a wall, they are reoriented 90° like they just reflected off the diagonal wall, and they advance one space (they do not remain on the wall).
When you flip the wall to its Damaged side, preserve its orientation.
-
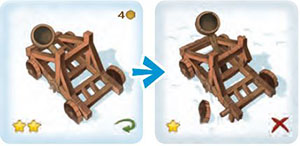
Catapult

All skeletons that step onto a space with a catapult during the skeleton movement phase are immediately catapulted into the cemetery of a single opponent of your choice.
-
Treasure
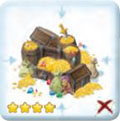
When a treasure is placed, all skeletons orthogonally adjacent to it immediately turn toward it.
Similarly, when moving the skeletons, if they end their movement on a space orthogonally adjacent to treasure, they turn toward the treasure. The allure of treasure outweighs any reorientation arrows depicted on the board, as well as any other trap effect.
Once all the skeletons have been moved, if at least one of them is on the space with the treasure (and the hero is not there to defend it), the treasure is stolen and removed from the game.
The thieving skeletons remain on the board without being reoriented, even if a reorientation arrow became visible when the treasure was removed. You can never get the treasure back; it can only be stolen once.
-
Dragon
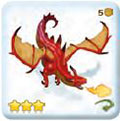
When skeletons step onto a space with the dragon, move them onto any orthogonally adjacent spaces of your choice. The skeletons are fleeing from the dragon, so point them away from it.
If the forest is adjacent to the dragon, you can even send the skeletons running through the forest to opponents' cemeteries.
Special Effect!
During the trap placing/retrieval phase, you can make the dragon "land" on a space with skeletons in it. In the basic version of Bad Bones, this is the only trap that can be placed this way.
If you do this, immediately flip the dragon to its Damaged side, and immediately repel and flip the skeletons from that space.
Attention!
When the dragon uses this special effect during the trap placing/retrieval phase, if just after that, other skeletons arrive in its space during the skeleton movement phase, these skeletons, too, flee from the dragon; however, because the dragon was used twice consecutively, the dragon is dead and removed from the game.
4. New Skeletons Arrive
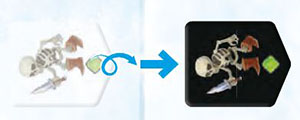
Draw 3 random skeletons from the bag, and place them on your cemetery.
Then, place all of the skeletons in your cemetery (not only the three you just drew, but also any your opponents sent there) in your forests, just as you did during setup:
- So the drawing is standing up.
- On the matching symbol.
- Pointed into the middle of your board.
- White side or black side up, to match the Tracking token on the Play Aid board, so that all skeletons on the table are showing the same color.
These skeletons that have just arrived in the forest are not yet on spaces of your board. They will enter during the skeleton movement phase of the next round.
End of the Game
If one or more players are eliminated (their tower or their village has been completely destroyed), the game ends at the end of the current round, and only the players who have not been eliminated count their points as follows:
1 point per star visible on the traps in your supply, all treated as being intact.
1 point per star visible on the traps remaining on your board.
4 points per floor of your tower still in the game.
3 points per intact house of your village.
Destroyed elements (tower floors, traps removed from the game, burnt houses) are not worth any points.
The player with the most points wins the game.
If there is a tie for first place, the tied player with the tallest tower wins. If there is still a tie, the tied players share the victory.
Continue Reading
