Domination Mode
In Domination Mode, players try to control the three spawnpoints. Of course, they still earn points for damaging each other.
Setup
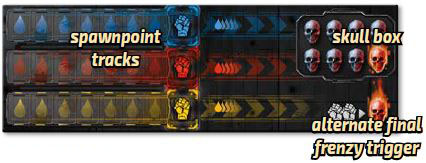
Once you have chosen the game board, cover the killshot track with this domination board, and place 8 skulls in the skull box.
Game Play
Each player's first turn follows the normal rules. Beginning with your second turn and continuing for the rest of the game, you have 2 ways to tag a spawnpoint:
- Damage the spawnpoint.
- End your turn as the only player on the spawnpoint.
Each spawnpoint has its own track on the domination board. When you tag a spawnpoint, put one of your damage tokens on the leftmost empty space of its track.
Damaging a Spawnpoint
You can target spawnpoints as though they were players. If the weapon's effect deals damage, tag the spawnpoint. The spawnpoint gets only 1 token, even if the weapon does more damage. You can damage a spawnpoint only once per turn.
The Tractor Beam and the Vortex Cannon can tag a spawnpoint, but only if you can see it. Weapons that damage everyone on a square or in a room also tag spawnpoints.
The T.H.O.R. can target a spawnpoint as the first, second, or third target, but it can't chain from the spawnpoint to another target. (The spawnpoint grounds the T.H.O.R.'s lightning bolt).
Ending on a spawnpoint
If you end your turn as the only player on a spawnpoint, you tag it, even if you have already tagged it once this turn by damaging it.
Spawnpoint strikes back
If you end your turn on a spawnpoint, it deals 1 damage to you, even if you are not the only player there. Give yourself this damage in your color. When your board is scored, this damage will count as though it were damage from another player.
Those points will not go to any player - they will stay in the bank. If a spawnpoint gives you a killshot at the end of your turn, your board is scored, but you cannot count it toward a double kill.
Killshots and Overkill
Score player boards as usual, except that killshots and overkill do not go into the skull box. Killshots are not tracked. If you deal overkill, however, put that token on the spawnpoint track of your choice. It will count in final scoring.
Final Frenzy

Final frenzy triggers when the last skull is taken from the skull box or when two spawnpoint tracks each have at least 8 damage tokens. (The 8th space is marked with a fist, but a track with 8 can still get more).
Final Scoring
Spawnpoint tracks are scored only at the end of the game. Score each separately. The player with the most tokens gets 8 points, second most gets 6 points, then 4, 2, and 1.
If there is a tie, all tied players get the reward. For example, if two players are tied for first, they will both get 8, but the next player is third and will get 4.

Turret Mode
Players try to control turrets, which can shoot other players.
Setup
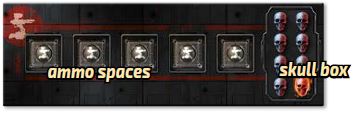
Cover the killshot track with the turret board and place 8 skulls in the skull box.
Ammo
Do not deal ammo tiles to the game board. Instead, a choice of 5 ammo tiles will be offered on the turret board. Deal 1 ammo tile face up to each ammo space. At the end of each player's turn, replace any tiles taken with new ones from the stack.
Turret Squares
Squares that offer ammo now have turrets as well.
Grab Ammo
Grabbing ammo works as usual, except you choose a tile from the turret board. You still are not allowed to grab ammo twice from the same square in one turn.
Commandeering a Turret
When you grab ammo on a turret square, you can choose to not take one of the ammo cubes or powerup cards and commandeer the turret instead. (This applies even to a cube or card that you would not be able to take because you already have 3).
When you commandeer a turret, place your damage token on the turret. If someone else's token is already there, put it on your board as a mark (unless you already have 3 in that color).
Entering a Turret Square
When you enter a square with someone else's turret, that player gives you 1 damage. This applies even when someone else moves you. If an action includes multiple moves, each one can trigger a turret.
Turret damage does not cause marks to turn into damage. It cannot be augmented by a Targeting Scope powerup. You can't use a Tagback Grenade against it.
Leaving a turret square or starting a turn on one has no effect. When you use a Teleporter you trigger only the turret you land on (if that square has a turret).
Weirdness
Yes, you can be killed on your own turn. If your first action kills you, you still take your second action and reload before scoring your board. Hey, it's Adrenaline!
If two or more opponents' boards receive killshots during your turn, you get the 1-point bonus for double kill, regardless of who gets credit for the killshot. But if you get yourself killed, you can't count that toward a double kill. (Nice try, though).
Skulls
Score player boards as usual, except that killshots and overkill are not tracked. Final frenzy triggers when the last skull is taken, as usual.
Final Scoring
Players get points for controlling turrets at the end of the game. The player with the most turrets gets 8 points, the second player gets 6, then 4, 2, and 1. Break ties according to play order in favor of the player whose final turn came earlier.
Adding a Bot
3-player Games
In a game with fewer targets, some weapons become weaker. You can add targets to a 3-player game in Domination Mode, as described on the preceding page. Or you can add a bot.
Note: You can add a bot to a 4-player game, too.
Setup
Choose a figure to represent the bot. You will need its player board and damage tokens. It will not use ammo cubes or an action tile. Give the bot card to the second player.
Spawnpoint
After looking at powerups, but before spawning, the starting player chooses any of the three spawnpoints and places the bot's figure there.
Game Play
The bot does not get a turn. It acts only on players' turns, beginning on the turn of the second player. It is shot and scored as though it were a player.
Along with your usual 2 actions, you must also take a bot action. The 3 actions can be taken in any order.
Bot Action
- Move the bot one square, if you want.
- Then, if the bot has any legal targets, you must choose 1 to be shot.
Legal targets are any figures the bot can see, but not you and not the bot. (In Domination Mode, the bot can also target spawnpoints it can see).
The shot does 1 damage. Give the damage in the bot's color. If the bot has both adrenaline actions unlocked, the shot also gives 1 mark.
Bot Card
The bot card reminds you that you have a bot action. Keep it in your hand until you use your bot action, then pass it on to the next player. It does not count as a weapon or powerup.
Powerups
In general, powerups that work on you cannot be used by the bot, but powerups that work on other players can be used on the bot.
Targeting Scope cannot add 1 damage to the bot action. Teleporter cannot be used to move the bot. Newton can be used to move the bot - even before your bot action.
Tagback Grenade gives a mark to the bot if played in response to damage from the bot action.
Scoring
The bot's damage counts like any player's damage. You can even keep track of the bot's points, if you want, although it might be embarrassing if it beats you. The bot's board is scored like any player's board.
If multiple boards have killshots at the end of your turn, you get the 1-point bonus for double kill, regardless of who gets credit for the killshots,
Other Modes
The bot can be used with both modes. If you can add a bot to Domination Mode, you will have a target-rich environment.
Adding a bot to Turret Mode is probably the most complicated way to play Adrenaline. It will go more smoothly if everyone knows Turret Mode really well.
Continue Reading

