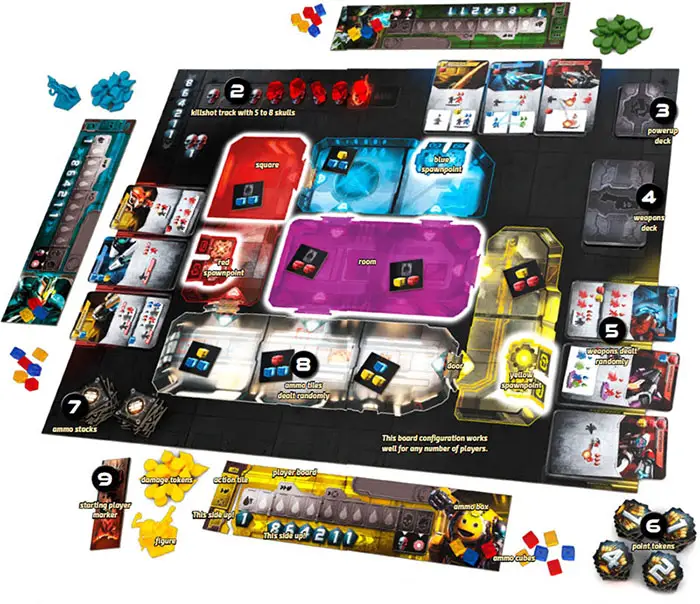
Components

- 1 double-sided board in two parts
- 1 board for game variants
- 5 player boards
- 5 action tiles
- 1 starting player marker
- 86 point tokens
- 36 ammo tiles
- 5 plastic player miniatures
- 100 plastic damage tokens
- 45 plastic ammo cubes
- 8 plastic skulls
- 21 weapon cards
- 24 powerup cards
- 1 bot card
- 1 rulebook
- 1 weapons manual
Setup
1 Choose two sides to make your game board.
2 Place 5 to 8 skulls on the killshot track. We recommend 5 skulls for your first game. A normal game uses 8 skulls.
3 Shuffle the powerup cards and place them on the game board in a face-down stack.
4 Shuffle the weapon cards and place them on the game board in a face-down stack.
5 Deal three weapons face up to each spawnpoint.
6 Place the point tokens on or near the board.
7 Mix the ammo tiles and stack them face down near the game board.
8 Deal one ammo tile to each square of the game board that does not have a spawnpoint.
9 Choose a starting player. Give him or her the starting player marker.
Your first game has 5 skulls and a sudden death ending. It's a quick way to learn the game, and you get to shoot lots of cool weapons. Don't worry about points too much. Just have fun.
The game is balanced for 8 skulls and a final frenzy ending, so once you know how things work, you should try it that way.
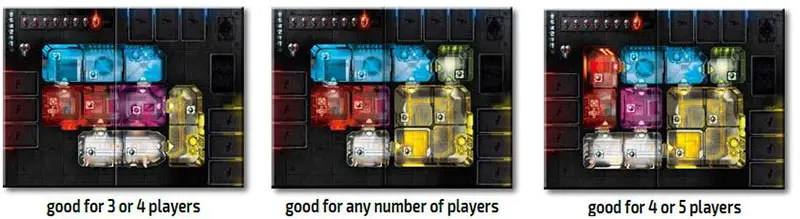
The game board is made of two double- sided pieces, which can make 4 different arenas.
Player Setup
- Get your stuff. Your figure, your board, your action tile, and your damage tokens are all the same color.
- Take 3 ammo cubes of each ammo color.
- Put 1 ammo cube of each color in your ammo box.
- Make an action-hero comment indicating you are ready to play. "Lock and load!" is traditional, but feel free to improvise.
Object of the Game
The object is to get the most points.
Game Play
Players take turns, beginning with the starting player, and continuing around the table clockwise. Figures will come onto the board one at a time and remain on the board for the rest of the game.
Spawn Location
On your very first turn of the game, you start by determining your spawnpoint:
- Draw 2 powerup cards.
- Choose 1 to keep.
- Reveal the other and put your figure on the spawnpoint with that color.
- Discard the revealed card.
Tip: Powerups are explained in the Adrenaline Weapons Manual. Before your first game it is absolutely imperative that you read the description of each powerup thoroughly.
Failure to fully grasp all the strategic ramifications of this crucial choice may greatly diminish your chances of victory.
Each powerup card has 3 potential uses:

As soon as you are on the board, take a normal turn, as described below.
Your Turn
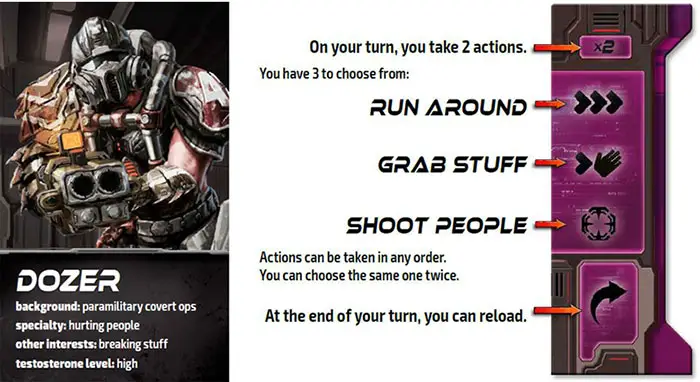
Run Around
Use the Run Around action to move 1, 2, or 3 squares.
Move
A move follows these intuitive rules:
A move is always from one square to an adjacent square (not diagonally).
You can move through a door but not through a wall.
These squares are 1,2, or 3 moves away from Banshee.
Grab Stuff
Every square has stuff. Use this action to grab it. This action includes a free move. You can either:
- Move one square and grab the stuff in that new square.
- Or stay and grab the stuff in your current square.
You can't grab stuff and then move as part of the same action.
Once you grab something, it is gone, but new stuff will replace it at the end of your turn.
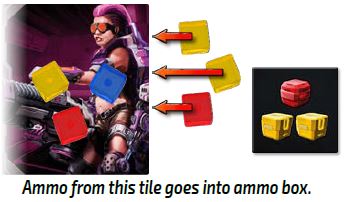
Grab Ammo
Every square that is not a spawnpoint offers ammo. To grab ammo in your square:
- Remove the ammo tile.
- Move the depicted cubes into your ammo box.
- If the tile depicts a powerup card, draw one.
- Discard the tile.
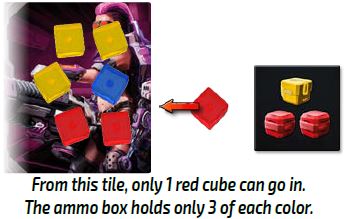
Limits on Ammo and Powerups
Your ammo box never holds more than 3 cubes of each color. Excess ammo depicted on the tile is wasted. Similarly, you can have at most 3 powerups. If a card depicted on the ammo tile would put you over this limit, do not draw it.
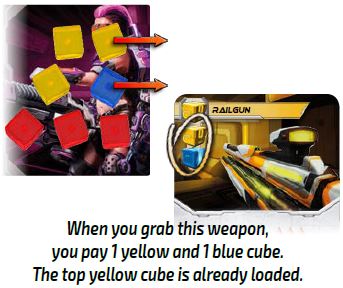
If Grab a Weapon
If you are on a spawnpoint, you can grab a weapon:
- Choose 1 of the spawnpoint's 3 weapons.
- Pay the cost.
- Take it into your hand. It is now loaded.
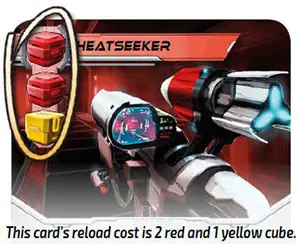
The cost is depicted in the upper left corner of the card. When you grab the weapon, the top cube is already paid for and you must pay the remainder of the cost. If you cannot pay, you cannot grab the weapon.

Paying an Ammo Cost
To pay an ammo cost, remove the depicted cubes from your player board and set them nearby.
Instead of moving a cube, you can pay all or part of an ammo cost by discarding a powerup card that depicts the required cube.
Weapon Limits
If you already have 3 weapons, you must drop one when you grab the new one. To drop a weapon, put it in the empty space left by the weapon you are grabbing.
You can drop a loaded or unloaded weapon. It automatically becomes partially loaded - anyone (including you) can grab it later in the game for the usual cost.
Shoot People
To shoot people:
- Play a weapon card from your hand.
- Specify one or more targets.
- Pay any additional costs.
- Hand out damage and resolve any other relevant effects.
When you play a weapon card place it face up on the table in front of you. It is now unloaded. It will stay there until you reload it, which you may be able to do at the end of your turn.
Your choice of targets is determined by your weapon and the positions of the figures on the board. This is explained in detail in the Adrenaline Weapons Manual. To Shoot People, you need at least one target. Each weapon has a basic effect that you paid for when you put the card in your hand.
Some have optional effects or alternate fire modes, which may have additional costs. You pay an additional cost the same way you paid the cost to put the weapon in your hand - by removing the depicted cube from your ammo box or by discarding a powerup that depicts that cube.
Damage is represented by damage tokens in your color. Give the indicated number of damage tokens to your target. Your target places the tokens on his or her board. It is possible to give damage to multiple targets with one action.
Damage and Adrenaline Actions
Your board is divided into 4 zones. If it has 0, 1, or 2 points of damage, you use the normal actions on your turn.

If your board has 3 or more points of _ damage, your Grab Stuff action improves. When you use it, you can move up to 2 squares before grabbing.

If your board has at least 6 damage, your Shoot People action also improves. As part of that action, you can move 1 square before shooting.
You are not required to use the adrenaline action's extra move. Note that it is still not possible to grab- then-move or shoot-then-move with one action.
As with normal actions, it is legal to use the same adrenaline action twice in one turn.
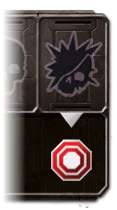
Killshot
The 11th point of damage is the killshot. A board with 11 damage will be scored at the end of the turn. (Which means you might have time to give it a 12th!)
Scoring
At the end of your turn, score all boards that have taken killshots:
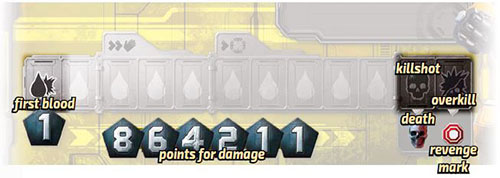
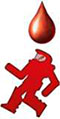
First Blood!
The player who shot that board first gets 1 point.
Damage!
The player who has the most damage on that board gets 8 points. The player with the second most gets 6. And so on, as depicted on the board.
Tie Breaker
If multiple players dealt the same amount of damage, break the tie in favor of the player whose damage landed first.
Killshot!
Killshots will play a role in final scoring. Take the damage token from the 11th space and put it on the killshot track of the main game board. It replaces the leftmost skull.
Death!
Take that skull from the killshot track and put it on the 8 pentagon below the dead board's damage track. The next time that player's board is scored, it will be worth fewer points. Details on the next page.
Overkill?
A 12th point of damage counts as overkill. If the board has a 12th damage token, put it on the killshot track on the same space as the killshot token. This plays a role in final scoring. Damage over 12 is wasted.
Revenge Mark?
Killing is okay, but overkill is just insulting. If you overkill a player, that player will give you a mark representing his or her desire for revenge. Marks and overkill are explained on on the following pages.

Double Kill?
If you deal multiple killshots on your turn, you get 1 extra point. And you are awesome.
Point Tokens
Your points are represented by tokens you take from the bank. You can make change, if necessary. Point tokens are kept near your board face down.
Death and Respawn
If you receive a killshot, tip your figure over. At the end of the active player's turn:
- Hand out points to everyone who shot you, as explained above.
- Remove all damage (and hand the tokens back).
- Pick up your figure. You are dead.
- Draw one powerup card, even if you already have three.
- Discard one of your powerup cards with no effect and place your figure on the spawnpoint indicated by it. You are alive again.
If you have any marks (see next page) those will remain on your player board. You keep all your weapons and ammo. Loaded weapons remain loaded, and unloaded weapons remain unloaded.
Your damage is reset to zero, so you no longer have access to adrenaline actions. But don't worry. You'll get shot again soon.
Marking A Target
Some weapons, powerups, and game mechanics allow you to mark other players. This represents a potential for extra damage - because you gain knowledge about your targets, or you track them in some way, or perhaps just because you really really want to hurt them.
When you mark a target, hand the player one of your damage tokens and say, "I mark you!"
A mark is not damage. The player receiving the mark puts the token in the box above his or her damage track.
The next time you take an action that does damage to the marked player, all of your marks are added to the damage track along with the usual damage.
If you deal marks and damage as part of one action, resolve the damage first. This moves all of your old marks onto the damage track. Now add the new marks. They can be triggered only on a later action.
Marks do not count during scoring. They remain on the board even after the player respawns.
Limits On Marks
You can have at most 3 marks on another player's board. Any marks that would exceed this total are wasted.
Note: This means your board can have up to 3 marks from each other player.
Overkill
The 11th point of damage is the killshot. The 12th is overkill. This is a game about shooting people, so overkill is rewarded.
The 12th point of damage counts when determining who did the most damage, and it will go up to the killshot track (on the same space as the killshot) which may be important at the end of the game.
Wasted Damage
Any damage beyond the 12th point is wasted. If you deal damage that would take your opponent beyond overkill, give him or her only enough to reach overkill. If your marks turn into damage that would exceed overkill, your opponent hands you back your excess marks.
Revenge Mark
If you deal overkill, your victim gives you a mark. This is just like a mark from a weapon or powerup.
Diminishing Values
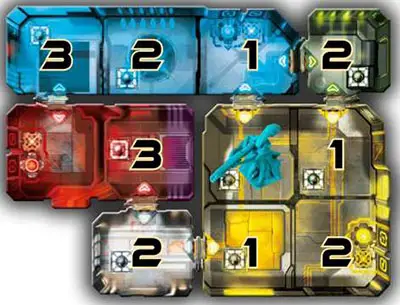
The first time a board is scored, the reward for dealing the most damage is 8, 6, 4, and 2 points. The board receives a skull on the 8. The skull indicates that the board is now worth fewer points.
The second time a board is scored, the reward for most damage is 6, 4, 2, and 1. The board receives a skull on the 6.
The third time, it is worth 4, 2, 1, and 1. And so on.
- Only players who did damage score points.
- Each player who did damage scores at least 1 point.
- Each skull reduces the reward for giving that board the most damage.
End Of Your Turn
-
Reload as many weapons as you want.
To reload you must pay the full reload cost - all the cubes depicted in the upper left corner of the card. You may pay this cost with cubes and/or powerup cards.
-
Score all player boards that received a killshot.
Scoring has already been explained.
-
Replace any stuff you took.
Replace ammo tiles with new tiles from the ammo stacks. If you empty the stacks, shuffle the discard pile (including any tiles you grabbed this turn) and make new ammo stacks.
Replace weapons by drawing from the weapons deck. If the deck is empty, no new weapons will appear for the rest of the game.
Sudden Death
Your first game ends when the last skull is taken. Skip over the Final Frenzy rules and go down to Final Scoring.
Final Frenzy
Sudden death is very ... sudden. A standard game uses a few more rules at the end to balance out the scoring opportunities. This is called final frenzy.
Final frenzy is triggered when the last skull is removed from the killshot track. Everyone gets one more turn, including the player who made the killshot.
Note: If you trigger final frenzy with multiple killshots, put all your killshot and overkill tokens on the killshot track. Don't worry about who gets the final skull token.
Final Frenzy Setup
All players with no damage (including those who were just scored) flip their boards over. They keep marks and ammo, but skulls are set aside. Their boards offer no point for first blood. The reward for damage is 2, 1, 1, 1.
All players flip over their action tiles. On your last turn you will have ...
Frenetic Actions!
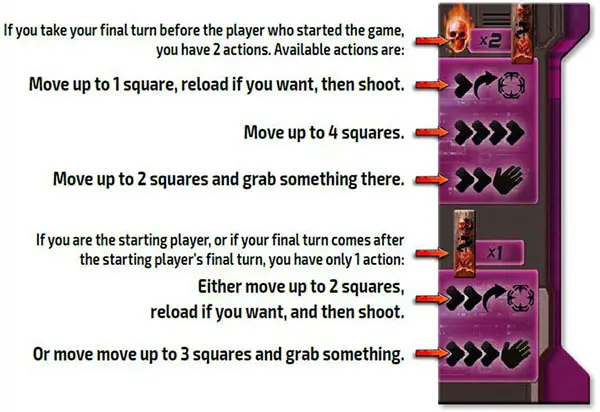
Note: You may be wondering what benefit this second option gives you, but it can be useful in the Turret Mode.
Easy Targets
Boards that are killed in final frenzy are flipped over to the 2-1-1-1 side. Killshot and overkill tokens go to the killshot track as usual.
End of the Game
After the final turn, score all boards that still have damage tokens. Score them as you usually would, except, of course, they don't have killshots. If you are playing with the final frenzy rules, don't forget that flipped boards offer no point for first blood.
Then score the killshot track. The player with the most tokens gets 8 points. The player with second most gets 6, and so on. Break ties in the usual way - the player who got the earlier killshot wins the tie.
Everyone reveals their points and whoever has the most points wins.
Tiebreakers
If players are tied, break the tie in favor of the player who got the higher score on the killshot track. If players who did not get a killshot are tied, they should be mocked for not getting a killshot. Also, they remain tied.
Continue Reading

