The game is played as two or three simultaneous competitions, each with its own scoring system. In each competition, you are trying to lose points. You play five rounds, or until one player reaches a score of zero in one of the competitions.
But it's not a race to see who can get to zero fastest. It's a game to see who can most effectively balance the different goals.
Your final score is given by your highest-scoring competition. The player with the lowest final score wins.
Setup
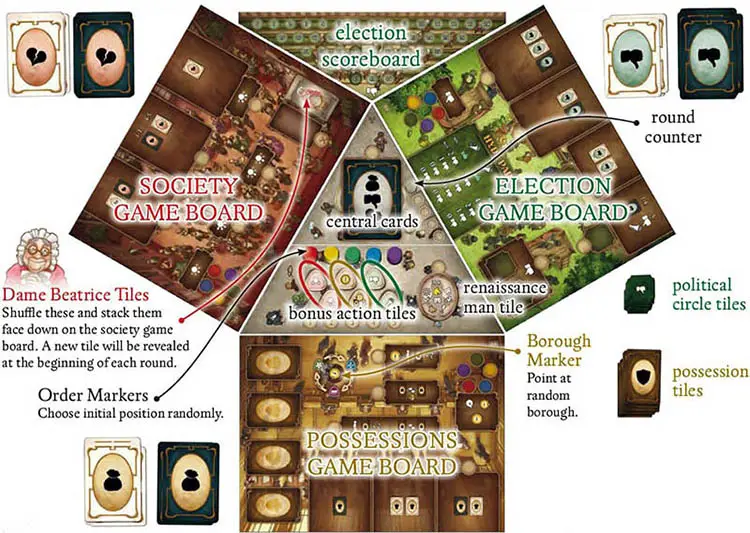
Game Boards
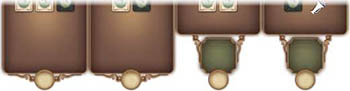
The setup for all three competitions is illustrated below, although the standard game is two competitions in any combination. Each competition has its own board and components.
Choose two competitions and leave the third one's components in the box. You can also play all three simultaneously if everyone knows the game well. For your first game, we recommend the election and society competitions.
Set up the game boards as shown below. Each board is two-sided. The side you use depends on the number of players.
Setting Up the Central Board
Use the side with this icon for a standard, 2-competition game. The side shown below is used for 3 competitions.
Place the round counter, the renaissance man tile, and the bonus action tiles on the board as shown below. A standard game uses 4 bonus action tiles, two from each competition. You will use all 6 only if you are playing with all three competitions.
Central Cards
From this collection of cards, find the five central cards that you will use. There is a different set for each combination of competitions.
Shuffle the 2 white-bordered central cards and place them face down on the central board. Shuffle the 3 black-bordered central cards and place them face down on top of the white-bordered cards.
This is the only deck that sits on a board. At the beginning of each round, the top card will be revealed. You may turn up the first card now.
Cards
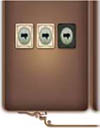
Each competition has two decks of cards, and each deck is divided into two sets. Shuffle the set with two icons on the back and place them face down near the corresponding board.
Shuffle the set with one icon and place them on top. New cards are dealt at the beginning of each round. A deck's single-icon cards will enter play before its double-icon cards.
Tiles
Tiles in the election and possessions competitions are prepared the same way. The tiles in a stack are divided into two sets. Mix up the double-icon set and stack them face down near the appropriate board. Mix up the single-icon set and stack them on top.
New tiles are dealt at the beginning of each round. All of a stack's single-icon tiles will enter play before the double-icon tiles.
Player Setup
Player setup depends on the number of players. Use the table at the bottom of this page as a quick-reference guide.
Player Boards And Errand Boys
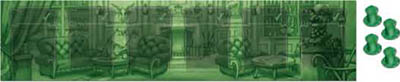
Each player chooses a color and takes a player board and errand boys (top hat figures) in that color. The number of errand boys is determined by the number of players, as shown in the table below. Take one extra errand boy for a game with all three competitions. Unused errand boys should be returned to the box.
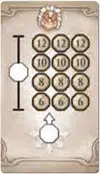
Player Setup In The Possessions Competition

Take the number of pounds indicated by the table below.
This money is used only in the possessions competition. If you are not playing this competition, you will not use the coins.
Randomly give each player one of the sets of possession tiles labelled A, B, C, D, or E.
In a five-player game, each player randomly discards one of the two tiles that has a base value of 5 pounds. With fewer than five players, start with all 6 tiles.
Player Setup in the Election Competition
Each player places his or her vote counter on the election scoreboard. The initial number of votes is specified in the table below.
Each player also starts the game with one of these political circle tiles (with no icon on the back). Each player should choose a starting tile randomly and put it face up next to his or her player board.
Player Setup in the Society Competition
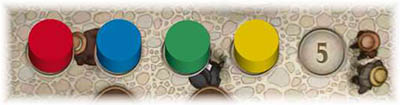
Each player has his or her own society scoreboard and influence markers. Place the four markers as shown in the table on the right. The two sides of a marker have no game effect. You can decide whether these people are cheerful or cross. However, the gender of the markers is important - this is Victorian England.
Determine Play Order
Randomly determine play order. Place the players' order markers on the numbered spaces in the middle of the central board.
Take Handicaps
Going first is an advantage. Those who start earlier must take a handicap in one or more competitions before the first round:
- Possessions: Take an extra 1-pound coin.
- Election: Gain 1 vote.
- Society: Move the rightmost influence marker straight up one space.
The last player has no handicap. The second-to-last player must take 1 handicap. Someone who plays ahead of 2 fellow players must take 2 handicaps, and so on. Handicaps are taken in the order shown above (take coin, gain vote, move up).
Once everyone has taken their handicaps, it is time to begin the first round.
Game Play
The Prodigals Club is played in 5 rounds, although it can end earlier if someone gets to zero in one of the competitions.
The round has several phases. Two of these phases are specific to a particular competition:
- Setup
- Errands
- Actions
- Hyde Park (in the election competition only)
- Dame Beatrice (in the society competition only)
- End of Round
1. Setup
Each board has its own setup that happens at the start of every round. The illustration on page 2 shows the boards already set up for the first round, except these steps:
Dealing Cards
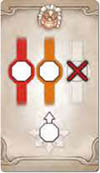
Each game board has three or four spaces requiring cards. The space depicts how many cards are needed and what type.
For example, this space gets 2 white-bordered cards and 1 black-bordered card. Cards are dealt face up. If you put the black-bordered card on top, the cards can be neatly arranged so players can see all the icons easily.
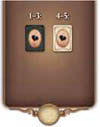
This space gets a black-bordered card in rounds 1, 2, and 3 and a white-bordered card in rounds 4 and 5.
In round 5, this space does not get a card. Instead, it offers the two rewards depicted.
Turn up the top card on the central board. There will be a new central card each round.
Dealing Tiles
Each competition has its own set of tiles.
In the possessions competition, deal 4 possession tiles to these 4 spaces along the side of the board.

In the election competition, deal 4 political circle tiles to the four spaces that look like this.
In the society competition, reveal the top Dame Beatrice tile and put her on this space.
2. Errands
Each player has a certain number of top hat figures representing errand boys. The number of errand boys depends on the number of players and on whether you are playing 2 or 3 competitions.

In order, as shown by the markers on the central board, players take < J turns placing an errand boy on an unoccupied space on one of the game boards. When you place your errand boy, you immediately perform the corresponding errand.
Sometimes an errand boy gets you cards that you will be able to use in the actions phase. Other times the errand boy has an immediate effect on your score in one of the three competitions. The effects of individual spaces are explained in more detail on the following pages.
Once a space has been taken, no other errand boy may be placed there in that round. That is why it is an advantage to go first.
You must place an errand boy on your turn. In general, it is legal to choose an errand that you cannot use, but on the possessions game board, if you choose an errand that offers you a chance to sell or exchange, you must sell or exchange at least one possession.
Taking Cards with 2 or 3 Players
Each board offers sets of cards you can take. In a 4- or 5-player game, there is one errand boy space for each set. In a 2- or 3-player game, there is one less space. You play on any unoccupied card-taking space to take any one of the sets. You are allowed to take more than one set in the same round. Once all card-taking spaces are full, no one may take the last set.
When all players have placed all their errand boys and performed their errands, it is time for the actions phase of the round.
3. Actions
In order, as shown on the central board, each player has one turn to play actions. Actions are represented by cards. You may play as many as you like on your turn, in any order. Your ability to save cards for later rounds is limited. At the end of the round you must discard down to 4 cards.
White-bordered Cards
White-bordered cards are one-time events. You play the card and do what it says. All the white-bordered cards you play will be discarded by the end of the round. (You can keep them in front of you as you play them. Some effects refer to cards previously played this round).
Black-bordered Cards
A black-bordered card can be used multiple times during the game. To play the card, place it on your player board. Your board has room for only six black-bordered cards.
If all six spaces are occupied, you must discard one of your previously played cards to make room for the new one. You may discard a card that you have already used this round.
Your black-bordered card does nothing when you play it, but you can use its abilities as soon as you wish. There are two types of abilities that you might find on your card:
An ability depicted in the upper right corner is an action that you may activate once per round during your actions phase.
An ability depicted in the bottom half of your card is a permanent bonus that triggers whenever certain conditions are met.
To activate the ability in the upper right corner, slide the card down and perform the depicted action. The card has now been used and may not be activated again this round.
You may activate a black-bordered card as soon as you play it, but you do not have to. If the card also has a trigger depicted in its bottom half, that bonus will apply whether the card has been activated or not. The bonus may trigger multiple times per round.
Bonus Action Tiles
You may have acquired a bonus action tile from the central board. A bonus action may be used during the actions phase. Perform the indicated action and return the tile to the central board. An unused tile must be returned at the end of the round.
After The Actions Phase
Depending on which competitions are in the game, there will be one or two more phases before the round ends. They are explained below.
Errands on the Central Board
Taking the Central Card
Each round has a different central card. This card is special because it ties the competitions together.
If you are playing with all 3 competitions, this works like any other errand space. When you place your errand boy on the space, you take the card. Do not reveal a new one until next round.
With only 2 competitions, taking the central card temporarily ties up an extra errand boy. To take the card, you send two errand boys instead of one.
When everyone is playing their last errand boys, you will be skipped. However, you do not miss this last turn: Once everyone has played all their errand boys, you take one of those you sent to the central card and play it somewhere else.
Reserving a Spot in the Order

Send an errand boy here to reserve that spot in the play order next round. Your play order will not actually change until the end of the round, as explained on page 10. At the beginning of the game, it is an advantage to go first. In later rounds, you might want to go last if you are deciding whether to end the game. Going last may also be an advantage in Hyde Park.
When you play here, you also choose and take one of the available bonus action tiles. Most of these have an action that you may use during your actions phase.
Each competition contributes 2 bonus action tiles. The actions are explained on the back page. All bonus action tiles are returned to the board at the end of the round.
You may reserve a spot even if there is only one spot left. It is legal to play here in round 5 to take a bonus action tile. You may not play on numbers that don't apply to your game. (For example, in a 3-player game, only the first 3 numbers apply). You may not play here twice in one round.
Renaissance Man Tile
Play here to take the renaissance man tile. This tile gives you two symbols for this round. These symbols can work in combination with cards you use during your actions phase.
The two symbols may be the same or different.
You do not specify a symbol until you use it. Once chosen, the symbol cannot be changed, but you can use it every time the symbol applies for the rest of the round.
You return the renaissance man tile to the central board at the end of the round whether you have used it or not.
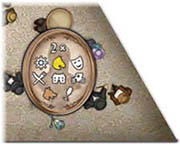
Common Symbols

These symbols are common to all three competitions. Many cards have an action that depends on how many symbols you have of a certain type.
You want to maximize the benefits of these cards. You can get 2 symbols by taking the renaissance man tile. Each competition also provides symbols in its own way. These are explained on the following pages. The symbols you earn in one competition apply to the others, too.
Possessions Competition
A true prodigal casts away his material things. That would be easier to accomplish if you did not have so many of them. But through shrewd exchanges, even a princely gentleman such as yourself can someday trade places with the pauper.
Goal
The object of this competition is to get rid of your money and possessions. Your score in this competition is the sum of your money and the value of your possessions, but there will also be a penalty of 3 pounds for each possession you still have at the end of the game.
Money
You start the game with the amount of money given by the table on page 3. As you sell your possessions, you will accumulate more money. Fortunately, there are many actions that allow you to spend money. Whenever you spend money, you get nothing in return except the satisfaction of lowering your score in this competition.
Possession Tiles

At the beginning of the game, you should have received one of the sets of possession tiles labelled A, B, C, D, or E. Each possession tile gives you one symbol, depicted in its upper left corner.
The coin in the middle depicts its base value. In the upper right corner there is a shield indicating the borough that your possession is from.
The Borough Indicator

At the beginning of the game, this indicator should be placed so that it points to a random borough. At the end of each round, it rotates one space clockwise.
When you sell a possession from the indicated borough, you receive 1 pound less. The borough indicator has no effect when you are exchanging possessions.
Exchange
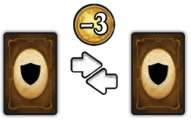
This depicts an exchange. Swap one of your possessions with one of the four on the board. Usually, you want to trade for a possession of lesser value. If the action specifies a limit, you must then take coins to make up the difference if you exceed the limit.
Example: The action above specifies a limit of-3. You trade a possession of value 6 for one of value 1. This is a loss of-5, which exceeds the limit. You must take 2 pounds from the bank to make up the difference.
The borough indicator has no effect on exchanges.
There will always be four possessions on the board. If you exchange later in the round, some of these may be possessions traded in by other players. At the end of the round, all possession tiles are cleared from the board.
Sell

Possessions can give you useful symbols, but sooner or later, you will want to get rid of them.
When you perform a sell action, put one of your possessions in the discard pile and take coins equal to the value printed on the tile, less any applicable discounts. Don't forget that the borough indicator gives a discount of -1 when you sell possessions from that borough.

Some actions and abilities let you sell at a discount. Subtract the indicated amount from the sale price. All discounts are cumulative.
If discounts reduce the value of a possession to zero or less, then its value is zero. You take no pounds from the bank when you sell it.
Some actions and errands let you sell two possessions 2>^2 at once. If a discount is specified, the discount applies to each sale. The second sale is optional. If you prefer, you may use this to sell only one possession.
Spend Money

This action indicates that you spend the amount of money depicted. Simply hand those coins to the bank. If the amount depicted is more than you have, spend all that you have. But you cannot go into debt unless you are rid of all your possessions.
A Little More Time
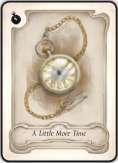
These cards do nothing by themselves. However, certain actions allow you to spend more money if you spend more time on them. You can add one or more of these cards to that action to get a greater effect.
Unlike other symbols, the  symbols are gone as soon as you use them. This card applies only to the action on which it was spent.
Errands in the Possessions Competition
The exchange possession and sell two possessions errands have already been explained above. If you take an errand that offers you the chance to exchange or sell, you must exchange or sell at least one possession. In particular, if you get rid of all your possessions, you can no longer choose these errands.
The other errand spaces have these effects:
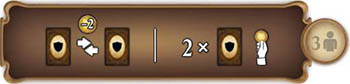
This space allows you to either exchange with a -2 limit, or sell twice (with no special discount). You choose one of these options and ignore the other. This errand is not available in a 2-player game.
This allows you to spend 1 pound, plus 1 pound for every A Little More Time card that you play. When you send an errand boy here, the figure goes on the space of your color. You may not play here again this round, and your play does not prevent others from using this errand.

Play here to take a set of cards. In a two- or three-player game, any space allows you to take any remaining set.
Election Competition
The voters in your district are honorable men. When someone buys their vote, their vote stays bought ... usually. Your father has already spent a hefty sum on this election. To lose, you will have to be extraordinarily impolitic.
Scoring
The election scoreboard tracks how many votes you currently have. The initial number of votes is depicted in the setup table above. The object of this competition is to lose votes.
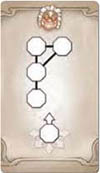
Political Circle Tiles
Symbols can be earned in the election competition by ingratiating yourself into certain political circles. This is represented by a grid of political circle tiles, which can have any shape. Your grid has one tile when you start the game. A single tile gives you no symbols by itself. You earn the symbol when you complete the circle.
You get more tiles by choosing certain errands. A new tile should be placed adjacent to one or more of those you already have. Adjacent edges must match:
- Two symbols that are the same match each other.
- A ? matches any symbol, but it does not match another question mark.
- An edge with no symbol matches only another edge with no symbol.

If you take a tile that cannot legally fit into your grid, you must discard it. You may also discard a new tile by choice. However, you may not discard a tile that you have already added to your grid.
When you make a match, either with the same symbol or with a question mark, you have joined that political circle and you now have 1 symbol of that type. (Matching a blank edge to a blank edge is legal, but it gives you no symbols).

If you create a 2 x 2 square, you have joined the inner circle. Your newfound political power gives you an immediate benefit.
Choose 2 of the following:
You may choose the same thing twice, or you may choose 2 different things. Each time four corners meet, you have joined a new inner circle. For example, a 3 x 2 rectangle has two inner circles.
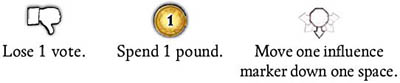
Lose One Vote

This icon indicates that you lose 1 vote. If an action you perform includes this icon, move your vote counter to reflect your new score.
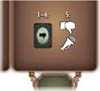
Megaphones

Megaphones are used only in Hyde Park, a special phase that happens once per round. During the Hyde Park phase, you count up all the megaphones you have acquired during the round.
Megaphones can come from errand boys on the game board, from the megaphone bonus action tile, or from certain cards. If you play a white card with megaphones, leave it face up in front of you until the end of the Hyde Park phase so that its megaphones will be counted.
You cannot add more megaphones during the Hyde Park phase. You have only what you earn from your errand boys, your cards, and the bonus action tile. This is an advantage for the last player. He or she can count up the total megaphones played by the others before deciding which cards to play in the actions phase.
Errands In The Election Competition
Play here to lose 1 vote. Put the errand boy figure on the space in your colour. You may not play here again this round, but your play does not prevent others from using this action.
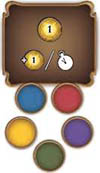
Play here to gain the indicated number of megaphones. The number gained depends on the round.
Play here to lose 1 vote and choose 1 of the two tiles. Place the tile in your grid immediately. Discard the other tile. (You may discard both if you wish).
Play here to take a set of cards. In a two- or three-player game, any space allows you to take any remaining set.
Two of the card sets also include a political circle tile. If you take those cards, you also take the tile. Place it in your grid immediately or discard it.
In round 5, the space that offered a single black card offers one vote loss and one megaphone instead. It always offers a political circle tile.
Liberals And Conservatives


Some cards are actions that offend either the Liberal or Conservative party.

Other actions are just generally offensive.
Treating At The Pub
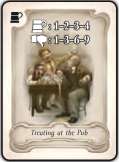
Although recent voting reforms have made it illegal to directly purchase voters' loyalties, there are still many districts which continue the grand old tradition of treating at the pub. You may play up to four of these cards at one time.
Each card means more free beer for your loyal followers. To help them reconsider that loyalty, you have added a little something to the beer.
You lose the number of votes stated on one card, depending on how many cards you play. For example, three Treating at the Pub cards would lose you 6 votes if you played them together.
If you have this card on your player board, its bonus triggers for each Treating at the Pub card.
For example, three Treating at the Pub cards would lose you 12 votes (6 for the standard effect and 2 for each card played).
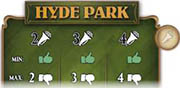
4. Hyde Park Phase
When you are playing the election competition, the round ends with a rousing speech in Hyde Park. The object of your speech, of course, is to lose plenty of votes. But your fellow prodigals are also trying to lose votes, so this becomes a competition to see who can be loudest.

Certain errands and actions have earned you megaphones. Count up all the megaphones you have earned this round.
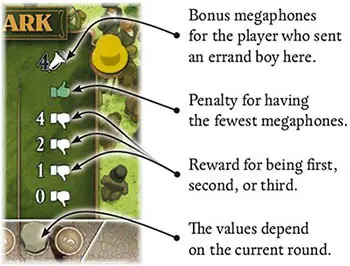
All players tied for fewest megaphones gain 1 vote. They do not get any rewards for being first, second, or third.
The other players may get rewarded. Rewards depend on the round. If you set up the election game board correctly, the round marker on the central board will indicate which column applies to the current round.
Determine the relative obstreperousness of the other players. The player with the most megaphones gets the biggest loss of votes. And so on down the line. If multiple players are tied, they all get that reward. Ties do not affect the order of players below them.
Example 1: Red, Yellow, Blue, and Green have each earned 2 megaphones this round. They are all tied for fewest, so they will all gain 1 vote. No one will lose votes.
Example 2: Red and Yellow have 4 megaphones, Blue has 3, and Green has 1. It is round four, as shown in the illustration above. Green has the fewest megaphones so she gains 1 vote. Red and Yellow are tied for first, so they both lose 4 votes. Blue is third, so he loses 1 vote.
Society Competition
You are well liked by four of society's most influential people. But with a little bad behaviour, you can change that.
Scoring
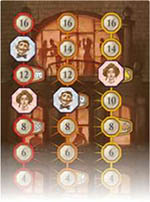
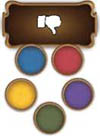
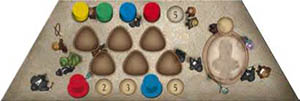
In this competition you keep score by moving 4 influence markers on your scoreboard.
Your total influence is equal to the sum of the numbers under the markers. The object of the competition is to decrease your social influence.
Moves On The Scoreboard
Actions and errands depict how you may move your influence markers. Some icons specify a color. If no color is specified, you may move any of your markers. Movement must always be into an empty space.

Move one of the influence markers down one space.

Move one marker diagonally down into the next row. You choose whether to move diagonally left or diagonally right.
If a move would take a marker off the board, that marker cannot use that move at all.
In general, these icons indicate that you move one marker to an adjacent empty space in one of the directions depicted.

Other movement depictions are explained on the back page.

If multiple moves are depicted, you do them one at a time, always into empty spaces. You may move the same influence marker or multiple influence markers in any order. You are not required to use all your moves, nor even to use any of them.
Symbols On The Scoreboard
Certain spaces on the scoreboard have a symbol. You have that symbol for as long as you have a marker on that space. Much of the strategy in the society competition depends on deciding which space to move onto and how long to leave the marker there.
If an action gives you multiple moves, you cannot perform a new action in the middle of it. For example, if a card gives you two moves straight down, you cannot do one move onto a dog symbol, play an action that uses dog symbols, and then use the second move.
However, you could use one card to move onto a dog symbol, play several cards that use that symbol, and then use another card to move off the symbol.
When you use a card like this, first count up how many of that symbol you have. Then make that many moves. Once the symbols are counted, the number of moves cannot be affected by how you use those moves. If a card gives you moves along with something else that depends on symbols, you count your symbols before making any moves.
Errands In The Society Competition
Some errand spaces give you moves, as explained above.
This errand gives you 1 move straight down. Put your errand boy figure on the space in your color. You may not play here again this round, but your play does not prevent others from using this action.

Play here to take a set of cards. In a two- or three-player game, any space allows you to take any remaining set.

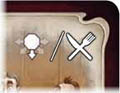
The benefit of this space comes during the Dame Beatrice phase. Essentially, you take time out of your busy schedule to do something that annoys Dame Beatrice.
If you choose this errand, you will not be affected by the Dame Beatrice tile during the Dame Beatrice phase.
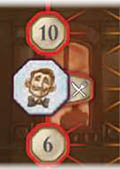
5. Dame Beatrice
Dame Beatrice is a sweet old lady who tells everyone how nice you are. This can really help your standing in society - which is exactly what you don't want.
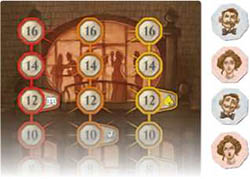
After the actions phase (and after the Hyde Park phase if you are playing the election competition) it is time to compare each player's influence markers with the Dame Beatrice tile. The current round's tile specifies which influence markers must move one space straight up. Each tile is explained below.
All affected markers move simultaneously. Some markers might be blocked from moving, either by an unmoving marker above or by being in the topmost row (16). For each blocked marker, you must move another marker up one space. In this case, you get to choose which marker is penalized. It can be one that has already moved or one that is not affected by the tile.
If no pieces can move up, then you are already so well thought of that Dame Beatrice cannot improve upon your social standing.
For each tile, there is a way to avoid being penalized. You can also avoid the penalty by playing on the Dame Beatrice space during the errands phase.
Dame Beatrice Tiles
Each influence marker in these two columns must move straight up 1 space. If all your markers are in the crossed-out column, Dame Beatrice does not affect you.
Each influence marker in these rows (from the 6-point row to the 12-point row) must move straight up 1 space. If all your markers are outside these rows, Dame Beatrice does not affect you.

If two or more markers are in the same row, they must move straight up 1 space.
This applies even if the two markers are not adjacent. If you have 2 rows of 2 markers, then all four are affected. If each row has no more than 1 marker, Dame Beatrice does not affect you.
Any marker adjacent to another must move up 1 space. Diagonally adjacent markers are considered to be adjacent.
Essentially, this means that each cluster of markers moves up 1 space as a cluster. If no marker is adjacent to any other, Dame Beatrice does not affect you.
6. End Of Round
At the end of each round, perform the following steps, in order:
Check for End of Game
The game ends at this time if any player's score in any competition is zero or less. During the round, a player might drop to zero and then go back up (because of Hyde Park or Dame Beatrice). That does not end the game. What matters is players' scores after Hyde Park and Dame Beatrice. The game will also end if you have played 5 rounds. Scoring is explained in the section below.
If the game does not end, then get ready for the next round:
Mark the New Play Order
Players who placed an errand boy on one of the numbered errand boy spaces will have that spot in the order next round. Move their order markers to the corresponding places. They should also return their bonus action tiles to the board if they have not already done so.
Players who did not send an errand boy to reserve a spot in the order must put their order markers on the spaces that are left. These players do not change their relative order.
Example: At the end of the round, the errand boys and order markers look like this:
Red and Blue get the spots they chose. Yellow and Green get the other two spots. Yellow remains ahead of Green.

If no one sent an errand boy to reserve a spot in the order, then play order does not change.
Clear the Boards
Players discard any white-bordered cards that they played this round. If they have cards in their hand, they must discard down to 4 cards. They should also reset any black-bordered cards that they activated.
Remove all cards that were not taken from the game boards. (Don't forget about the central card). Remove all political circle tiles from the election game board, remove all possession tiles from the possessions game board, and remove this round's Dame Beatrice tile.
Return all errand boy figures to the players.
The renaissance man tile should be returned to the central board. All bonus action tiles should be returned to the central board.
Advance The Round
Move the round marker to the next space. On the possessions game board, rotate the borough indicator ahead to the next borough.
Scoring
In the possessions competition, your score is the amount of money you have. Ifyou have possessions at the end of the game, you must turn them in for the value written on the tile plus 3 pounds each. So as long as you have possessions, your score is above zero. The borough indicator has no effect on your score.
While you have possessions, you cannot go into debt. For example, if an action would allow you to spend more money than you have, you may only spend what you have. However, once your possessions are gone, you may go into debt, so your score may go below zero.
In the election competition, your score is marked on the election scoreboard. This scoreboard has a maximum of 44. If you are at this maximum, you cannot go any higher. However, if your loss of votes would put you below zero, keep track of this. You can have a negative score in this competition, too.
In the society competition, your score is limited by your player board. Markers may not move above the top row or below the bottom row. Your score is the sum of the values underneath your four markers. This could be below zero.
So in each competition, you will have a score. One of these scores will be your highest. That is your final score. The player with the lowest highest score is the winner.
Break ties according to the tied players' second highest scores. If you played three competitions, use the third highest scores for the next tiebreaker, if necessary. If players are still tied, then that is quite remarkable.
Continue Reading

