Basic Combat Overview
Combat in Tainted Grail is a turn-based confrontation between a Character (or a Party of Characters) and an enemy, represent- ed by the Encounter card. Together, Characters build a long line (Sequence) of cards, with the aim of gaining enough markers in the Combat Pool to defeat the Encounter.
These markers represent the total progress Characters make against their opponents, such as their tactical advantage, wounds they cause, and the op- ponent's exhaustion.
The detailed rules of Combat are described further down, but in general, most Combat Encounters play out like this:
All Party members draw their initial hands of cards (see Starting Combat).
Party members pick a Character who becomes Active and goes first (Combat Turn, phase I).
The Active Character may play one Combat card, adding it to the end of the Sequence (Combat Turn, phase II, step 2).
The Active Character may play as many additional Combat cards as allowed by the rules (Combat Turn, phase II, step 2).
The enemy makes an attack against the Active Character (Combat Turn, phase II, step 3).
If there are Characters who were not Active this Turn, one of them becomes Active (Combat Turn, phase II, step 4). If not, the Turn ends and a new Turn begins.
Hint: you need to be careful when approaching various Encounters during your travels. Some of them might be particularly difficult for your Character.
If that's the case, you may always Escape from an Encounter (see: Escaping Combat).
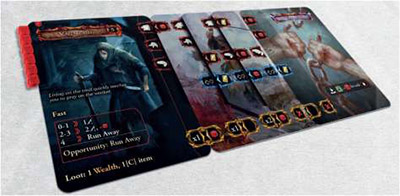
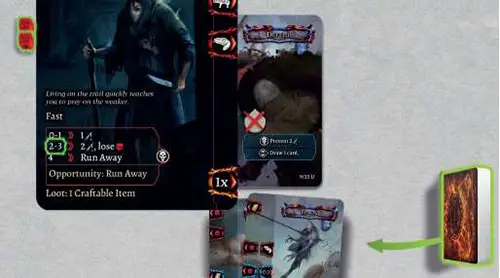
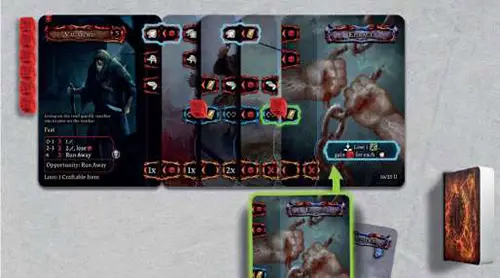
Combat Sequence Example
A Sequence consists of Combat cards played during a Combat Encounter by all Party members.
Every Character plays their Combat cards, adding them to one, shared Combat Sequence. Cards always form a single straight line. The bottom Keys always join together, and no Keys are ever obscured.
Escaping Combat
A player may Escape at any time during their Activation - they lose 1  and trigger the Opportunity attack listed on the Encounter card. Then, they place the Encounter card on the bottom of its deck, reshuffle their Combat deck and set it aside.
In a Party: if an Active Character decides to Escape from Combat, the Character triggers the Opportunity attack and leaves the Combat, as described above.
The rest of the Party remains in the Encounter and proceed to step 4 - Check Readiness. When all players Escape, place the Encounter card on the bottom of its deck.
Run Away
Characters are not the only ones who may flee from Combat. Some Creatures have a special "Run Away" attack - when it triggers, immediately end the Encounter and put the Encounter card at the bottom of its deck.
Characters receive no Loot or Reward. For the purpose of any rules, forcing the enemy to Run Away doesn't count as winning the Encounter.
Encounter Card
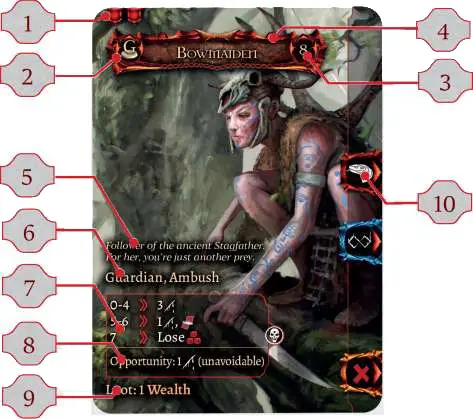
This card represents the enemy the Characters will face during the whole Combat Encounter. It consists of several parts:
- Encounter Difficulty. Each Encounter falls into one of four difficulty categories.
- Guardian icon. See Guardian in the Combat Encounter Traits.
- Encounter Value. The resilience of this Encounter - to win, the number of markers in your Combat Pool needs to reach this number.
- Card Name.
- Flavor text.
- Enemy Traits. Special modifiers that remain active throughout this Encounter (see: Enemy Traits).
- Combat Table. Determines which Attack the enemy will per- form according to the number of markers in the Combat Pool.
- Opportunity. Describes what happens should the enemy use their Opportunity attack.
- Reward & Loot. What you get for defeating this enemy. Rewards apply to each player, and Loot needs to be shared between Party Members.
- Attribute Keys. Connecting these Keys grants various bonuses- es if you have the required level of an Attribute.
Starting Combat
Combat in Tainted Grail starts whenever the game asks you to draw or pick a card from any of the following Encounter decks: gray, green, purple, and the card you draw has at least one open Key on its right edge.
After drawing an Encounter card, set it in the play area, ensuring you have plenty of space to the right - you will build your Sequence there.
If the enemy has any Trait, check it now, as some Traits can take effect during this step (see: Encounter Traits).
Then, all Party members make sure they're not using more than one Item with each of the following keywords: Weapon, Shield, Armor, Companion, Relic (see: Items and Secrets). Party members may also decide not to use some of their Items in this Encounter. Set these unused Items aside for the duration of this Combat. No Items may be added once you enter Combat!
After confirming their equipment, each Party Member draws a number of cards from their Combat deck:
- 3 cards if there are 1-3 Characters in Combat.
- 2 cards if there are 4 Characters in Combat.
If you don't like your starting hand, you can discard it and draw a new hand with one fewer card. You may repeat this until you only have one card left in your hand.
When all Party members have their starting cards, go to phase I of the Combat Turn.
Combat Card
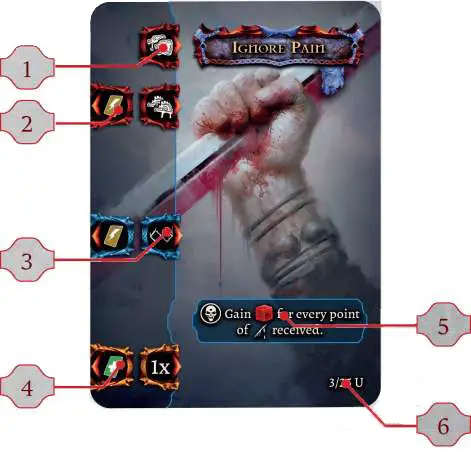
This is an example of a Combat card.
-
Attribute Keys. Each of them is open and may connect to one Bonus Key on the next card in the Sequence. Icons in the Attribute Keys correspond to Attributes on the Character Tray. If you do not have the required level in a given Attribute, the Attribute Key won't connect!
-
Bonus Keys. Each of these Keys may connect to one Attribute Key on the previous card in the Sequence.
-
Magic Key. This Key connects if you join its left part with its right part AND spend 1 point of Magic.
-
Free Key. This Key always connects for free and grants you a bonus, specified in the second part of the Key. Each Bonus is explained in detail in the "Combat Bonuses" frame. If the second part of this Key is empty, you don't receive anything.
-
Ability. The text part of the card containing special rules, with various timings. Only Abilities that are visible (and are not covered by other cards in the Sequence) are considered active. Passive cards (see below) are never covered, so their Abilities remain in play throughout the Encounter.
-
Card Number. To make sorting through cards and building decks easier, each Combat and Diplomacy card has a unique number. The letter next to the number identifies the card's deck and color (U - blue, G - green, B - brown, Y - gray).
Passive Combat Cards
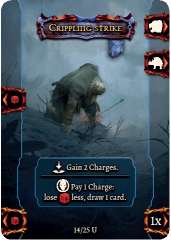
Unlike regular Combat cards, Passive Combat cards have their Ability always visible when in Sequence. To facilitate that, their Keys are on the opposite edges of the card.
Charges: Some cards instruct you to gain Charges - use universal markers and place them on the card.
You can use "Pay x Charges" Abilities any time you want. (unless their text restricts them to one of the phases).
In a Party: only the Active Character can use Charges from cards, but the owner of the card must agree.
Combat Turn
A Combat usually consists of several Combat Turns, with each Turn going through the following phases:
I. Pick the Active Character
The Party members decide who will be the next Active Character. They can select any Characters who have not been Activated this Combat Turn (they have no Time Token on their Character Tray).
If the Party members can't reach an unanimous decision, the Character with the lowest Character Number becomes Active.
Place a Time Token on the Tray of the Character that became Active. It will remind you this Character cannot be Activated again until the next Turn.
II. Character Activation
1. Delayed Abilities
Remove one Time Token from each Combat card in the Sequence that has any. If you've removed the last Time Token from a card, immediately resolve its Ability with the Time Token trigger (see: "Combat Card Triggers"). These abilities trigger only once!
Combat Card Trigger Icons
Most Combat cards have an Ability. Abilities usually start with a Trigger icon that clearly indicates when you should resolve them.

On Placement - resolve this Ability immediately after placing the card in the Sequence.

Delayed - put a Time Token on this card as you play it. The Ability is triggered after removing the very last Time Token from the card. The Ability does not trigger on subsequent Turns, and the Time Token does not return!
If you put another card on a card with a Time Token, and you cover the Ability, the Time Token is lost and the ability won't trigger.

On Enemy Attack - this Ability remains active throughout the entire step 3 of your Activation, usually modifying the enemy's Attack.

Damage - this icon means your Character has to lower their  by the indicated amount.

Connected Attribute Key - this icon means the number of connected Attribute Keys of this specific type in the entire Sequence.
2. Playing Cards
This is where you execute your plan, playing cards from your hand and adding them to the Sequence. If you fail to play even a single card, the enemy will benefit from your inaction (see: Opportunity). You may also be forced to play a card if you're affected by Panic (see: Panic).
To complete this step, follow the list below:
-
Play one Combat card. When playing the very first Combat card during your Activation, you don't need to fulfill any special requirements! This card doesn't have to connect any Keys.
It just needs to line properly with the previous card in the Sequence (see: Combat Sequence Example), which will cause its bottom Key to join with the bottom Key of the previous card. After you play the card:
- Check if any Attribute Keys connect to Bonus Keys. Apply these Bonuses. Remember that in order for them to connect, you need to have this specific Attribute level.
- If both parts of a Magic Key join, you may connect this Key by paying 1 Magic and gain its bonus.
- Connect the bottom, Free Key and gain its bonus.
- Check the Ability, and if it triggers now, resolve it (see Ability Triggers).
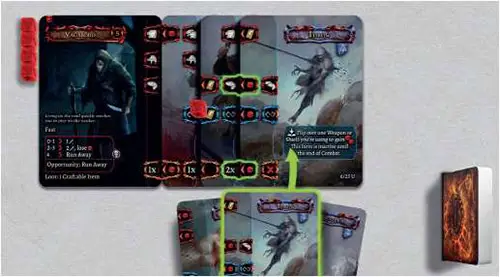
-
Play additional Combat cards. Each Turn, every Combat card you play after your first one MUST connect with a
 Key. If you have no cards that have this Bonus Key, or you can find no way to connect it, you may not play any additional cards! Resolve any cards you play just like above.
Please note: the
icon must appear on the card you want to play (not the one before), and become connected.
-
Check for Opportunity attack. If you haven't played a single card this Activation, the enemy immediately makes an Opportunity attack (see: Opportunity). Afterward, draw a card.
-
Perform the Victory Check. See the Victory Check frame for details.
Victory Check
Count the number of markers in the Combat Pool. If it's higher than or equal to the target value printed on the Encounter card, you win!
Receive any Rewards, share any Loot, and place the Encounter card on the bottom of its deck; reshuffle your Combat deck, including any played and discarded cards, and set it aside.
Otherwise, go to the next step.
3. Enemy Attack
Find the Attack on the Encounter card that matches the number of markers in the Combat Pool. Apply the result of this Attack to the Active Character.
If the enemy's Attack removes any markers from the Combat Pool, and the Combat Pool doesn't have enough markers to cover the loss, see the Negative Combat Pool section.
After modifying the Combat Pool, perform the Victory Check (see the Victory Check frame). 4. Check Readiness
Check if all of the Party Members have been Activated during this Turn (and have Time Tokens on their Character Trays). If there are no Characters left to Activate, go to the End Turn phase (III).
If there are still Characters who haven't been Activated, go back to "Pick the Active Character" phase (I).
III. End Turn
Discard. Discard down to 3 cards in your hand.
Draw. All Party members draw 1 card from their decks. Do not draw if your Character Panics (see: Panic). If there are no cards to draw, see: No Cards in Deck.
Clear Activations. Remove all Time Tokens from the Character Trays. This does not affect any Time Tokens left on Combat cards!
Start new Turn. Go back to the start of phase I (Pick the Active Character)!
Connected Keys
For any Key to be connected, both halves of the Key need to physically join. Additionally:
 Your Character must have the appropriate Attribute level.

You must spend 1 point of Magic if you want to connect it. Place this point on the Magic Key to indicate it is active. If you have to discard a card with a Connected Magic Key, you discard the Magic point used to Connect this Key.

Always connects! Free Keys often contain multipliers, making them even more potent!
Combat Bonuses

Place that many markers in the Combat Pool.

Draw a card.

This Bonus Key allows you to play additional Combat cards during step 2 of your Activation (see: Playing Cards). Ignore this Key when playing your first Combat card in the Activation.
This Bonus does not multiply - if it's next to the multiplier, ignore the multiplier.

Discard the last card of your Sequence.

Multiplies the next icon.

Voids the next icon.
Other Combat Rules
Panic
Panic takes place anytime your  is higher than your current (terror marker is higher than the wings of the T-shaped limiter). When that happens:
Instead of playing the first card of this Turn from your hand in step 2 of your Activation (Playing Cards), play a card from the top of your Combat deck. Then, you may play any additional cards from your hand, according to the standard rules.
Do not draw a new card at the End of Turn. Any bonus or extra cards gained from Bonus Keys, Skills or Abilities are still drawn as normal.
Opportunity
If you play no cards in step 2 of your Activation (Playing Cards), your enemy immediately performs the Opportunity attack listed on their card, and you draw 1 extra card. Then, proceed to step 3.
No cards in deck
Whenever your Character has to draw any Combat cards and their Combat deck does not have the required number of cards, you are forced to Escape. Apply the standard Escape rules.
You Are Dying!
Whenever your Character's drops to 0, your Character gets a "You Are Dying" card. Among other rules, the card immediately removes your Character from the current Encounter - see its text for more details.
Discarding From An Empty Hand
Whenever you have to discard a card from your hand, but you don't have any cards, discard a card from the top of your Combat deck.
Negative Combat Pool
The Combat Pool can never become negative. Whenever an enemy Attack or another effect asks you to remove a marker from the Combat Pool, but there are not enough markers, the player controlling the Active Character discards a card from their hand for every excess point instead. If there are no cards to discard, see: "Discarding from an empty hand" above.
Example: a player has 2 markers in their Combat Pool and one card in their hand. The attack causes them to lose 4 markers. They discard two markers from the Combat Pool, one card from their hand and one card from the top of their deck.
Combat Encounter Traits
Ambush - the first Character Activated in this Combat discards down to 1 card in hand immediately after being Activated.
Rush - the first Character Activated in this Combat receives 2  immediately after being Activated.
Defensive - each first Combat card played during step 2 of your Activation (Play Cards) adds 1 less marker to the Combat Pool.
Fast - each Character can play a maximum of 2 Combat cards per Activation.
Feint - any inflicted during step 3 (Enemy Attack) can't be prevented in any way.
Guardian - if not defeated, this Encounter will roam the map (see the Guardians section of the Basic Rules).
Horde - during each Enemy Attack step, the Active Character discards 2 Combat cards from the top of their Combat deck.
Opportunist - if a Character doesn't play at least 2 Combat cards in step 2, trigger the Opportunity attack.
Rage - during this encounter, resolve step 3 (Enemy Attack) twice.
Robber - when all Party members drop to 1 or less during this Encounter, they lose all their Wealth and discard all their Items. Then, end the Encounter and place it on the bottom of its deck.
Shatter - at the end of the Encounter, all Party members discard any Items bearing the Weapon keyword they were using during the Encounter.
Slow - at the start of Combat, each Party member draws an additional Combat card. During the End of Turn phase, each Party member draws an additional Combat card.
Combat Example
Beor draws a gray Encounter - it's a Vagabond. This enemy has the Fast Trait - it means the player can only play up to two Com- bat cards per turn.

Turn 1
The player controlling Beor draws 3 cards from their Combat deck and plays an Attack card.
Beor has 2 points of  , so the Key connects to a Bonus that adds 1 marker to the Combat Pool. The Free Key also connects - the player places another 1 marker in the Combat Pool.

Then, remembering they can play only two cards (due to the Fast Trait of the Vagabond), the player plays a Defend card and connects its Magic Key by paying 1 Magic. Connecting the Magic Key activates the Bonus ( ) required to play any additional cards.
There's also a  symbol on the card, so the player places a Time Token there. Now, it's time for the enemy Attack.
The player looks at the Attack table of the Encounter card. The current value of the Combat Pool is 2. This means the enemy deals 2 and removes 1 marker from the Combat Pool.
However, the Defend card modifies the Attack, reducing by 2. In the end, the Vagabond's Attack only removes 1 Combat Pool marker.
The player draws 1 card.
Turn 2
The player removes a from the Defend card and draws 1 card.
Then, the player plays a Throw card. It's the first card this Turn, so the player doesn't need the bonus.
The  Key and Free Key connect (the player wants to save Magic, so they don't connect the Magic Key). The card adds a total of 3 markers to the Combat Pool - 1 from the Key and 2 from the Free Key (it has a x2 multiplier).
The Ability of the card allows the player to throw Beor's weapon or shield, but Beor doesn't have one.
Then, the player plays an Enrage card, paying 1 Magic to connect the Magic Key - this Bonus was required for them to play the additional card. No other Keys connect.
Due to the card's Ability that triggers on placement ( ), the player loses 1 and adds 1 marker to the Combat Pool for each connected key.
There are 2 connected keys of this type in the entire Sequence, so the player places 2 more markers in the Combat Pool. There are now 6 markers in Combat Pool - it exceeds the Value of the Encounter. Beor wins!
The player gains the Loot and Reward listed on the Encounter card and puts the card on the bottom of the gray Encounter deck. All Combat cards used or discarded during Combat are returned to the Combat deck.
Then, the player shuffles the deck and places it back on the left of Beor's Character Tray.
Continue Reading