
-
Two new Ravage cards (Demobilization and Desiccation) are added to the stacks. These cards are presented on page 19. Since this adds 16 cards to the stacks, the battle will last 4 more turns (16 instead of 12).
-
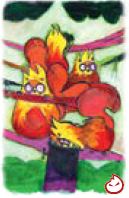
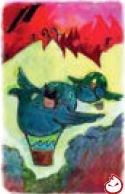
Four new Sylvan cards are also added to your options (Stag, Squirrels, Doves, and Fish).
-
Before the Battle phase, there is a Mobilization phase. It is during this phase that you will need to assemble, as best you can, your Defender deck from the 64 Sylvan cards. This is the Defender deck you will use during the Battle phase, and as such, the deck you assemble each game will be different.
-
During the Battle phase, when you run out of cards in your Defender deck, a Demobilization occurs during which one or two cards will be removed from the game.
Phase I - Mobilization
During this phase, you will have multiple turns to choose Sylvan cards in order to assemble the best Defender deck.
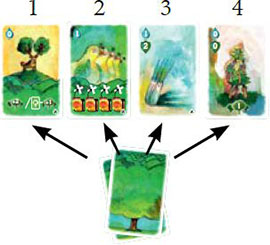
The Sylvan cards are revealed one after the other, each in one of the 4 "recruitment columns". Each turn, you will need to choose a column, take all the cards from that column (one to four), and add them to your Defender deck.
You must choose wisely, for not all cards will remain at your disposal: each turn, a desertion will occur where all cards from one column will be permanently removed from the game. The column that is lost is randomly determined with a Desolated card.
Setup
Shuffle the 64 Sylvan cards from the base game (the 24 cards from the introductory game and the 40 cards with  ).
).
Shuffle the 12 Edge cards to create the Desertion deck. Only the Bloom side must be visible; this means that the numbers on the Desolated side will be hidden.
Mobilization
The Mobilization phase is played over many turns, each divided into the following 4 steps:
- Summoning
- Recruitment
- Summoning
- Desertion
1. Summoning
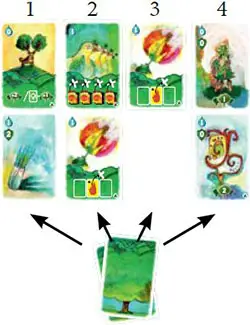
Reveal the first cards (one to four) from the Sylvan deck, and place them next to each other to create four vertical columns. This is how you create/complete the four recruitment columns.
Important: if there already are four Sylvan cards in a column, do not add cards to that column until it has been emptied (either during Recruitment or Desertion, both described below).
2. Recruitment
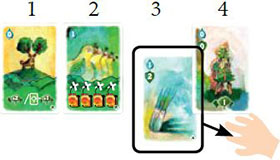
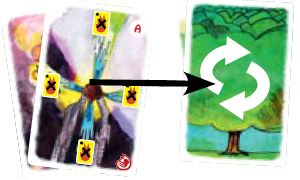
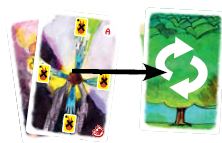
Choose a column: take every Sylvan card in that column, and add them to your Defender deck.
3. Summoning
Identical to step 1.
4. Desertion
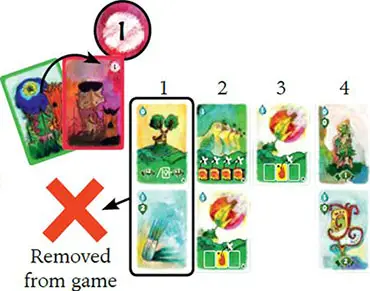
Reveal the top card from the Desertion deck: the number on its Desolated side tells you which column is deserted. Remove all the Sylvan cards in the matching numbered column from the game.
Mobilization Phase End
The end of the Mobilization phase can be triggered in one of two ways:
You reveal the twelfth and last card from the Desertion deck. The Mobilization phase ends immediately (any Sylvan cards left in the Sylvan deck and on the table are removed from the game).
You reveal the last card from the Sylvan deck. Mobilization continues (even if you did not complete every recruitment column) until you reveal an Edge card whose number matches an empty column.
The Mobilization phase then ends immediately (any Sylvan cards left on the table are removed from the game).
Rules for Two Players
The modifications for two players for the Battle phase are unchanged from those presented on page 13. What follows are the modifications to the Mobilization phase.
The players assemble a single Defender deck, and they choose one after the other. The Mobilization phase is thus resolved in this order:
- Summoning/Recruitment (player A chooses)/Summoning/Desertion
- Summoning/Recruitment (player B chooses)/Summoning/Desertion
- Summoning/Recruitment (player A chooses)/Summoning/Desertion
- ...
Phase 2: Battle
Setup
Shuffle your Defender deck (the Sylvan cards you chose during phase 1) and draw 8 cards to form your starting hand.
Shuffle the 64 Ravage cards and divide them into four equal stacks of 16 cards.
Create the battlefield by placing these four Ravage stacks next to one another, and the
12 Edge cards along the other three sides of the battlefield (Bloom side up). The battlefield will thus be identical to the one shown on page 7, with the exception that all 12 Edge cards are Bloom side up, instead of 6.
Battle
The Battle phase is resolved as in the introductory game, with the following exception: if you must draw a card from your Defender deck when it is depleted, a Demobilization occurs immediately.
Demobilization
Choose one of the following two options:
Remove from the game two cards of your choice from the discard pile. Then, shuffle the discard pile to form a new Defender deck.
Shuffle the discard pile to form a new Defender deck, and then remove the top card of your deck from the deck (you may look at it).
End of the Game
Identical to the base game.
Adjusting the Difficulty
For a more difficult game, adjust the difficulty as you see fit:
Setup: Start the game with 3, 6 (as in the introductory game), or 9 Edge cards Desolated side up.
Battle: Draw two cards instead of three during the "Reinforcements" step.
Expansion I. Extraordinary Teats and Betrayal
Components
8 Betrayal cards, 8 Extraordinary Feat cards

Setup
When setting up for the Mobilization phase, shuffle the 16 cards from this expansion along with the 64 Sylvan cards from the base game.
Note: although Betrayal cards are shuffled with the Sylvan cards, they are not considered Sylvan cards.
Game Play
As in the base game, with the following exceptions:
Mobilization
During a Summoning (step 1 or 3), if you reveal a Betrayal card, place it in the recruitment column as you normally would, and then immediately reveal another card that you place in the same column, on the Betrayal card (slightly offset so that the Betrayal card remains visible )•
Therefore, a recruitment column may now hold more than 4 cards: a maximum of 4 Sylvan / Extraordinary Feat cards, and one or more Betrayal cards.
Note: if you reveal several Betrayal cards one after the other, place them one on top of the other (slightly offset so that all Betrayal cards remain visible), and continue revealing cards for that column until you reveal a Sylvan card.
During a Summoning (step 1 or 3), if you reveal an Extraordinary Feat card, place it as you would any normal Sylvan card, and then continue with the next column.
During Recruitment (step 2), if you choose a column with one or more Betrayal cards, add them to your Defender deck.
During Recruitment (step 2), if you choose a column with one or more Extraordinary Feat cards, do not add them to your Defender deck, but instead set them aside next to your Defender deck.
Battle
Betrayal Cards
When you draw a Betrayal card (in your starting hand, during step 3 "Reinforcements", or after any game effect), you must immediately choose one of the following:
- Discard that Betrayal card, OR
- Discard another card of your choice from the game, and remove that Betrayal card from the game.
Very important: this is the only way to remove a Betrayal card from the game. As a matter of fact, Betrayal cards are never removed from the game due to the Demobilization effect (either with the Support card or when your deck runs out of cards).
During a Demobilization, you may never choose to remove a Betrayal card from the game; and if a Betrayal card is randomly revealed, you must set it aside, and draw another random card to remove from the game.
Then, the Betrayal card is returned to the discard pile (or, depending on the situation, reshuffled into the deck).
Extraordinary Feat Cards
All Extraordinary Feat cards acquired during the Mobilization phase can be used at any time during the Battle phase. During step 4 "Defense", you may play any number of Extraordinary Feat cards.
They are free to play and are removed from the game after being played. Extraordinary Feat cards cost nothing to play; they also may not be discarded in order to pay for any type of cost.
Important: Extraordinary Feat cards never trigger automatically, and they may only be played during step 4 "Defense".
-

Owl's Wisdom
Look through your Defender deck for two cards of your choice, and add them to your hand. Reshuffle your Defender deck.
-

Deluge of the Elephants
Discard all cards from the battlefield (Fountains, Trees, and Elementals; if playing with Expansion 2, also discard Geysers and Acid Lakes).
-
Hedgehog Fence
Skip the next step 1 "Reveal Ravage cards".
-
Squirrel Disinformation
Reveal the top two cards of each Ravage stack. Of these eight cards, return two to each stack in the order of your choice. These cards are not required to return to the same stack from which they were revealed.
-

The Stag King Returns
If there are 8 Tree cards on the battlefield (including at least one of each of the four Tree types), you immediately win the game.
-

Fish Flood
If there are 10 Fountain cards on the battlefield (including at least one of each of the four Fountain types), you immediately win the game.
-

Doves' Armistice
If you have 16 cards in hand, you immediately win the game
-
Charging Whales
If the 12 Edge cards are flipped to their Desolated side, and there are 12 Elemental cards on the battlefield, you immediately win the game.
Expansion 2: the Elements Few
Components
16 Element cards : 4 Geyser, 4 Stone Rain, 4 Acid Lake, 4 Temporal Tornado
Setup
During setup for phase 2 "Battle", shuffle the 16 cards from this expansion along with the 64 Ravage cards. Then, divide these 80 cards into 4 stacks of 20 cards.
Element Cards
These are additional Ravage cards that affect the row in which they are revealed.
-
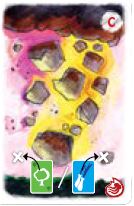
Stone Rain (C)
Starting from the Ravage stack and moving to the left, destroy the first Fountain or Tree in this row. If no such card can be found, flip one Edge card to its Desolated side. If all Edge cards are already on their Desolated side, you immediately lose the game.
Discard Stone Rain after applying its effects.
-
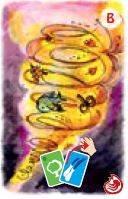
Temporal Tornado (B)
Return all Fountain and Tree cards in this row to your hand. If no Fountain or Tree cards exist in this row, return two cards of your choice from your hand to the top of your Defender deck, in any order. If you have no cards in hand, ignore this card.
Discard Temporal Tornado after applying its effects.
-

Acid Lake (B)
Put this card on the empty space (without a Tree, Fountain, Elemental, Acid Lake, or Geyser card) that is furthest away from this Ravage stack.
An Acid Lake remains on that space until the end of the game, and it no longer counts as a movement space for Elementals cards. In other words, an Elemental card that should move onto a space occupied by an Acid Lake must immediately move to the next space (if that is the fifth space, it inflicts its damage).
If there are no empty spaces in this row, discard the Acid Lake.
-
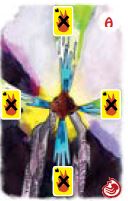
Geyser (A)
Put this card on the empty space (without a Tree, Fountain, Elemental, Acid Lake, or Geyser card) that is furthest away from this Ravage stack.
A Geyser remains on that space until the end of the game, until an Elemental card moves onto that space, or until you decide to initiate a Geyser Eruption (see below).
If there are no empty spaces in this row, discard the Geyser. If an Elemental card reaches a space occupied by a Geyser, both cards are immediately destroyed.
During step 4 "Defense", if one or more Geyser cards are on the battlefield, you may decide to have one or more of them erupt.
Geyser Eruption
Discard all Elemental cards on the battlefield that are in a straight line above, below, to the left, OR to the right of the Geyser card (you choose only one of these four directions). Then, discard the Geyser card.
Appendix: the Ravage
Setup
Put the Ravage pawn near the battlefield.
Game Play
Phase 2 - Battle: During step 1 "Reveal Ravage cards", if you reveal an Elemental card with the & icon, put the Ravage pawn onto that card.
From this point on :
If that Elemental should move onto a Fountain card of higher or equal strength, destroy the Fountain card, remove the Ravage pawn from the card, and move the Elemental card onto the space previously occupied by the just-destroyed Fountain card.
If an effect should discard this card, remove the Ravage pawn, and leave this card on the battlefield.
If this card should reach the fifth space in its row (the forest) with the Ravage pawn on it, you immediately lose the game.
Notes:
If during step 1 "Reveal Ravage cards" another Elemental card with an  icon is revealed, move the Ravage pawn onto that card if it is stronger than the card the pawn currently occupies. Otherwise, leave the Ravage pawn on its current Elemental card.
The card which the Ravage pawn is on remains affected by all effects:
Blazing: replace the Elemental card with a Blazing Elemental card, making sure that the Ravage pawn follows.
Simoon, Whale, Acid Lake: the pawn moves with the Elemental card.
Doves, Hedgehogs: the Elemental card is not yet in play, it is therefore not yet protected by the Ravage pawn and is discarded.
Elephant, Deluge of the Elephants, Geyser: the Ravage pawn is removed instead of the card. Of course, if another effect should later (same or future turns) cause this card to be destroyed, it will be destroyed since it is no longer protected by the pawn.
Continue Reading
