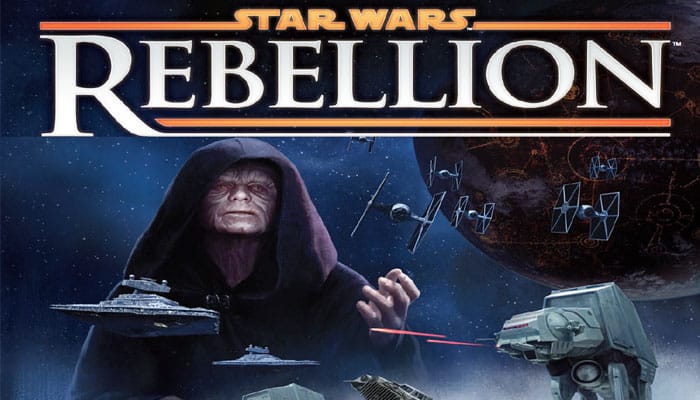
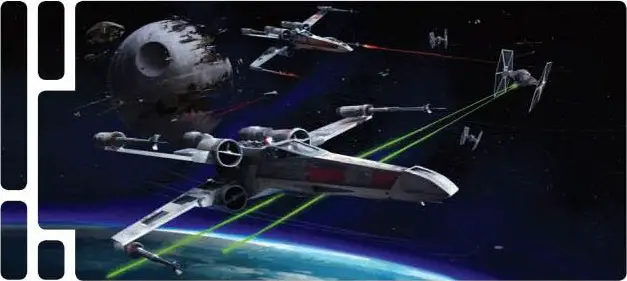
It is a period of civil war. The last remnants of the Old Republic have been swept away, and the Empire rules the galaxy by fear. Its newly constructed battle station, the Death Star, is powerful enough to destroy any opposition.
Yet, there is a new hope. A brave few have chosen to stand against the Empire. From their secret base, these Rebels are making plans to deal the Empire a crushing blow and restore freedom to the galaxy.
Star Wars: Rebellion lets players reenact the epic struggle between the Rebel Alliance and the Galactic Empire. Players take control of iconic characters from the Star Wars saga, sending them on secret missions and leading troops in combat across the galaxy.
Each of the two factions has very different strategies and objectives. The Rebel Alliance is vastly outnumbered and cannot survive a head-on fight; instead, it must remain hidden and rely on subterfuge, guerrilla tactics, and diplomacy to undermine the Empire. The Rebels win the game by gaining enough support to start a full-scale galactic revolt and overthrow the Empire.
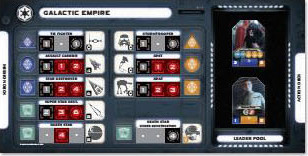
The Galactic Empire is a vast, tyrannical regime that rules many systems throughout the galaxy with an iron fist.
The Imperials can easily build terrifying weapons of war in large quantities. Although their forces are many, their only chance of extinguishing the spark of rebellion is to spread throughout the galaxy, quell uprisings, and search for the hidden Rebel base. They win the game by finding where the Rebel base is located and conquering it.
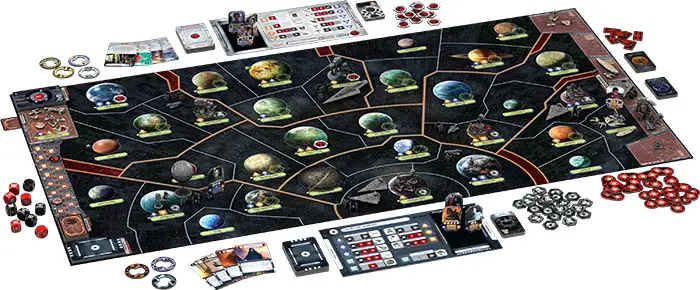
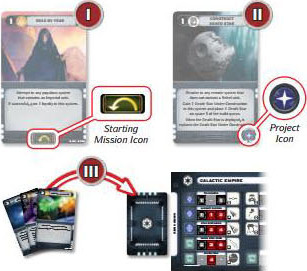
Components

Setup
To set up the game, follow these steps:
-
Choose Factions and Gather Components: Players must choose who will control the Imperials and who will control the Rebels for this game. If they cannot decide, choose randomly.
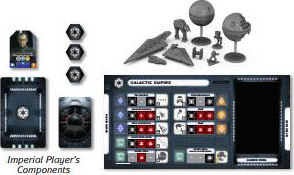
Each player takes his faction's plastic miniatures, leaders, loyalty markers, faction sheet, mission cards, and action cards, placing these components in front of him.
-
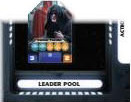
Place Starting Leaders: Each player takes his four leaders that do not have a recruit icon and places them in the box labeled "Leader Pool" on his faction sheet. All leaders that have recruit icons are placed near the game board and cannot be added to the leader pool until later in the game.
-
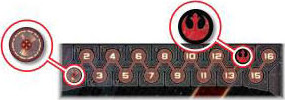
Prepare Game Board and Time Track: Take both halves of the game board and place them next to each other in the center of the play area. Then place the time marker on space "1" of the track and the reputation marker on space "14" of the track.
-
Prepare Objective Deck: Sort the objective cards into three piles based on the number shown on the card back (I, II, or III), and shuffle each pile individually.
Then place pile III on the "Objectives" space of the game board; place pile II on the top of pile III, and finally place pile I on top of pile II to create a single objective deck.
Then the Rebel player draws one card from the objective deck, keeping it secret from the Imperial player.
-
Prepare Action Decks: Each player takes all of his action cards that have a recruit icon and shuffles them to create his action deck. He places it facedown next to his faction sheet on the side labeled "Action Deck".
All action cards that do not have a recruit icon are not used for the first game and are returned to the game box.
-
Prepare Tactic Decks, Markers, and Dice: Shuffle the space tactic and ground tactic decks individually and place them within easy reach of all players. Then take all remaining markers and dice and place them nearby.
-
Prepare Mission Cards: Players take their mission cards and sort them as explained below.
Starting Missions: Starting mission cards are identified by a curved arrow at the bottom of the card. Each player takes his four starting mission cards and sets them aside.
Projects: Project cards are missions that have a white star in the bottom-right corner of the card. The Imperial player takes the project cards and shuffles them together. Then he places this deck on the "Project" space of the game board.
Remaining Missions: Each player takes his remaining mission cards and shuffles them to create his mission deck. He places it facedown next to his faction sheet on the side labeled "Mission Deck".
-
Place Starting Units and Loyalty: For your first game place units and loyalty markers on the game board as described in the diagram on page 16. For future games use the "Advanced Setup" on page 18.
-
Choose Base Location: The Rebel player should make sure that all systems that contain Imperial units have been removed from the probe deck.
Then, from the remaining probe cards, the Rebel player secretly chooses one card and places it facedown under the Rebel base "Location" space of the game board.
Then the probe deck is shuffled and placed on the "Probe Deck" space of the game board.
For your first game, make sure the Rebel player chooses a system that is not adjacent to any Imperial units.
-
Draw Starting Hand: Each player takes his four starting missions and draws two cards from his mission deck to create his starting hand. This hand of cards is kept secret from his opponent.
Players are now ready to begin playing the game!
Game Play
Star Wars: Rebellion is played over a number of game rounds. During each game round, players resolve three phases in the following order:
Assignment Phase: Players assign their leaders to missions.
Command Phase: Players take turns resolving missions or placing leaders on the game board to move units and start combats.
Refresh Phase: Players resolve cleanup steps, such as retrieving leaders, drawing mission cards, launching probe droids, recruiting new leaders, and building new units.
Each of these phases are explained in detail in the following sections.
Players continue resolving game rounds until one faction has won the game as explained later.
I. Assignment Phase
During this phase, players assign their leaders to missions.
Missions represent pivotal moments from the Star Wars saga, such as stealing the Death Star plans. Each player has a hand of mission cards that represent the different missions his leaders can attempt.
The Rebel player starts by assigning any of his leaders to missions. When he is finished, the Imperial player assigns any of his leaders to missions.
To assign a leader to a mission, the player takes a mission card from his hand and places it facedown near his faction sheet. Then he chooses one or two leaders from his leader pool and places them on top of that card.
Each mission has a skill requirement in the upper left hand corner. These are explained in detail later, in the "What are Skills?" sidebar.
Any leaders who are not assigned to missions remain in the leader pool and can be used during the Command Phase to move units or oppose enemy missions.
After the Imperial player finishes assigning his leaders, players proceed to the Command Phase.
The Imperial player assigned two of his leaders to missions and left his other two leaders in the leader pool.
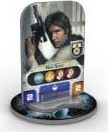
WHAT ARE LEADERS?
Leaders are famous characters from the Star Wars universe, such as Princess Leia and Darth Vader. These characters drive all core actions in the game.

Leaders are required to move units and attempt missions. The numbers on each leader indicate the bonuses it provides in combat, and the skill icons below the leader's name indicate its strength for different mission types. These are explained in detail later.

The Imperial player assigned two of his leaders to missions and left his other two leaders in the leader pool.
II. Command Phase
During the Command Phase, players can move their units and reveal their missions. Starting with the Rebel player, players alternate taking turns by doing one of the following:
Activate a System: Use a leader from his leader pool to move units on the game board and possibly start combat.
Reveal a Mission: Use a leader on a mission card to reveal the card's ability.
A player can pass at any time. After a player has passed, his turn is skipped for the rest of the Command Phase.
After all players have passed, players proceed to the Refresh Phase.
Activate A System
Players move their units and initiate combat by activating a system with a leader.
To activate a system, the player takes one leader from his leader pool and places it in any system. When a system is activated, he can move any of his ships from adjacent systems to the activated system. A player cannot move units out of a system that already contains one of his faction's leaders.
Each incoming ship can bring a number of ground units along with it equal to its transport capacity, which is found on its faction sheet. TIE Fighters also require transport as if they were ground units.
After moving units into a system that contains opposing units, players resolve a combat, which is explained later.
If a leader does not have any tactic values, it cannot activate a system.
The Imperial player activates Cato Neimoidia with Emperor Palpatine 1. He can move the Star Destroyer and AT-AT from Sullust to Cato Neimoidia 2. He cannot move the Stormtrooper from Corellia because it would require a ship with transport capacity to bring it along 3. Also, he cannot move units from Coruscant because it is not adjacent to Cato Neimoidia 4.
WHAT ARE SYSTEMS AND REGIONS?
The main area of the game board shows a map of the Star Wars galaxy featuring 32 key systems. Each system consists of planet art
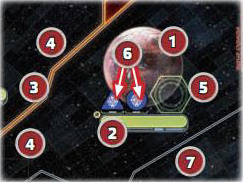
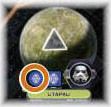
1, the system's name2, space area surrounding it3, and its borders4. Ground units in the system are placed on the planet art, while ships are placed in the space area around the planet.There are eight regions of the game board, separated from each other by large orange borders. Each region contains four systems.
Most systems are populous systems, which have a loyalty space
5and resource icons6that show which units the system produces. If a system does not have a loyalty space or resource icons, it is a remote system.Shaded areas that are completely surrounded by an orange line are impassible
7and cannot be moved through.
Finding The Rebel Base
After Imperial ground units move into a system, the Rebel player must declare whether the Rebel base is in that system.
If the Rebel base is in that system, the Rebel player must reveal the base before resolving a combat. Rules for revealing the Rebel base are explained in detail later.
Revealing A Mission
To reveal a mission, the player chooses a facedown mission card that one of his leaders is assigned to. He flips the card faceup and reads the card aloud.
Most mission cards instruct the player to "attempt" or "resolve" the mission in a system. He must declare the system in which he is attempting the mission, but he does not make any other decisions at this time.
Then he places his leader in the declared system. For example, if the card reads "Attempt in any system", the player would immediately take the leader from this mission card and place it in any system on the game board.
Important: If a mission is attempted or resolved in the "Rebel Base" space, the leader is placed in the "Rebel Base" space of the game board and not in the system where the Rebel base is hidden.
Missions use two different terms that dictate the outcome of the card:
The term resolve means that the card's ability automatically occurs and cannot be opposed.
The term attempt means that the card's ability is only performed if the mission succeeds. The mission will automatically succeed unless it is opposed by an opponent's leader, which is explained below.
Important: After using a starting mission card, the player returns the card to his hand. All other mission cards are discarded after use.
Opposing A Mission
After a player declares where he is attempting a mission, his opponent has a chance to send one leader from his leader pool to oppose that mission. An opposing leader is placed in the system where the mission is being attempted.
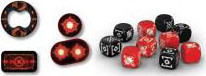
If both players have a leader in the system, the mission is opposed. Both players roll dice to determine whether the mission succeeds or fails. Each player rolls dice (of any color) equal to the combined number of skill icons on all of his leaders in the system. He rolls dice only for skill icons that match the mission's skill requirement.


Each  and
and  rolled is one success. Each ?? rolled is two successes. If the player attempting the mission rolls more successes than his opponent, the mission succeeds and he performs the "If successful" ability on the card. If he rolls equal to or fewer successes than his opponent, the mission fails and he does not perform the ability on the card.
WHAT ARE SKILLS?
All missions have a skill requirement in the topleft corner of the card. This shows the minimum number of skill icons that the assigned leaders must match in order to reveal the mission.

The more matching icons a leader has, the more likely that leader will succeed at its mission.
There are four skill types:
+Diplomacy: These missions typically provide loyalty in systems or give players more units.
+Intel: Rebel intel missions typically help acquire objective cards, while Imperial intel missions help locate the Rebel base.
+Spec Ops: Rebel spec ops missions typically destroy Imperial units, while the Imperial spec ops missions capture Rebel leaders and exploit them in various ways.
+Logistics: Rebel logistics missions typically move units to and from the Rebel base, while Imperial logistics missions build special units or accelerate Imperial units' build time.

Other Mission Rules:
When a mission is attempted "against a leader", it is attempted in that leader's system.

Some mission cards have a leader's image below the skill requirement. Any leader can attempt these missions. However, if the indicated leader attempts this mission, he adds two successes to his dice roll.
If the mission is resolved instead of attempted, the card's ability will list an additional effect if the matching leader resolves this mission.
The color of the leader's frame is relevant only in the team game.
Mission Example
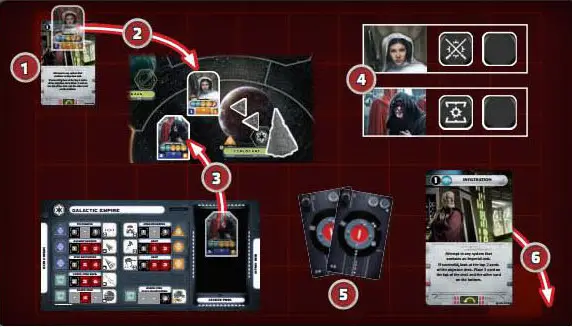
1At the start of the Command Phase, the Rebel player chooses to reveal Princess Leia's mission. He flips the card faceup, revealing "Infiltration", which can be attempted in any Imperial system.
2He decides to attempt this mission at Coruscant, placing Leia there.
3The Imperial player decides to send Emperor Palpatine to oppose this mission. He takes this leader from his leader pool and places it at Coruscant.
4"Infiltration" has an intel (??) skill requirement, so players count the number of intel icons on their leaders in the system. Both Leia and the Emperor have two intel icons (??), so each player rolls two dice.The Rebel player rolls a ??, and the Imperial player rolls a ??. Because ?? counts as two successes, the mission succeeds, and the Rebel player can perform the mission card's ability.
5The Rebel player looks at the top two cards of the objective deck, places one on the top, and places the other on the bottom.
6Since the "Infiltration" card is a starting mission card, the Rebel player returns this card to his hand.Now that the Rebel player has finished resolving his mission, it is the Imperial player's turn to either activate a system or reveal one of his missions.
Refresh Phase
During this phase, players prepare for the next round by following these steps:
-
Retrieve Leaders: Each player takes all of his leaders from the game board and returns them to his leader pool. If a leader is still on a mission card, it returns to the leader pool, and the card returns to the player's hand.
-
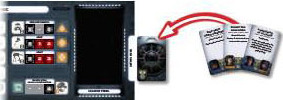
Draw Missions: Each player draws two mission cards and, if there are more than 10 cards in his hand, he discards down to 10 cards.
-
Launch Probe Droids: The Imperial player draws two probe cards. Each probe card shows one system where the Rebel base is not located. The Imperial player keeps these cards secret.
-
Draw Objective: The Rebel player draws one objective card and adds it to his hand.
-
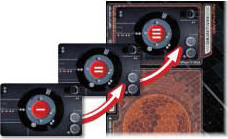
Advance Time Marker: Advance the time marker one space along the track. Then players recruit and/or build if any icons are shown in the time marker's new space.

#Recruit Icon: Each player draws two cards from his action deck, chooses one leader shown on either card, and places that leader in his leader pool. When playing your first game, the abilities on both cards are ignored and the cards are returned to the game box.

# Build Icon: Each player builds one unit matching each resource icon in his loyal and subjugated systems (explained later). For subjugated systems, he uses only the left-most resource icon.
 He takes these units from the supply and places them on his build queue (see below) in the space matching the number to the left of the resource icon.
 -

Deploy Units: Starting with the Rebel player, each player slides all units one space down his build queue (toward his edge of the board). Any units that slide from the "1" space off the board are ready to be deployed.
The player deploys these units (places them) in systems that have his loyalty or subjugation markers.
Each player can deploy a maximum of two units in each system.
Building Units Example
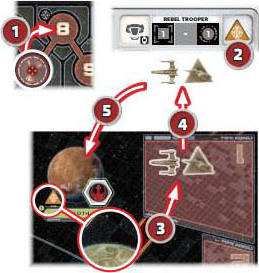
1 . During the Refresh Phase, the time marker is advanced to a space that has a build icon.
2 . The Rebel player finds each system that has Rebel loyalty and checks its resource icons.
Ryloth is loyal to the Rebels and has one
resource icon; according to the Rebel faction sheet, a icon
3 . The number "1" next to the resource icon indicates that this miniature is placed on space "1" of the build queue (next to the X-wing that is already there).
4 . After building units from all of his loyal systems, he slides each unit in the queue one space toward the Rebel edge of the game board. The Rebel Trooper and X-wing slide off the board, so they are now ready to be deployed.
5 . The Rebel player decides to deploy both of these units to Ryloth, so he places them in the system.
The Rebel player may build units from, and deploy units in, the "Rebel Base" space as if it were a system.
Systems that contain an opponent's unit or a sabotage marker cannot build units during step 5 nor deploy units during step 6.
After deploying units, players begin a new game round starting with the Assignment Phase.
End of the Game
The Imperial player immediately wins the game if he conquers the Rebel base's system (e.g., there is an Imperial unit in the system and there are no Rebel units).
This is such a major setback to the Rebellion that it ensures Imperial dominance.
The Rebel player immediately wins the game if the reputation marker and time marker are in the same space of the time track. The Rebels garner enough sympathy and reputation within the galaxy to set the decline of the Empire into motion.
The most common way for the Rebels to gain reputation is from objective cards.
Objective Cards
The Rebel player begins the game with one objective card and draws one more during each Refresh Phase. The Rebel player may play an objective card from his hand if he has fulfilled the card's requirement at the specified time.
He discards the card and gains the reputation shown in the top-left corner of the card. He moves the reputation marker that number of spaces toward the time marker.
Only one objective can be played during each combat and each Refresh Phase. This objective can be fulfilled during combat, and it provides one reputation.
The Death Star
The Death Star is a terrifying unit that can destroy entire systems. To do this, the Imperials need to use their "Research and Development" mission to draw a "Superlaser Online" card from the projects deck.

When a Death Star destroys a system, place a destroyed system marker in the system and destroy all Rebel ground units there. If the Death Star destroys the system where the Rebel base is located, the Imperial player immediately wins the game.
The Death Star can be destroyed only by the "Death Star Plans" card found in the objective deck.
Additional Rules
This section contains all remaining game rules needed to play the game.
The Rebel Base
During setup, the Rebel player secretly chooses a system for his Rebel base, which starts the game hidden and can be revealed later. This section explains all rules for finding, revealing, and moving to and from the Rebel base.
While the Rebel base is hidden, the Rebel player can deploy units in the "Rebel Base" space of the game board without revealing the system in which his base is located. When an effect refers to the "Rebel Base" space, it is referring to this space of the game board and not the system where the Rebel base is hidden.
Moving To And From The Rebel Base
While the Rebel base is hidden, Rebel units can move between the "Rebel Base" space and systems adjacent to the system that contains the Rebel base. This means that moving to or from the "Rebel Base" space will identify one system that is adjacent to the base (or where the base itself is located).
A few missions allow Rebel units to move between the base and any system without revealing information.
Revealing The Rebel Base
If the Imperial player ever has loyalty or ground units in the same system as the Rebel base, the Rebel base is immediately revealed. When Imperial ground units enter the system, the base is revealed before resolving a combat.
When the base is revealed, the Rebel player flips the probe card in the "Location" space faceup and places it in the "Rebel Base" space. All units and leaders from the "Rebel Base" space are placed in the system shown on the probe card. The probe card remains faceup on the "Rebel Base" space to remind players that the base is revealed.
While the base is revealed, the resource icons in the "Rebel Base" space can still be used. However, units cannot be deployed in or moved to the "Rebel Base" space. Any units that would be placed here are instead placed in the system shown on the base's faceup probe card.
Establishing A New Base
The "Rapid Mobilization" mission card allows the Rebel player to establish a new base. To do so, he draws the top four cards from the probe deck. He may choose one of those cards to become the new base location, but cannot choose a system that has Imperial loyalty or Imperial units.
If he chooses a new base location, he reveals the old base's location and places all units from the "Rebel Base" space in the old base's system. The Rebel player will not have any units at the new base until he either moves or deploys units there.
He gives the old base's probe card to the Imperial player and places the new base's probe card facedown under the "Location" space. Then he shuffles all unchosen probe cards and places them facedown on the bottom of the probe deck.
Sabotage Markers
Some Rebel missions place a sabotage marker in a system, which means that neither player can use its resource icons to build new units, and units cannot be deployed there. Sabotage markers can be removed by some Imperial missions.

A Sabotage Marker in a System Rebel Units at the "Rebel Base" Space 12
Loyalty And Subjugation
Neither faction can win the war without support from citizens across the galaxy. Factions achieve support by convincing star systems to join their cause, which is represented in the game by loyalty. The Empire can also occupy systems, subjugating the population and compelling them to aid their galactic dominion.
Loyalty

Each populous system has loyalty, which represents whom the system's population supports: Rebel, Imperial, or neutral. A system's current loyalty is indicated by which loyalty marker is in the system. If a system does not have a loyalty marker, it is neutral.
The main way that players gain loyalty in systems is by resolving diplomacy (??) missions. The player who has loyalty in a system can use the system's resources to build new units.
When a player "gains 1 loyalty" in a system that is neutral, place his loyalty marker in that system; the system is now loyal to his faction. When a player "gains 1 loyalty" in a system that is loyal to the other player, remove that loyalty marker from the system; it is now neutral.
Each system that has an Imperial loyalty marker or subjugation marker is an Imperial system. Coruscant is always loyal to the Imperial player and cannot gain or lose loyalty.
Subjugation

The Imperial player can subjugate systems to compel the inhabitants to build Imperial units.
When there is at least one Imperial ground unit in a system that does not have Imperial loyalty, the Empire subjugates the system. Place a subjugation marker in the system's loyalty space.
If the newly subjugated system had Rebel loyalty, place the marker on top of the Rebel loyalty marker. This denotes that the inhabitants are compelled to work for the Imperials.
If at any time there are no Imperial ground units in a subjugated system, the subjugation marker is discarded and the system's loyalty returns to the Rebels (or neutral if no loyalty marker is beneath it).
The Imperial player can use a subjugated system's left-most resource icon to build new units.
The Rebel player cannot build or deploy units in a subjugated system, even if a Rebel loyalty marker is under the subjugation marker.
Attachment Rings
Some card abilities attach rings onto leaders, such as the captured leader ring.
When a ring is attached to a leader, press the leader's stand snugly into the ring.
The ring's effect is explained on the card that brought the ring into play. If a leader who already has a ring receives another ring, the previous ring is removed to make room for the new ring.
Capturing Leaders
Some abilities, such as the one found on the Imperial "Capture Rebel Operative" mission card, cause a Rebel leader to become captured. When a leader is captured, attach the captured leader ring to that leader. Captured leaders typically do not oppose missions; also, they cannot return to the leader pool and cannot be moved by the Rebel player. However, they do not prevent Rebel units from moving out of their system.
Captured leaders can be moved by the Imperial player like ground units. The Imperial player also has missions that can be attempted against captured leaders, such as interrogating a leader for information about the Rebel base. When a mission is attempted against a captured leader, that leader will oppose the mission even though it is captured.
The Imperial player has only one captured leader ring. If he captures a second leader, the first leader is rescued, and he attaches the captured leader ring to the new leader.
Rescuing Captured Leaders
If there are no Imperial units in the captured leader's system (usually after an Imperial defeat in combat), the leader is immediately rescued. Some mission cards can also rescue captured leaders.
When a captured leader is rescued, remove the ring from the leader and place the leader in the "Rebel Base" space.
Structures

The Shield Generator and Ion Cannon are special types of ground units called structures.
Structures are immobile (cannot move) and do not provide dice in combat. Instead, they provide abilities that occur during combat as explained on the Rebel faction sheet.
First Game Setup
For the first game, each player's starting units are placed as shown below. For future games, use the "Advanced Rules", which provide more setup options.

1. Remove these cards from the probe deck: Corellia, Mandalore, Saleucami, Sullust, and Mustafar.
Shuffle the deck and return it to its space on the game board.
2. Kashyyyk: 1 Rebel loyalty marker.
3. Bothawui: 1 Corellian Corvette, 1 Rebel Transport, 1 X-wing, 1 Y-wing, 3 Rebel Troopers, 1 Airspeeder, 1 Rebel loyalty marker.
4. Naboo: 1 Rebel loyalty marker.
5. "Rebel Base" Space: 1 X-wing, 1 Y-wing, 3 Rebel Troopers, 1 Airspeeder.
6 . Saleucami: 1 Star Destroyer, 2 TIE Fighters, 2 Stormtroopers, 1 AT-ST, 1 Imperial loyalty marker.
7. Mandalore: 1 Death Star, 4 TIE Fighters, 2 Stormtroopers, 1 AT-ST, 1 subjugation marker.
8. Coruscant: 1 Star Destroyer, 1 Assault Carrier, 2 TIE Fighters, 3 Stormtroopers, 1 AT-AT, 1 AT-ST.
9. Corellia: 1 Assault Carrier, 1 Stormtrooper, 1 Imperial loyalty marker.
10. Sullust: 1 Star Destroyer, 2 TIE Fighters, 2 Stormtroopers, 1 AT-ST, 1 subjugation marker.
11. Mustafar: 1 Assault Carrier, 2 TIE Fighters, 2 Stormtroopers, 1 AT-ST, 1 Imperial loyalty marker.
Continue Reading

