Components
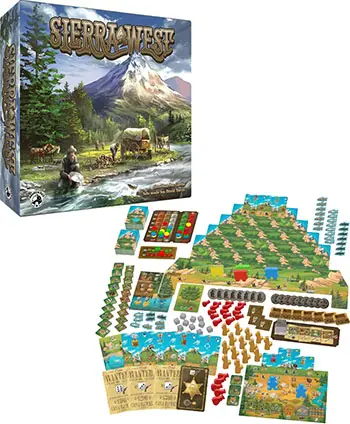
- Moutain base
- 4 Player Boards
- 2 Scoring Boards
- Cabin Market Board
- 154 Cards
- 104 Resource pieces
- 13 Figures
- 12 Homestead Markers
- 4 Wagon pieces
- 4 Canoe pieces
- 83 Tiles
- 54 Tokens
- 1 Apple Supply board
- 2 Apple Supply Markers
- 8 Aplle homestead markers
- 1 Starting player Marker
- 1 Die
- Instructions
Sierra West comes with four modes of play: Apple Hill  , Boats & Banjos
  , Gold Rush
  , Outlaws & Outposts
  . Rules pertaining to each mode will be highlighted by their appropriate background color.
For your first time playing, we suggest trying the Apple Hill mode, and skipping over the rules sections highlighted in other colors.

Autumn in the foothills is a time of plenty-the orchards are overflowing with fruit and the air is sweet with the smell of fresh apple pive. In this mode you can harvest green Granny Smith and Red Delicious apples from the rolling orchards. But since the season's apples are so bountiful, you may not be able to use all of them yourself! Thus, any apples you leave behind will be available for your fellow homesteaders to take.

Eureka! Gold has been discovered! People from near and far have caught the "gold bug" and headed to the hills to stake their claims. In this mode you can mine for gold and load it in your carts. If you ever have trouble finding nuggets among the shadows and rocks, you can use your trusty lantern-or a stick or two of dynamite to blast them out altogether!

The clear waters of the nearby river are loaded with trout, bass, and salmon-not to mention gold nuggets! But beware, there seems to be the ominous sound of banjo music coming from somewhere in the hills... In this mode you will want to paddle your canoe to the best fishing holes, pan for gold on the riverbanks, and not let those dang twangy notes stop you!

"Badges? We don't need no stinking badges-or badgers, for that matter!" Dangerous outlaws have taken a foothold in the nearby mountains. You and the other pioneers must stop them from threatening your cabins and wagons. In this mode you will need guns and ammo to capture the Most Wanted and turn them in for rewards.
Setup
The following setup procedure is used for each Sierra West mode. The general section is followed by mode-specific setup steps.
As it is strongly recommended that you play the Apple Hill mode for your first game, its special rules are interwoven with general setup in special frames. Read their contents carefully when setting up Apple Hill, and ignore them while setting up different modes.
-
Choose a mode, and find all of its mode-specific components. Leave components from other modes in the game box.

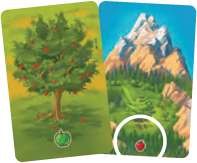
For the Apple Hill mode you will use components with an apple symbol:

The apple homestead scoring board:
The apple supply track:
The deer animal tile:

Cards marked with an apple
the top-right corner - an apple with a hat signifies a card that will go into a player deck (as described in point 4 below), with all other cards becoming a part of the mountain, as explained below.Cards marked with a red apple
 at the bottom of the card back are the special ("orchard") cards, which also become a part of the mountain.
Any cards, animals and board pieces marked with a different mode symbol should be returned to the box. Caution! Animal tiles with no mode symbol are used in every mode including this one!
-
Place the mountain base/wagon trail board in the middle of the table. Place the homestead scoring board next to it.
-
Each player places one of their homestead markers (discs in their chosen color) at the bottom of each homestead track (space "0").
For the Apple Hill mode also complete the two following steps:
-
Place the Apple Hill homestead scoring board extension next to the homestead scoring board. Each player places two additional homestead markers at the bottom of each homestead track.
-
Place the apple supply board near the general supply. Place the green marker on the leftmost space of the green Granny Smith track, an the red marker on the leftmost space of the Red Delicious track.
Note: This shows that there are no apples available at the start of the game.
-
-
Each player receives a player board and a set of 8 starting cards (each card is marked with a hat symbol of their chosen color
 ) and one copy of the mode-specific card
  .
. -
The 8 starting cards are shuffled and placed face- down as a draw deck. Then the mode-specific card is placed at the bottom of the draw deck (also face- down). Do not shuffle the mode-specific card in with other cards!
-
Each player receives a frontiersman, wagon, and two different pioneers.
-
The frontiersman is placed on the mountain base; the wagon is placed on the trailhead of the wagon trail (marked with a wagon illustration); and the two pioneers are placed on the player's board (idle in their camp area).
-
Each player places 5 animal tiles, face-down, below their player board. These should include the 4 common ones (beaver, rabbit, fox, bear), as well as the unique animal tile for the chosen mode.
For the Apple Hill mode add the deer to the face-down animals.

-
Take the six special mountain cards, and place the one marked with a campfire icon
 (if there is one) face-up on the leftmost space below the wagon trail.
If no special cards display a campfire icon, randomly draw and place the first card. Shuffle the remaining five (unless stated otherwise by the mode).
The special cards for the Apple Hill mode are marked with a red apple
on their back.Unlike some other modes, there is no special card with a campfire symbol. Simply choose one to be placed at random.
-
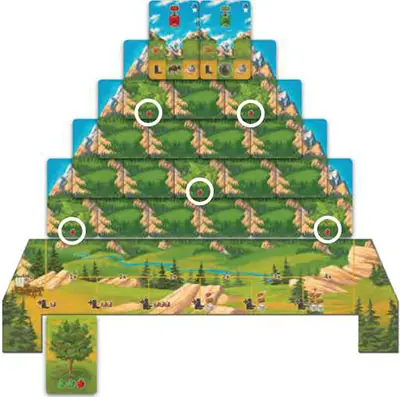
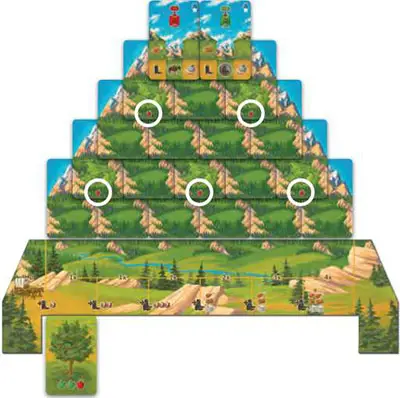
Shuffle the 15 basic mountain cards and the remaining 5 special cards, and build the mountain in one of the following patterns:
-
For a 3-4 player game:
-
For a 2 player game:
Exceptions: The special cards in Gold Rush and Outlaws & Outposts use different setups. Please refer to their mode-specific rules for instructions.
-
-
Place the cabins near the general supply, shuffle and stack them on the space shown on the left of the market board face-down, then draw 4 tiles and place them face-up on the market spaces.
-
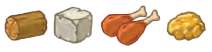
Form a general supply of all food, wood, stone, and gold pieces, along with the Pair of Boot tokens and surplus tokens.
Note: These components are not limited. Use surplus tokens to mark when you have large quantities of a piece, such as more than 5 or 10. For example, a surplus tile in your supply of wood showing "+5" means you have five more wood pieces.
-
Place the mule figure
 near the general supply.
 -
Randomly determine the starting player. Give that player the starting player marker.
Note: The starting player marker does not rotate during the game.
-
Each player draws 3 cards from their draw deck.
-
If you are not playing the Apple Hill mode, check the mode-specific setup steps below. Otherwise, the game is ready to begin!
Mode Setups
-
Shuffle the six river cards and randomly place one face-up on the leftmost space under the wagon trail.
Note: There is no river card with a campfire icon. Set up the mountain as usual otherwise.
-
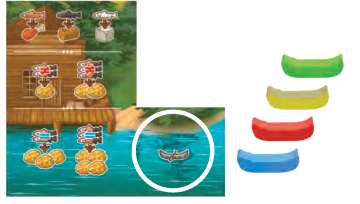
Place the Fish Market tile under the trailhead, next to the face-up river card.
-
Each player places a canoe on the Fish Market tile (in the space marked with the canoe symbol).
-
Place gold and stone on the face-up river card, as indicated on its top half. Make sure to place gold and stone pieces following the left-to-right order on the card.
-
Place the fish pieces near the general supply, adjusted for player count as follows:
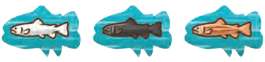
- 2-players: 6 of each color
- 3-players: 8 of each color
- 4-players: 10 of each color
-
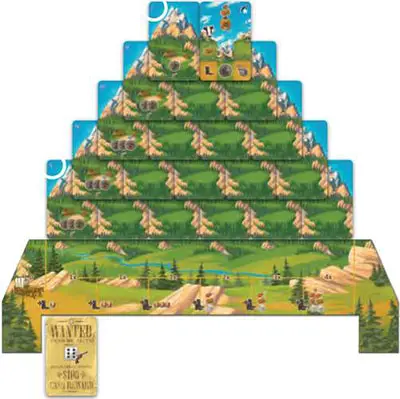
Set up the mountain as follows: shuffle the three mine cards marked "II" and place them in the three lowest spaces, normally used for special mountain cards, adjusted for player count.
Then shuffle the two marked "I" and place them in the upper spaces, normally used for special mountain cards. The special card marked with a campfire is placed face up below the mountain base. Set up the rest of the mountain as usual otherwise.
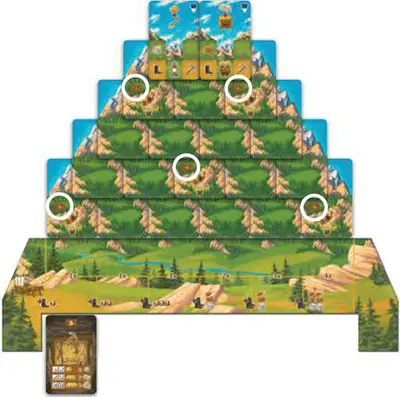
Image:Gold Rush setup example.
-
Place the dynamite and lantern cards near the general supply.
-
Place the mine cart tiles near the general supply, adjusted for player count as follows:
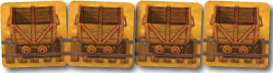
- 2-players: 8
- 3-players: 10
- 4-players: 12
-
Set up the mountain as follows:
Place an outpost card as the leftmost card in each row of the mountain, with the card marked "V" adjacent to the mountain base, then going up to "I" at the top. The special card marked with a campfire is placed face up below the mountain base.
Note: The 15 basic mountain cards are shuffled and placed in all of the remaining spaces. Only one of them will be face-up. See the setup example.
-
Place outlaw tokens on each outpost
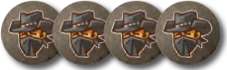
- For 2 players: place 1-2-2-2-3 outlaws (changing the last 2 to 3 outlaws)
- For 3-4 players: place 1-2-3-3-3 outlaws (top to bottom)
-
Keep the remaining outlaw tokens near the general supply.
-
Place the Sheriff card near the general supply.
-
Each player gets a set of two bullet supply cards and lays them to show no bullets.
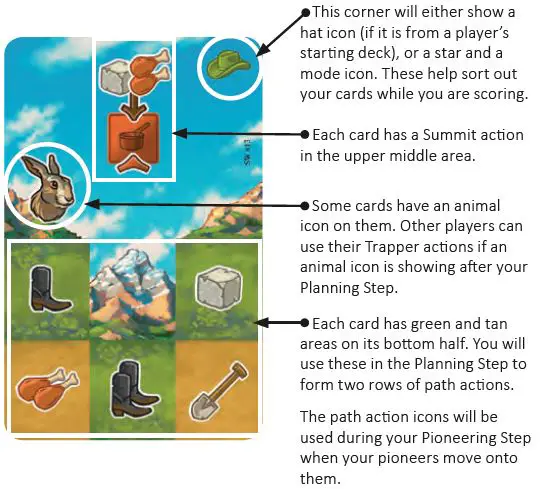
Card Anatomy
Each card you play on your turn has more than one function. The lower half is used to create paths for your pioneers to take sequential actions on, and the upper half is used like a worker-placement space: you can place a pioneer there to take the action shown. Then you leave the pioneer there until you pass.
Each card you claim from the mountain to build your deck will score you points. The star icon in the upper right is there to remind you which cards came from the mountain and which ones you started the game with.
Some cards have an animal icon on them. These icons allow other players to use their Trapper off-turn actions. All of these details will be covered in the sections below.
Game Play
Players take turns in clockwise order, performing all the steps as explained below. Once the end of the game has been signaled, the game is continued until each player has had an equal number of turns and then each player receives one final turn.
Players will then calculate their points and determine the winner.
Each active player's turn is broken into three steps:
- Planning
- Pioneering
- Passing
1. Planning Step
Tuck and overlap your three cards into your player board to create a complete panorama and two complete paths:
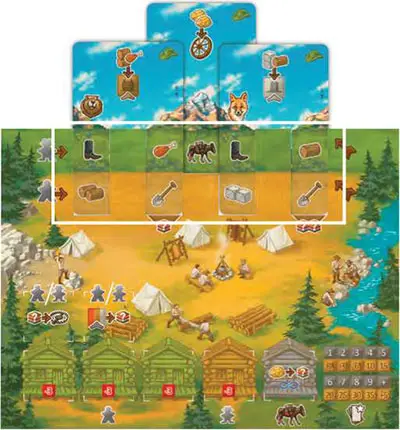 Example of placing cards into player board. |
It is mandatory to play exactly 3 cards.
Note: The first and last column of the middle card is covered by the other cards, while the middle columns of the other two cards are covered by the player board's "teeth".
Also note how the top row of icons shares a green background color, while the bottom row shares a tan background. These rows of matching icons are called paths.
Note on play styles: In casual games, the Planning Step can be performed before it is your turn as the active player. It is suggested that others do not pay attention to the information on your cards as you arrange them.
However, if this becomes a problem, we recommend using privacy screens or holding your cards in your hand until the beginning of your turn. For serious games it is best not to show your hand until the player before you has passed.
Announce to all players the animals visible on your cards (in the above example: a beaver and a fox), as it will become important for their Trapper abilities, see below.
Note: The animal printed on the middle card will never be visible. Also note that the mule is not considered an animal in the context of Trappers.
2. Pioneering Step
The Pioneering step offers players three main types of moves for their pioneers:
- Assigning to cabins
- Path actions
- Summit actions
These moves may be resolved in any order (and at least once for each of your pioneers), as long as specific rules of each type of move are minded.
As you will see below, some options become unavailable as your pioneers perform specific actions.
While there is no strict order of actions, following the order of the actions as they were listed above may help you grasp the game quicker-at least during the first few turns.
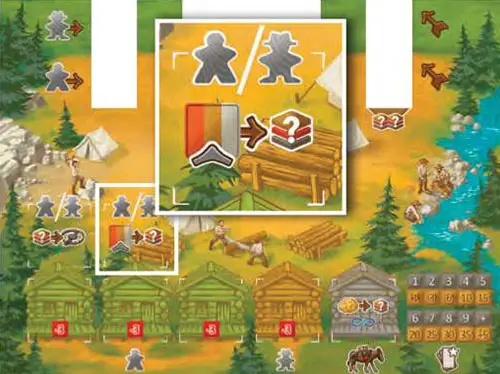
1. Assigning to Cabins
You may assign a pioneer to a cabin if it is idle in your camp area (not already assigned to a cabin or Trapper/Tracker space).
Note: A pioneer that is already on a path or a summit action may not be assigned to a cabin any longer.
When you assign a pioneer to a cabin, the cabin's abilities are immediately activated. Some cabin abilities offer a one-time use (marked with a 1x symbol), while others offer an ongoing effect (marked with an infinity symbol)-so long as your pioneer remains on the cabin.
In most cases, you will assign one pioneer to a cabin to assist the other while it moves along its path.
You may assign the tan-path pioneer  only to the three leftmost cabins. The green-path pioneer
  can only be assigned to the fourth (tan) cabin. The rightmost (grey) cabin can only be used by the mule.
Note: You can refer to your player board in order to make sure you are assigning the correct pioneer to a given cabin:
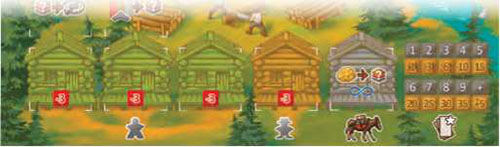 Player board with correct pioneers assigned to a given cabin. |
If a cabin tile has not yet been built in a space, you may not assign a pioneer to it.
Note: The grey cabin is considered prebuilt, and is available for the mule throughout the game. Also note that you may not build another cabin on top of it.
Assigning pioneers to cabins is optional. Once you are done with this process, proceed to path actions.
2. Path Actions
You may move a pioneer from the camp area (or a cabin/Tracker/Trapper space) to the start of its path. The green-path pioneer may only walk along the green path, while the tan-path pioneer may only walk along the tan path.
From the start of its path, a pioneer may move from left to right, taking a series of path actions. Each icon along its way is a type of path action that can be activated when your pioneer stops on it.
Note: If you do not wish to use a path action, you may skip it-unless it is a mandatory path action (marked with a red border), in which case you must perform the action, take damage, or not move the pioneer any further this turn.
Two of the actions on the tan path cost resources to use. These are called paid path actions. When your pioneer stops on one of these actions, you must either pay the cost marked below it and perform the action once, or skip it.
 Paid path actions on a player board. |
If you choose (or are forced to) to perform the action in the paid action spaces, you must pay one or two basic resources before resolving the given action.
You may perform path actions in any order you choose, so long as your pioneers continue to move from left to right. For example, you can move the tan-path pioneer several times, then move the green-path pioneer, followed by more moves with the tan-path pioneer.
In short, you may alternate between moves freely. You might even assign one pioneer to a summit action before the other completes its path.
Note: A pioneer is never allowed to move back (to the right) or switch its path-unless a special ability of a cabin explicitly allows for this rule to be bent.
3. Summit Actions
Once a pioneer has reached the end of its path (beyond all cards to the rightmost side of your player board), you may assign it to any vacant summit action. Summit actions are shown on the top half of every card in your player board.
To use a summit action, place a pioneer on the card, and then immediately perform the card's ability. Once a pioneer has been assigned to a summit action, it can no longer be moved until you pass.
Note: The mule can also be assigned and perform summit actions, following the same rules.
Each summit action may only have one pioneer/mule assigned to it. Once a figure has been assigned to a summit action, it must stay there until you pass your turn.
It is not mandatory to move a pioneer to the end of its path. You may leave a pioneer at any point and declare that it is the end of your Pioneering step - for example, to avoid a mandatory action. However, you may not move a pioneer to a summit action if it did not reach the end of its path.
Note: Only the mule can be assigned directly from your camp area (or grey cabin) to a summit action.
Passing
You may pass at any time on your turn. Once you have done so, return both of your pioneers to your camp area (and the mule, if you have it). Discard the three cards from your player board, placing them face-up on your discard pile, and then draw a hand of three new cards.
If your deck runs out of cards, shuffle your discard pile and continue drawing. If you bought one or more cabins during your turn, refill the cabin market.
As you will soon learn, other players may perform off-turn actions during your turn. For this reason, make sure that all other players have a chance to perform these before you pass.
When you are about done, simply ask if everyone has finished their possible Tracking and Trapping actions. Then you may discard your cards and so on.
Off-Turn Actions
The Tracker and Trapper spaces on your player board allow you to benefit from other players' actions during their turns.
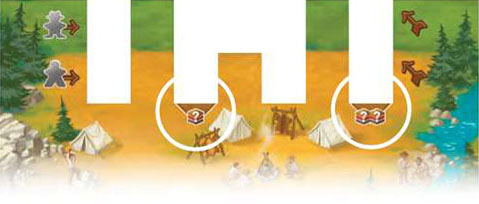
Tracker
When another player moves their marker up on a homestead track, you may immediately assign an idle pioneer from your camp area to your Tracker space.
When you do this, gain a resource from the general supply that matches the homestead track they just moved up on. For example, if you used the Tracker action after a player moved his marker up on the stone homestead track, you would gain 1 stone.
Note: In the Apple Hill mode, you cannot use the Tracker action when another player moves up on an apple homestead track.
 The Tracker space on a player board. |
You may assign either pioneer to it (but not the mule!).
Trapper
When another player begins their Pioneering Step, you may look at the cards in their player board. If there are any animal images visible, you may assign an idle pioneer from your camp area to your Trapper space.
To do this, you must spend one basic resource (food/wood/stone), and immediately flip a matching face-down animal tile from your supply face-up. For example, if you used the Trapper action after seeing a fox, you would spend one resource and flip your fox tile face up.
You may only flip one animal tile each time you use the Trapper action.
Note: You cannot re-flip an animal tile that is already face-up.
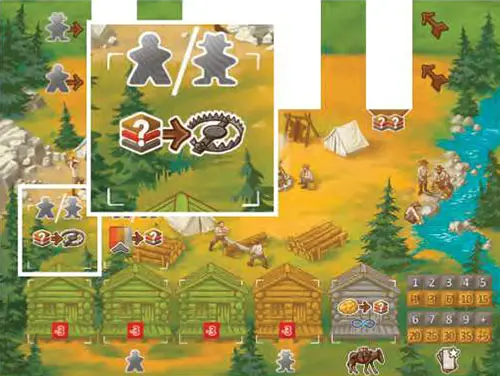 The Tracker space on a player board. |
 Example animal images: a fox, a racoon, a bear, a rabbit and a beaver. |
Caution! Only one pioneer may be moved to a Trapper space, and only one may be moved to the Tracker space. A pioneer is taken off a Trapper or Tracker space only to move to its path.
This means a pioneer tracking or trapping may not be placed on a cabin during its player's next turn.
Additional Rules
Resources
Food, wood, and stone are considered "basic" resources, whereas gold and other mode-specific resources are not. Many actions and abilities require either a specific or "any basic resource" to be spent (see the wild icon below). Spent resources are returned the general supply.
Some actions have a "wild" icon  which lets you choose which of the three basic resources you would like to spend.
Leftover gold in your supply is worth 1 point at the end of the game.
Note: You may not spend gold or mode-specific resources as wild.
Note: Leftover basic resources are not worth any points.
Apple Hill mode introduces a mode-specific resource: apples. Apples are communal resources: any player may gain or spend them, regardless of who gained them last.
When you gain them, you increase the value of the respective apple supply track (to the maximum of 6 per kind).
When you spend apples, you decrease the value of the respective track.
Note: Apples (like all mode-specific resources) are not considered "basic resources" and can never be spent in place of food, wood, or stone.
Boots and Movement
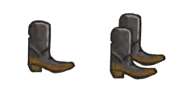
Boots  are a resource that must be used immediately when they are gained, otherwise, they are lost (except for Pair of Boots tokens, which can be saved).
Note: Boots can be summed and split between different costs and movements-see below.
Boot path actions can only be spent while there is a pioneer standing on that icon. Some icons show 1 boot, while others show 2 boots. Any excess, unused boots are lost once a pioneer leaves that space.
Pair of Boots tokens can be spent to use as 1-2 boots on your turn. Unused Pair of Boot tokens are worth 1 point at the end of the game.
Moving your wagon on the wagon trail
You may move your wagon on the wagon trail if you can afford to spend the boots and required resources to do so. The cost of each move is indicated on the right of your wagon's current position. When you pay to move your wagon, move it one space to the right.
Note: You may not move your wagon to the left except to "take damage"-see the Taking Damage rules below.
Your Wagon's Position
Your wagon's position is a very important element of the game. Your wagon allows you to interact with the special cards below it and to the left of it. These cards are referred to as "along your trail".
Each mode introduces unique rules regarding them. In addition, your wagon's position at the end of the game is the multiplier for all of your markers on the homestead scoring board.
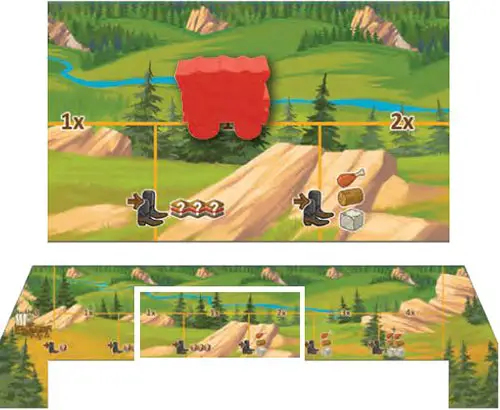 Example of "Along Your Trail" |
In Apple Hill mode the orchard cards available show a number of red and green apples. These apples are harvested by using a mode-specific action.
For this and other mode-specific rules, simply keep reading beyond End of Game and Scoring section until you finish the Apple Hill rules. Then you will be ready to play your first game!
Moving your frontiersman on the mountain
You may move your frontiersman on the mountain if you spend boots. For each boot spent, you may move your frontiersman to an adjacent card.
Note: The mountain base is considered to be adjacent to all cards touching it on the bottom row. It costs 1 boot to move on/off the mountain base.
Note: Frontiersmen can never move onto the wagon trail or the row of special cards below it.
More than one one frontiersman can be on the same card. It does not matter if the card is face-up or face-down or a special card that has a different back from the rest.
Claiming a Mountain Card
You may claim a card from the mountain to "build your deck" during your Pioneering Step. This will allow you to keep this card and use it on future turns, like the rest of the cards in your deck. It will also score points at the end of the game (see Scoring below).
Your frontiersman must be on a face-up card in order to claim it. Then you must complete the following:
-
Activate a Use Shovel
 paid path action (see Common Path Actions below).
 -
Move your frontiersman directly to the mountain base. If any other players' frontiersmen were also on the card, they also move their figures back to the mountain base, and receive a Pair of Boots token in compensation.
-
Take the card that your frontiersman was on, and place it either on top of your draw deck (face-down) or on top of your discard pile (face-up).
-
After removing a card from the mountain, one or two face-down cards may become uncovered-meaning that there are no more cards layered on top of them.
Flip these cards face-up in their respective places. If any other players' frontiersmen were on these cards, their figures are replaced on the now-face-up cards, remaining in their respective places. The players do not receive a Pair of Boots token for this.
Exception: If a card turned face-up is a special card, add it to the next empty space in the row below the wagon trail.
If any other players' frontiersmen were on the card, they move their figures back to the mountain base, and receive a Pair of Boots token in compensation.
The Mule
If you have or receive the mule, you may assign it to the grey cabin, or to a summit action. You could also assign it to the grey cabin first, then to a summit action later on your same turn.
The mule is never allowed to use a Tracker or Trapper action.
Cabin Market
You may build a cabin tile from the cabin market board and add it to your player board during your Pioneering Step. Cabins have special rule-bending abilities, and prevent you from losing points at the end of the game (see Cabins and Scoring below).
-
Activate a Use Shovel paid path action (see Common Path Actions below).
-
Choose one of the four face-up cabin tiles available.
-
Pay any additional cost printed below the cabin.
-
Place the cabin on a vacant cabin space on your player board that matches the cabin's color (green or tan).
Note: You cannot build-over a cabin or remove a cabin once it has been added to your player board; and you cannot have two of the same cabins.
-
If the cabin tile you took from the market board was not the rightmost tile of the four, remove the rightmost cabin and place it in a discard pile. This space is marked in red.
-
Slide each of the remaining cabin tiles to fill in the rightmost spaces on the cabin market board.
-
Draw new cabin tiles to fill the empty spaces.
Note: If there are not enough cabin tiles in the draw pile to refill the spaces, shuffle the tiles from the discard pile and create a new draw pile. Then continue to refill each space.
The cabin market is refilled immediately after you build one; therefore it is possible that you may build a second cabin on the same turn by repeating this process with another Use Shovel action.
Taking Damage
If you skip a mandatory path action with a pioneer, you must take damage. When you take damage you must choose between these two options:
- Remove a cabin from your player board (returning it to the box).
- Move your wagon backwards one space on the wagon trail (to the left, toward the trailhead).
Note: If you have no cabins on your player board and if your wagon is on the trailhead, ignore taking damage.
Explanation of Common Abilities
Common Path Actions
Some actions have a red border. These are mandatory path actions. You may not advance your pioneer further to the right until you resolve them.
-
Gain Resources
Gain the type and number of basic resources or gold shown on the icon.
-
Use Boots
Allows you to spend the shown (1 or 2) number of boots for moving your frontiersman and/or wagon.
Note: Gaining two boots is not the same as gaining a Pair of Boots token.
-
Use Shovel

When you gain a shovel you may choose one of two options:
-
You may claim a card from the mountain. You may only do this, if your frontiersman is on a face-up card. Then follow these steps:
-
Move your frontiersman directly to the mountain base. If any other players' frontiersmen were also on the card, they also move their figures back to the mountain base, and receive a Pair of Boots token in compensation.
-
Take the card that your frontiersman was on, and place it either on top of your draw deck (face-down) or on top of your discard pile (face-up).
-
After removing a card from the mountain, one or two face-down cards may become uncovered - meaning that there are no more cards layered on top of them.
Flip these cards face-up in their respective places. If any other players' frontiersmen were on these cards, their figures are replaced on the now-face-up cards, remaining in their respective places. Note: The players do not receive a Pair of Boots token for this.
Exception: If a card turned face-up is a special card, add it to the next empty space in the row below the wagon trail.
If any other players' frontiersmen were on the card, they move their figures back to the mountain base, and receive a Pair of Boots token in compensation.
-
-
You may build a cabin from the cabin market by following these steps:
-
Choose one of the four face-up cabin tiles available.
-
Pay any additional cost printed below the cabin.
-
Place the cabin on a vacant cabin space on your player board that matches the cabin's color (green or tan). Note: You cannot build-over a cabin or remove a cabin once it has been added to your player board; and you cannot have two of the same cabins.
-
If the cabin tile you took from the market board was not the rightmost tile of the four, remove the rightmost cabin and place it in a discard pile. Note: This space is marked in red.
-
Slide each of the remaining cabin tiles to fill in the rightmost spaces on the cabin market board.
-
Draw new cabin tiles to fill the empty spaces.
Note: If there are not enough cabin tiles in the draw pile to refill the spaces, shuffle the tiles from the discard pile and create a new draw pile. Then continue to refill each space.
-
-
-
Gain The Mule
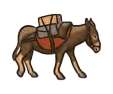
Immediately gain the mule, taking it from another player if necessary. You may immediately place the newly gained mule on the grey cabin and/or a summit action, as if you had it from the beginning of your turn.
Note: If you already have the mule, this action has no effect.
-
Fur Trade
Gain the effect shown on all of your face-up animal tiles.
- Fox: Gain 1 stone.
- Beaver: Gain 1 wood.
- Rabbit: Gain 1 food.
- Bear: Gain 1 gold.
Deer: Increase the value of Granny Smith and Red Delicious by one each on the apple supply board. Note: This is mandatory.
Racoon: Gain 1 fish of any color you choose (if available).
Marmot: Either take the dynamite or lantern card.
Badger: Either take the Sheriff card or gain 2 bullets.
Note: Animal tiles that are face-up are not "spent" or turned face-down when you use this action; therefore you can use them again with future Fur Trade actions.
-
Bear Hazard

This is a mandatory paid path action that does nothing when resolved. You must either pay the resource cost below it on your player board, take damage, or not move your pioneer any further on this path.
-
Gain a Pair of Boots
Gain a Pair of Boots token.
Common Summit Actions
Some summit actions have the symbol beneath them. That means you may perform the effect any number of times upon placing a pioneer/mule on this summit action.
Summit actions without the  symbol can only be performed once per activation!
Homestead

Spend the indicated resources to move your marker up on the homestead track shown. If the track indicator is multi-colored, choose one of the three tracks to move up on.
-
Whenever moving up on a homestead track, gain a reward:
_
Food track: Perform the Gain the Mule action.
Wood track: Gain a Pair of Boots token.
Stone track: Gain 1 gold.
-
If your marker cannot move up anymore on a given track, leave it where it is and gain the reward.
-
Once a player has reached the top of the track (the locked "5x" space), no other players may reach that space - they are capped at the "4x" space below.
In the Boats & Banjos mode some cards show specific colored fish instead of basic resources, but otherwise the action works the same.
In the Outlaws & Outposts mode some cards show bullets besides resources, but otherwise the action works the same.
Advance Wagon
Spend the resources shown above the arrow to advance your wagon one space to the right, ignoring the printed cost on the wagon trail.
End of the Game
The game end is triggered when the sixth special card is added below the wagon trail. The round continues until each player has played an equal number of turns, and then each player plays one final turn. Once that is complete, score as follows:
-
Score points for the number of cards claimed from the mountain. These cards can be easily distinguished and removed from your deck and discard pile by looking for the star icons
 in their upper right corners.
Gain points for these cards according to the chart below (which is also printed on your player board):

-
Lose 3 points per face-down animal tile you have.
-
Lose 3 points per empty cabin space on your player board.
-
Gain 1 point per leftover gold in your supply.
-
Gain 1 point per leftover Pair of Boots token in your supply.
-
Multiply each of your homestead markers' positions by your wagon's position. For example, if your wagon is at the "3x" position, and your food homestead marker is on the "4" space, multiply 3 x 4 and gain 12 points. Repeat this process for your wood and stone homestead markers.
-
Score any additional points from the mode's rules.
Variant: Advanced Planning
For expert players who want more control and planning, each player always draws 4 cards instead of 3.
In each Planning step, select 3 cards to play, and then either place the remaining card face-down on top of your draw deck, or place it face-up on your discard pile.
This variant is... not recommended for the faint of heart!
Beware, playing with a hand of four explodes the number of options each turn-so expecta more downtime and a less streamlined flow.
Why did we include this at all?
Sierra West was from the start meant to be played with three cards in hand, but we know some of you would try playing with a larger hand anyway. Hence the strong warning...
Continue Reading
