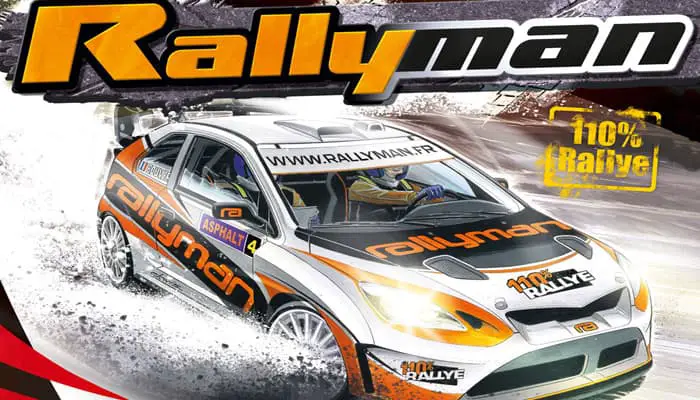
Rallyman is a board game for 1 to 4 players, in which each player takes on the role of a rally driver, racing to reach the end of each stage as quickly as possible. Whenever a die is rolled and a symbol appears, you increase the risk of losing control of your Micro Rally Car (MRC).
Before a real rally, the crew performs reconnaissance of the route. The co-driver takes notes about the course which will be given to the driver during the race. In Rally- man, these notes are marked on the road and correspond to the recommended gear to make the best use of every corner, shortcut and bump.
Depending on his or her driving, the driver will collect cards with timings ranging from 10 to 50 seconds each turn. The accumulation of these cards will determine the total race time at the end of each course, which is known as a special stage.
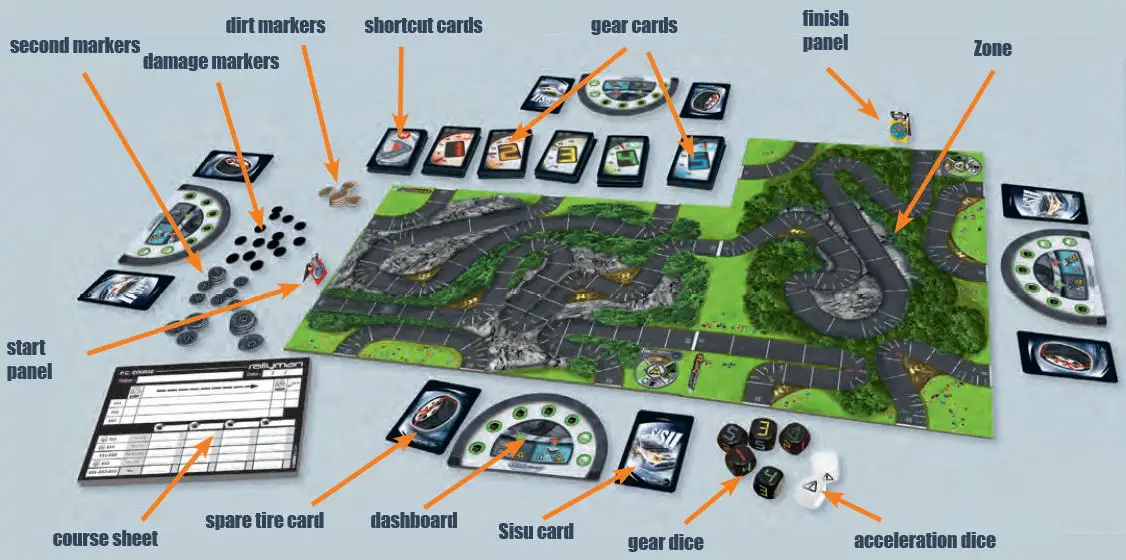
Components
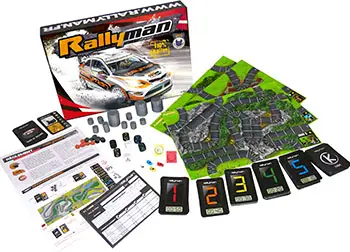
- 4 x Micro Rally Car
- 4 x dashboard
- 7 plastic dice
- 165 Cards
- 4 sided trays:
- 132 cardboard tokens
- 18 damage token
- 1 x 50 sheet marking block
- Rulebook
Object of the Game
The winner is the player who completes a set of 3 rally special stages in the shortest total combined time.
Organization of a Rally
Before starting the rally, one player is designated the race director. He will be responsible for organizing the rally which will be played over 3 timed stages called special stages ("specials", or "SS"). The routes of each special may be determined together by the drivers at the start of the rally, or by the race director beforehand.
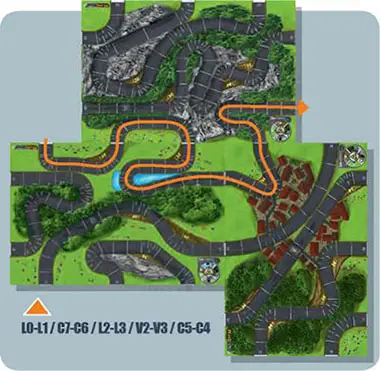
Each special contains a disctinct start and finish point, between which the MRC will be timed (it is not a race on a closed circuit). The specials are determined by combining 1, 2, 3 or 4 game boards, called ZONES (C, J, L, V), and then choosing one of the several possible routes as illustrated in the following examples:
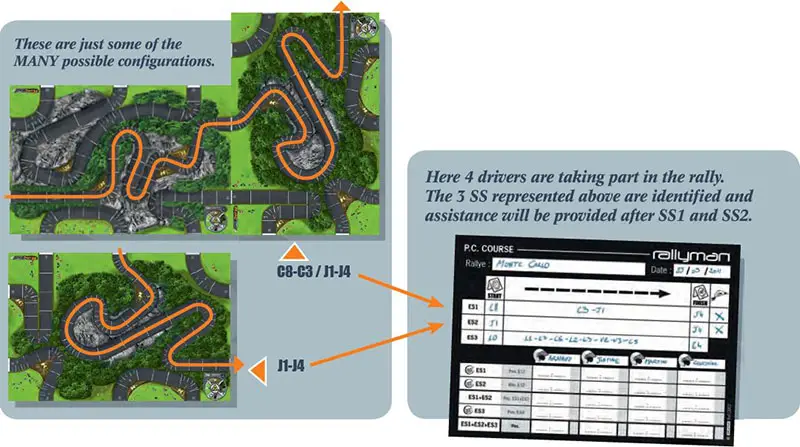
The race director takes a COURSE SHEET and:
Writes the name and date of the rally, and the names of the drivers participating (next to each helmet);
Describes the routes of the 3 specials, indicating the start, junction and finish points for each special;
Puts a cross in the column to indicate whether there will be assistance at the end of the special. Assistance is a period between two specials that is reserved for the repair of cars that have suffered damage or flat tires. It is advisable for novice drivers to have an assistance period at the end of each special.
Setup
The race director prepares the first stage by setting up the zones used for that stage and placing the start panel and finish panel on the board (cut these panels out of the provided card).
Each driver is given a dashboard, a sisu card, and a spare tire card. Each driver then chooses which tires to equip by flipping his dashboard to the appropriate side.
Starting
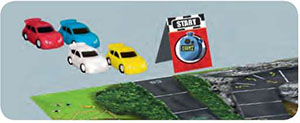
The starting line is formed by the edge of the board. It is marked by the red starting panel displaying a chronometer.
Determine the starting order
The order of departure of the 1st SS is decided by the drivers at the beginning of the game.
The starting order of the 2nd SS is determined by the standings (based on time) at the end of the SS1. The player with the shortest time starts first, followed by the player with the next shortest time, and so on.
The starting order of the 3rd SS is determined by adding up the times from SS1 and SS2. Once again, players start the stage in order of their times, beginning with the shortest time.
Starting Procedure
In a real rally, starting times are spaced out one or two minutes apart to give drivers the benefit of an open road without being obstructed by other drivers.
To simulate this departure against the clock, the drivers A, B, C, and D play the first few turns like this:
- Turn 1: player A
- Turn 2: player A, player B
- Turn 3: player A, player B, player C
- Turn 4: player A, player B, player C, player D Once all drivers have started the special stage, each player takes their turn one at a time.
The order of play each round is the same as the order of the cars on the road.
If one car overtakes another, then the player order will change next round. If more than one car is in the same space, the car with the highest engaged gear plays first, or in case of a tie, the car that arrived first in that space.
Driving the Micro Rally Car
To advance the car along the road, the driver uses the dice. The 5 black dice (gear dice) correspond to the 5 gears of the MRC. The 2 white dice (acceleration dice) move the car along using the last engaged gear.
Base Rule: Roll 1 Die = Advance 1 Space regardless of the die rolled or its result.
On a player's turn, the driver performs the following 3 phases to move the Micro Rally Car (MRC):
Phase 1 : Choose a gear to engage, and roll the first die
If the driver is starting the special stage, or if he is restarting after a loss of control, he must roll the 1st gear die.
If the driver is already underway in the special stage, he may roll a die that is either one gear above, one gear below, or is the same as the gear used at the end of the previous turn (see the last gear card taken). He may also maintain the current gear by rolling an acceleration die. In any case, move the MRC 1 space ahead for the rolling the die.
Phase 2 : Chaining gears, roll the other dice
To perform a chain of gear changes, roll the dice one by one, moving the car forward 1 space after each roll, while respecting the following 4 rules:
Each die can only be rolled once per turn. When a die is rolled, put it aside but leave it visible to show any
 rolled.
Continuing from the gear chosen in PHASE 1, gears are chained in sequential order by rolling the dice one by one. The acceleration dice (white dice) may be rolled at any time: at the beginning, interspersed, or at the end.
Respect the notes indicated in the corners, bumps, and shortcuts.
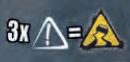
The accumulation of 3
symbols in the same turn results in a loss of control  of the car and the end of the driver's turn.
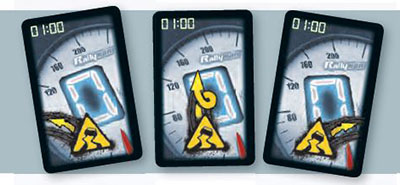
Phase 3 : End of turn, draw a GEAR CARD
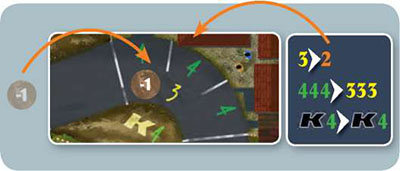
When the driver decides to end his turn (for not having more available dice, to avoid a loss of control, or simply by choice), he takes the gear card that corresponds to the last gear die rolled and puts it on the top of his stack of cards - the chrono pile - which is formed in front of the driver.
The big colored number should be visible: it reminds the driver of his current gear. The digital timer at the top of the card is a chronometer which indicates how much time the turn took. These times will be added together at the end of the SS.
Time Attack
(It is possible to play without this rule)
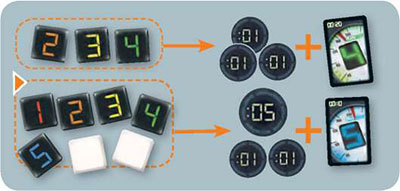
This technique allows the driver to take risks and collect second markers. It is done by selecting all of the dice the driver wishes to use for his turn (minimum of 2 dice), and rolling them simultaneously instead of one by one.
The driver then arranges these dice in the order he wishes to use them (while respecting the normal rules of chaining gears), and moves his car 1 space along the track per rolled die.
The driver then takes as many seconds  as the number of dice he rolled. These second markers will be deducted from his total time at the end of the SS, or they can be used on future turns to avoid the risk of rolling a symbol.
On any given turn, a driver may choose to use the basic technique or time attack, but may not combine the two techniques on a single turn.
-
When using time attack, if less than 3
appear on the rolled dice, the move is completed in its entirety. Just like the basic technique, a GEAR CARD is drawn at the end of the turn which corresponds to the last engaged gear. -
If at least 3
appear, the driver may still arrange the dice in the order he wishes to use them, again while respecting the rules for chaining gears. When the car enters the space that corresponds to the 3rd symbol, a loss of control will occur.In this case it is possible that some dice will not be used for movement. Even though the driver will lose control of his car, he still takes a number of second markers equal to the total number of dice he rolled as a reward for his risk-taking.
Note 1: It is forbidden to roll more dice than the number of spaces necessary to reach the finish line, or to roll dice that you would not legally be able to use (due to damage, punctures, snow tires on asphalt, etc).
Note 2: In the event that a puncture (ART.9) causes the driver to lose an acceleration die, the driver may choose to give up a die with a symbol. In this case, the does not count toward a loss of control.
Note 3: Unless a loss of control occurs, a driver must use all dice that were rolled.
Spending Second Markers
(It is possible to play without this rule)
The second markers earned on a special stage from using the time attack technique can be spent on future turns during that same special to ensure safe dice rolls. This can be helpful if 2 have appeared on the dice in a turn and the driver is afraid of rolling a 3rd.
When using the basic driving technique, and before rolling a die, the driver may take a second marker from his personal stash and place it together with the die on the table.
This prevents the die from being rolled at all and ensures safe movement along the track (it cannot cancel a after rolling it). A driver may spend several seconds during the same turn as follows:
1 second marker for the first die, +2 markers for the second die, +3 markers for the third, etc. (thus 6 second markers for 3 dice).
Note: It is not possible to spend second markers while using the time attack technique.
Loss Of Control - Sisu Cards
A loss of control occurs when:
3
symbols are accumulated on the rolled dice within the same turn, or 2 when using asphalt tires on snow.On a corner, the gear used is 1 or 2 gears above the printed note.
On a bump, the gear used is 1 gear above the note indicated on the bump and the
symbol appears on the rolled die, or if the gear used is 2 gears above the note.
In the event of a loss of control:
Move the car into the space that corresponds to where the loss of control took place.
Take a GEAR CARD that matches the current gear, turn it over and place it on top of the driver's chrono pile, then perform the event indicated on the card.
 Spin Out
The car spins out, but stays on the road. Keep the car in the current space or shortcut, but turn the car around to face the opposite direction. If the car is in the skidding trajectory of a corner, place the car facing the opposite direction on the inside trajectory. The car takes no damage for spinning out.
 Or
Or  Off The Road
Move the car off the road to the left or right side, according to the arrow shown on the GEAR CARD, to just beside the space where the loss of control occured.
When going off the road, the amount of damage the car receives is determined by the type of terrain the car enters into.
Resuming play the next turn after a loss of control.
Reposition the car on the road space where the loss of control took place (or turn the car to face the proper direction in case of a spin), and begin the turn using the 1st gear die (the last gear engaged, visible on the chrono pile, is 0 - neutral).
Specific Cases:
If the car was on the road and the loss of control pushes the car off the road into a shortcut space, draw a shortcut card and apply the effects. The driver will begin his next turn from the shortcut space.
If the car was on a shortcut space and the loss of control pushes the car off in the direction
of the road, position the car on the inside trajectory of the corner and start the next turn from that space.
If the loss control occurs while crossing the finish line.
Sisu Card
"Sisu" is a Finnish word to describe the fighting spirit of a Finnish driver. Each player has a Sisu card he may play once per game to cancel a loss of control.
After rolling the dice, a player may discard his Sisu card to cancel all symbols rolled that turn.
The Sisu card cannot be used to cancel a loss of control caused by approaching a turn too quickly, or when hitting a bump 2 gears higher than the note.
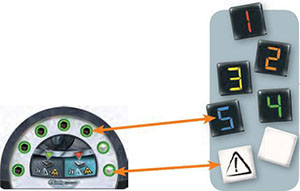
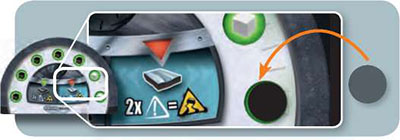
Damage
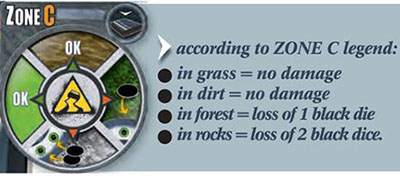
If a loss of control forces a driver's car off the road, the amount of damage the car receives will be determined by the type of terrain the car enters into. The legend printed on each ZONE board indicates how many points of damage each terrain type inflicts.
Each point of damage a car suffers will result in the loss of a black gear dice.
To track the damage a car has suffered, place damage markers  on the dashboard, covering a number of black dice symbols
  equal to the number of black dice that have been lost.
Losing 1 black die means that only 4 gear dice and 2 acceleration dicE may be used in a given turn. It does not mean the loss of a specific gear die. For example, in one turn a driver may use the 1st gear die, 2nd gear die, 3rd gear die, and 4th gear die, and in the next turn use the 5th gear die, 4th gear die, 3rd gear die and 2nd gear die.
All damage will be repaired during the next assisstance period.
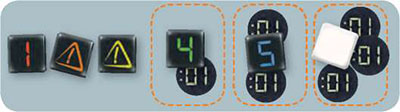
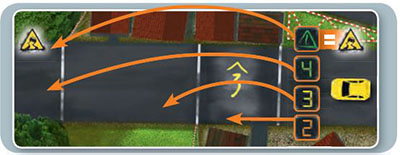
Corners
There are three ways to navigate a turn:
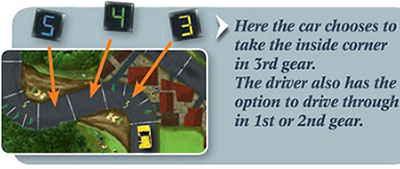
Inside Trajectory
Indicated by the note (number) written on the road on the inside of a corner.
This note specifies the maximum gear that can be used on this space. Place the car on top of the note in the direction of movement. A car may also drive through the inside trajectory space in a gear that is lower than the printed note.
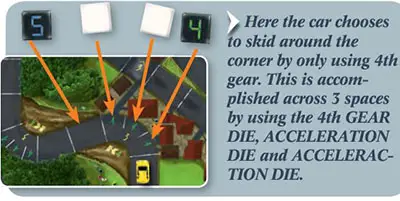
Skidding Trajectory
Indicated by the notes (numbers) written on the outside edge of a corner.
These notes specify the exact gear a car must be in to skid or drift around the outside edge of the corner. A lower gear will instead put the car on the inside trajectory, and a higher gear will result in a loss of control. While skidding, place the car sideways in the spaces between the white half-lines.
After the 1st or 2nd skidding space, the car may move into the inside trajectory by shifting to a lower gear.
By The Shortcut

If a corner has a shortcut, it is indicated by the dirt space on the inside of the corner and marked with a  followed by a note.
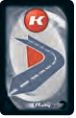
This note specifies the maximum gear that can be used on this space without losing control. Place the car in the brown dirt space in the direction of movement. The driver then draws one shortcut card "K", applies its effect immediately, then discards the card.

 Good shortcut.
No consequences.
 Dirty corner.
The car kicks up dirt over the road. Place a DIRT MARKER -M on the corner. The notes written on the road section of this corner are now decreased by 1 for all subsequent drivers. The note on the shortcut space, however, remains unchanged.
If a second dirty corner card is drawn by another driver traversing this shortcut, the notes on the corner will decrease by 1 yet again.
 Flat tire:

Punctured tire! This results in the loss of an acceleration die. Place a damage marker over a white die symbol  on the dashboard to indicate the lost die.
In the case of 1 flat tire: the driver can only use a single acceleration die.
In the case of 2 flat tires: the driver cannot use any acceleration dice.
If the car receives a 3rd flat tire, and neither of the previous 2 have been repaired, then that driver is knocked out of the rally.
When receiving a flat tire, the driver must immediately remove a white die that has not been rolled (or in the case of time attack, has not been used for movement).
A flat tire does not affect the dice already used this turn, including the die that moved the car into the shortcut space, but will affect all subsequent turns.
a flat tire persists until it is repaired either during an assistance period (see art.14) or by using a spare tire card.
If a car enters a corner in a gear that is 1 or 2 gears above the highest note in the corner, there is an immediate loss of control (see ART.7). If the car is more than 2 gears above the highest note, the driver is knocked out of the rally.
Spare Tire
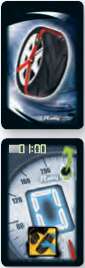
The spare tire card allows drivers to change a flat tire during a special stage. This can only be done at the beginning of a turn, and only if the car is in 1st gear or neutral (gear 0).
At the start of the driver's turn, flip the Spare tire card over (so it's showing the chronometer and gear 0) and place it on top of the chrono pile. Then remove one damage marker that's covering a white die symbol on the dashboard. He may then continue his turn starting with the 1st gear die.
The spare tire card can also be played between 2 specials if there is no assistance period. In this case, the card is discarded (instead of being placed on the chrono pile). However, it will no longer be available for the next special stage.
Note: A new spare tire card can only be gained during an assistance period (maximum 1).
Bumps
A bump is indicated by a note that's written underneath a  symbol. There are 3 ways to approach these:
Reduced speed: When entering a bump space in a gear lower than the note, the car simply moves 1 space as usual (into the bump space).
Recommended speed: When entering a bump space with a gear equal to the note, the car jumps ahead to the next space past the bump (2 total spaces).
Excessive speed: When entering a bump space in a gear that's 1 higher than the note, the car jumps to the second space ahead of the bump (total of 3 spaces). If the
symbol appears on the die just rolled, then there is a loss of control in that space.
When entering a bump space in a gear that's 2 gears higher than the note, the car jumps to the third space ahead of the bump (for a total of 4 spaces), but there will be an immediate loss of control.
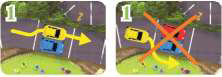
Overtaking
Overtaking can only be done in 4 situations:
-
In a straight, if there is enough room to pass by the opponents' cars on the road.
-
Through a shortcut if the opponent is on the corner (inside trajectory or skidding).

-
Through a corner if the opponent is on the shortcut.
-
If the opponent is off the road. However, an opponent that is turned around on a corner space still blocks the road.
Multiple cars can be in the same space, provided it's long and wide enough to accomodate them.
If a driver is unable to overtake a car, he must end his turn. In the rare event that a driver begins his turn and it is impossible to move forward, draw a gear card that corresponds to their current gear, and pass play to the next player.
End of the Game
The finish line is defined by the edge of the board. It is marked by the yellow finish panel (cut out from the provided card). To finish the special stage, it is necessary to cross over the edge of the board.
After finishing the special stage, each driver adds up the times of all their accumulated gear cards, then subtracts any second markers he has remaining.
Stage time = chrono pile time - number of seconds
The total stage time, converted into minutes and seconds (0:00), is recorded by the race director in the course sheet. The driver who achieved the fastest time wins that special stage.
If a driver loses control of his car as he crosses the finish line, the special stage is still considered completed. The driver takes a gear card which corresponds to the gear engaged when crossing the finish line and adds it to his chrono pile without turning it over. He then coveres a black die symbol with a damage marker . If there is no assistance period before the next special, this damage will remain.
When starting the next SS, starting order goes from the driver with the shortest combined time from all completed stages to the driver with the longest combined time. If this was the 3rd and final SS, the driver with the shortest combined time is the winner of the rally!
Assistance
It is recommended for novice drivers to include an assistance period at the end of each special stage. This is indicated on the course sheet by an X written in the  column. Each assistance period allows drivers to fully repair their cars. This includes the following:
Remove all damage markers
from the dashboard, uncovering all & symbols.Take a new Spare tire card if a driver already used their previous one (each driver can only carry a maximum of 1 spare tire card at a time).
Change the type of tires on the car, if desired.
Weather Conditions and Tire Choice
(It is possible to play without this rule)
The reverse side of each zone board is covered in snow. Therefore, it is possible to hold a rally that is either completely on snow or with mixed weather conditions. Weather can be determined in two ways:
Fixed Weather:
The players choose which zones to be covered in snow at the start of the rally.
Variable Weather:
The road conditions are not known before the rally when the race director fills in the course sheet. Instead, the road conditions are determined at the beginning of each special stage.
To do so, the race director rolls as many black dice as there are zones: Use the 1st gear die for the 1st zone, the 2nd gear die for the 2nd zone, etc. Whenever the symbol appears on a GEAR DIE, the corresponding ZONE will be under snow.
Tire Choice.
At the beginning of the first special stage, and during each assistance period, each driver chooses which type of tires they would like to equip (after weather conditions have been determined).
To indicate their tire choice, drivers flip their dash- board to the appropriate side (showing either asphalt or snow tires). If there is no assistance period between two special stages, drivers must keep the same tires from the previous special stage.
Split Times
(optional rule)
At the beginning of a special stage, the race director may choose to set up one or more checkpoints along the route by marking the desired spaces with a black marker .
Whenever a driver enters this space, he calculates his current total time by adding up all the cards in his chrono pile and subtracting any second markers. This time is then recorded and made public for all drivers.
This information allows each driver to determine their current standing, and might influence them to adjust their driving style.
Shakedown
(optional rule)
This game mode serves as a training mode, and allows players to improve their handling of the Micro Rally Car. Play as you would normally, but disregard all symbols and punctures.
Continue Reading
