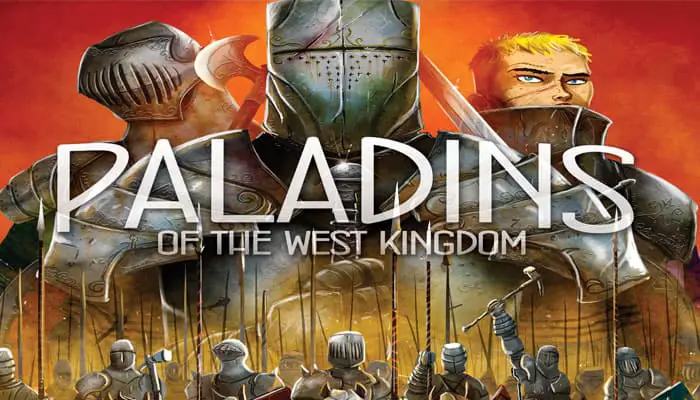
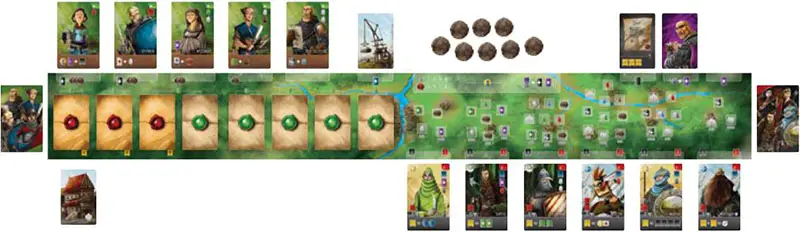
Paladins of the West Kingdom is set at a turbulent time of West Francia's story, circa 900 AD. Despite recent efforts to develop the city, outlying townships are still under threat from outsiders.
Saracens scout the borders, while Vikings plunder wealth and livestock. Even the Byzantines from the east have shown their darker side. As noble men and women, players must gather workers from the city to defend against enemies, build fortifications and spread the faith throughout the land.
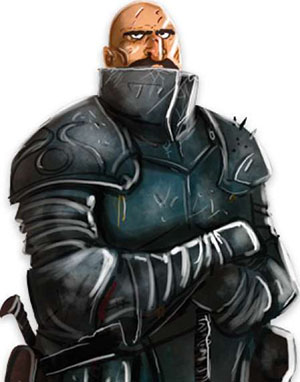
Fortunately, you are not alone. In his great wisdom, the King has sent his finest knights to help aid in our efforts. So ready the horses and sharpen the swords. The Paladins are approaching.
Components
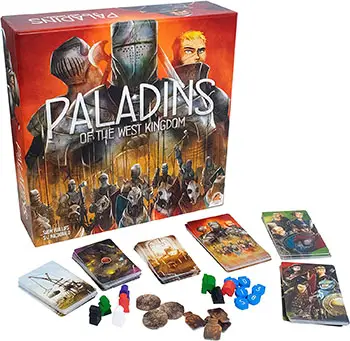
- 22 Laborers
- 18 Fighters
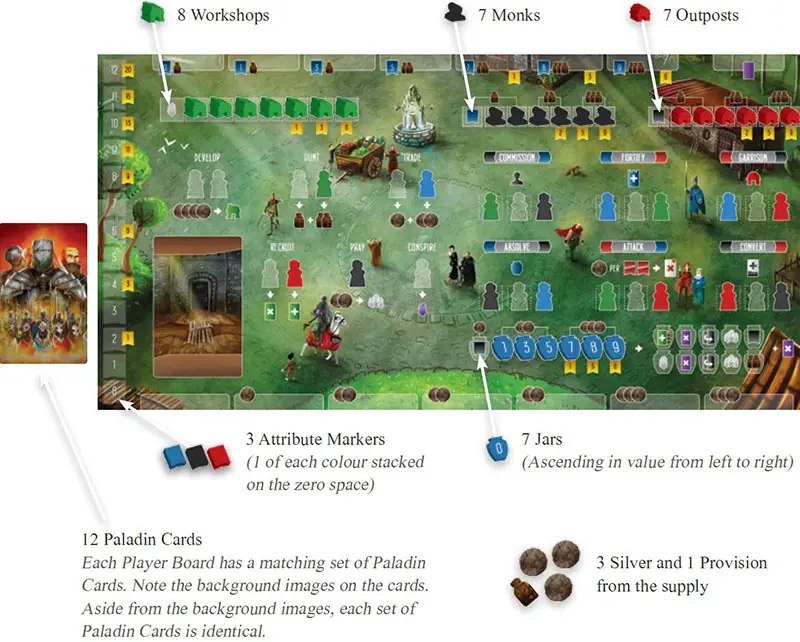
- 32 Workshops
- 28 Outposts
- 18 Scouts
- 18 Clerics
- 28 Monks
- 28 Jars
- 18 Merchants
- 18 Criminals
- 12 Attribute Markers
- 48 Paladin Cards
- 32 Townsfolk Cards
- 36 Outsider Cards
- 16 King's Cards
- 24 Debt Cards
- 24 Suspicion Cards
- 24 Tavern Cards
- 24 Wall Cards
- 17 Scheme Cards
- 50 Silver
- 40 Provisions
- 1 Start Player Marker
- 1 Resource Marker
Object of the Game
The aim of Paladins of the West Kingdom is to be the player with the most victory points (VP) at the game's end. Points are gained by building Outposts and Fortifications, Commissioning Monks and confronting Outsiders.
Each Round, players will enlist the help of a specific Paladin and gather Workers to carry out tasks. As the game progresses, players will slowly increase heir Faith, Strength, and Influence.
Not only will these affect their final score, but also determine the significance of their actions. The game is concluded at the end of the seventh Round.
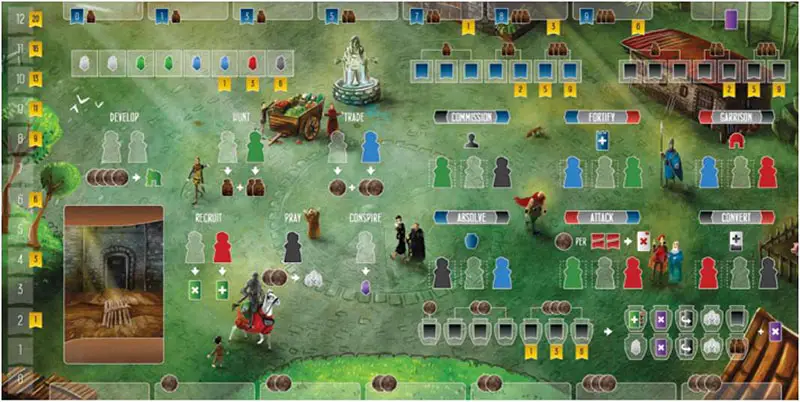 4 Player Boards: The reverse side of each Player Board contains an AI Player Board |
 2 Parts of the Main Board |
Setup
Follow these steps to set up Paladins of the West Kingdom:
-
Place the 2 Parts of the Main Board together to form the large central play area.
-
Shuffle the Townsfolk Cards into a facedown Draw Pile on the left side of the Main Board. From the top of this pile, draw and reveal 5 Townsfolk Cards, placing them faceup above the top left area of the Main Board.
-
Shuffle the Wall Cards into a facedown Draw Pile above the central area of the Main Board.
-
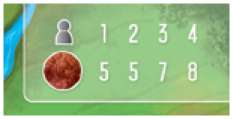
Depending on the player count, place 5-8 Silver above the Main Board, as shown by the icons there. This is known as the "Tax supply".
-
Place the Debt Cards into a Draw Pile, "Unpaid" side faceup, above the top right area of the Main Board.
-
Shuffle the Suspicion Cards into a facedown Draw Pile to the right of the Debt Card Draw Pile.
-
Shuffle the Outsider Cards into a facedown Draw Pile on the right side of the Main Board. From the top of this pile, draw and reveal 6 Outsider Cards, placing them face up below the bottom right area of the Main Board.
-
Shuffle the King's Order Cards and randomly place 3 of them facedown on the left end of the Main Board. Also shuffle the King's Favour Cards and randomly place 5 of them facedown in the spaces to the right of the King's Order Cards. Return all unused King's Order Cards and King's Favour Cards to the box unseen.
-
Shuffle the Tavern Cards into a facedown Draw Pile below the bottom left of the Main Board.
-
Place all remaining Silver, Provisions and Workers (Labourers, Scouts, Merchants, Fighters, Clerics and Criminals) into a supply near the Main Board, within reach of all players.
-
Give each player 1 Player Board and the following components:
-
Players should each shuffle their Paladin Cards into a facedown Draw Pile alongside their Player Board.
-
Randomly determine a starting player and give them the Start Player Marker.
-
In reverse turn order (starting with the player to the right of the Start Player Marker and moving counter-clockwise around the table, each player must select 1 Townsfolk to Recruit into their crew, from those visible above the Main Board.
Recruited Townfolk should be kept faceup alongside Player Boards. Note that this does not cost players anything. Once all players have recruited, slide all remaining Townsfolk Cards to the right, filling empty spaces.
Then reveal new Townsfolk Cards from the top of the Townsfolk Draw Pile to fill all remaining empty spaces.
Note: When recruiting Townsfolk (during setup and during the game, some have immediate rewards
 . These are pictured on the left side of some Townsfolk Cards.
Game Play
Paladins of the West Kingdom is played over a series of 7 Rounds.
Each round, players will select a Paladin to assist them, along with 6 new Workers. In turn, order, moving clockwise around the table, players will each take a single action on their turn. This continues, each player taking 1 action at a time until all players have passed.
Once all players have passed, there is a quick reset of the Main Board to bring out new Townsfolk and Outsiders before proceeding into the next Round.
Round Structure
Each of the 7 Rounds in Paladins of the West Kingdom follows the same structure:
-
Pass the Start Player Marker to the next player in clockwise order (ignore this step in the first round.
-
Reveal any King's Order Cards and King's Favour Cards for the current Round. Notice the Round number printed in the green shield above each card space. In the first 2 Rounds, 1 King's Order Card will be revealed.
In the third round, both a King's Order Card and a King's Favour Card will be revealed. In Rounds 4 to 7, just a single King's Favour Card will be revealed.
For example, in the first round, the first King's Order Card has been revealed, with icons depicting 5 Walls
King's Orders
These offer bonus scoring opportunities to all players. Notice the scoring flags printed below the 3 King's Order Card spaces. The first King's Order will score players an additional 4 VP if they meet its condition (5 Walls in the above example).
The second will score 6 VP and the third, 8 VP. These bonus Victory Points are awarded to all players who achieved the conditions by the game's end.
King's Favours
These open up new action spaces for players to use each Round. Each King's Favour may only be used once per Round (they cannot be cleared using the Pray action - explained later.
-
From the Draw Pile, reveal a number of Tavern Cards faceup, equal to players, plus 1.
For example, in a 4 player game, 5 Tavern Cards would be revealed:
-
From their Paladin Draw Pile, each player must draw the top 3 Paladin Cards to their hand and do the following:
- Choose 1 Paladin to use for the current Round, placing it facedown onto the card space on the left side of their Player Board.
- Place 1 Paladin facedown on top of their Paladin Draw Pile (they will see this card in the next Round).
- Place the last Paladin facedown at the bottom of their Paladin Draw Pile.
Selecting which Paladin to use (and which ones to place at the top and bottom of the Draw Pile) is a crucial decision to make at the beginning of each Round.
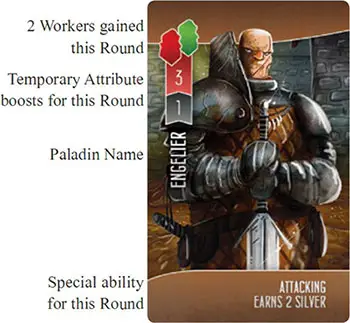
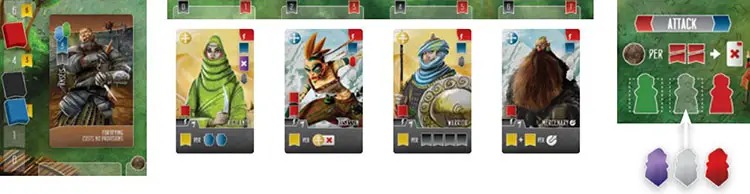
Each Paladin will immediately reward 2 new Workers for the current Round. They will also give temporary Attribute boosts in 1 or more areas. Lastly, they also come with a special ability for the current Round.
For example, Engelier comes with 1 Fighter (red) and 1 Scout (green). He boosts Strength by 3 and Faith by 1. He also earns 2 Silver each time he attacks an Outsider this Round.
-
Starting with the first player for this Round and moving clockwise around the table, each player reveals their Paladin and collects the 2 Workers printed on the card from the supply. After doing so, they also select 1 of the available Tavern Cards and collect the 4 Workers printed on it.
Tip: After selecting a Tavern Card, players should rotate it 90 degrees, or flip it to indicate to other players that it is no longer available. Note that there will always be 1 unclaimed Tavern Card each Round.
Workers collected from Paladin Cards and Tavern Cards should be placed below Player Boards. Once all players have revealed their Paladin for the Round and collected its Workers, plus 4 Workers from an available Tavern Card, play continues.
-
Starting with the first player for this Round and moving clockwise around the table, each player must decide to either take an action or pass. This continues until all players have passed. How each action works will be described in detail on the following pages.
-
Once all players have passed, the Main Board needs to be refreshed. Follow these steps:
If there is still a Townsfolk Card in the right-most space, discard it, then slide all remaining Townsfolk Cards (if any) to the right, filling empty spaces. Then reveal new Townsfolk Cards from the top of the Townsfolk Draw Pile to fill all remaining empty spaces. If the Townsfolk Draw Pile runs out, do not shuffle the discards. They are intended to be a limited supply.
If there is still an Outsider Card in the left-most space, discard it, then slide all remaining Outsider Cards (if any) to the left, filling empty spaces. Then reveal new Outsider Cards from the top of the Outsider Draw Pile to fill all remaining empty spaces. If the Outsider Draw Pile runs out, do not shuffle the discards. They are intended to be a limited supply.
Remove all Tavern Cards from this round, placing them into a faceup discard pile to the left of the Tavern Card Draw Pile. Should the Draw Pile ever run out, simply shuffle the discards to form a new Draw Pile.
Return all Workers placed on King's Favour Cards back to the supply (from Round 3, onwards).
Introduction to taking Actions
As explained on the previous pages, once all players have revealed their Paladin for the Round and collected their Workers, players will start taking actions.
In turn, order, moving clockwise around the table, players will each take a single action on their turn. This continues, each player taking 1 action at a time until all players have passed.
Players take actions by placing 1 or more Workers from their personal supplies onto either their own Player Boards or onto any of the revealed King's Favour Cards on the Main Board.
The actions on the left side of Player Boards are focused on engine building and resource gathering. The actions on the right side of Player Boards are focused on scoring and increasing Attributes.
All the actions on the right side of Player Boards require a particular Attribute and also reward a different Attribute. Understanding how this work is very important when teaching the game to new players.
The required Attribute is indicated on the left side of each action's banner, while the rewarded Attribute is indicated on its right side.
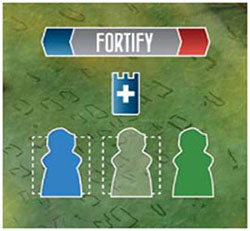
For example, Fortify requires Influence (blue) and rewards Strength (red).
How each specific action functions will be explained in detail on the following pages. For now, it is worthwhile noting this for future reference.
Each action also requires a certain number of Workers and often specific types (colors) of Workers.
There are a few rules around placing workers onto colored and transparent spaces:
- Any Workers may be placed onto transparent spaces (regardless of their color).
- Workers of the correct color must be placed onto colored spaces.
- Criminals (purple) act as wilds and may be placed onto both transparent and colored action spaces.
For example, Fortify requires 1 Merchant (blue), 1 Worker of any type and 1 Scout (green).
Important Rule: Players can only ever do 7 of each Commission, Fortify, Garrison, Absolve and Convert actions. However, there is no restriction to how many times they may Attack.
Player Board Actions
 Develop
This action requires exactly 2 Workers of any type and costs 4 Silver. After placing 2 Workers and paying 4 Silver to the supply, players must then move the left-most Workshop from their Player Board to 1 of the action spaces on the right side of their Player Board.
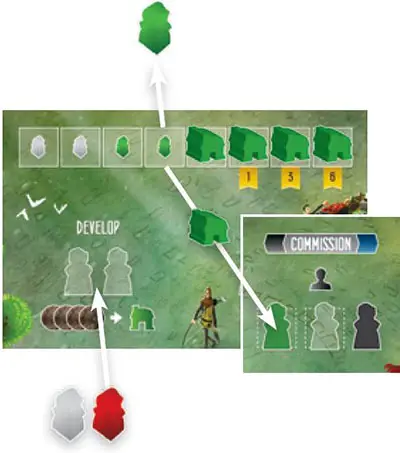
Notice the white dotted boxes around the 2 left Worker spaces of each action space. This is where players can place their Workshops when taking the Develop action. Placing Workshops onto action spaces will allow players to use less Workers when taking the associated action in the future.
Each of the 6 action spaces on the right side of Player Boards can have at most, 2 Workshops.
In addition to this, players will also immediately gain the Worker indicated from the space where the Workshop was taken.
Note: Players are allowed to place a Workshop onto a space where a Worker already rests (placed previously that Round). When doing this, simply return the Worker to the supply before placing the Workshop.
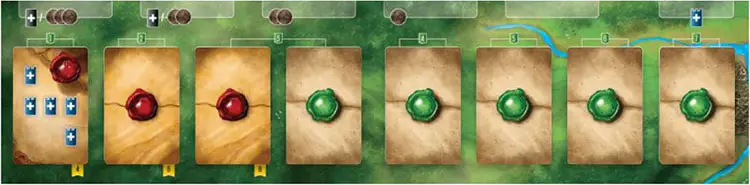
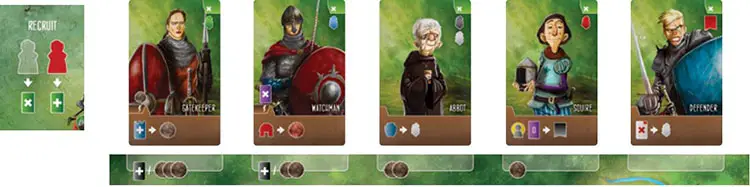
Recruit
This action requires either 1 or 2 Workers and may require Silver to be paid. Any costs are printed below where each Townsfolk Card sits at the top left of the Main Board.
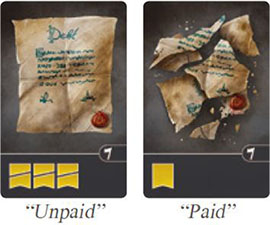
Alternatively, the 2 left-most Townsfolk Cards may be Recruited by taking a Debt, rather than paying the Silver cost. When taking a Debt, players should take it from the Debt Draw Pile and place it alongside their Player Board, "Unpaid" side faceup.
Important rule: If players place a single Worker on 1 turn, they cannot place the second Worker on a future turn. They must decide to place either 1 or both Workers as a single action.

When using only 1 Worker, it can be any type but must be placed on the left Worker space. Placing 1 Worker allows players to discard a Townsfolk Card from above the left side of the Main Board.
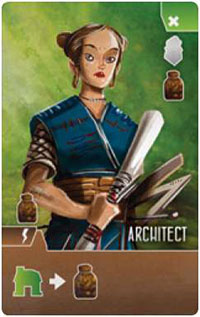
Think of this as sending them off on a quest. When taking this action, players are only concerned with the top right icons on each Townsfolk Card. This shows an immediate reward they will gain for taking this action.

Placing 2 Workers (1 of which must be a Fighter) allows players to Recruit a Townsfolk Card into their crew. When taking this action, players are only concerned with the bottom icons on each Townsfolk Card.
These show an ongoing ability they will gain for the rest of the game, and potentially some immediate rewards. All Townsfolk Recruited this way should be kept faceup alongside Player Boards.
For example, the Gatekeeper shown below would cost 3 Silver or 1 Debt and immediately reward 1 Silver. Once recruited, she would earn her player 1 additional Silver each time they Fortify for the rest of the game.
Hunt and Trade
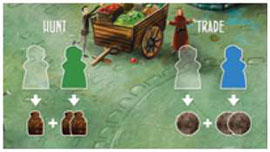
These actions both require either 1 or 2 Workers. When placing 1 Worker, it must be in the left worker space and can be any Worker Type.
This allows players to gain 1 resource of the pictured type from the supply (Provisions for Hunt and Silver for Trade.
When placing 2 Workers, the right Worker must match the required type (Scout for Hunt and Merchant of Trade . This will allow players to gain a total of 3 resources of the pictured type from the supply.
Important rule: If players place a single Worker on 1 turn, they cannot place the second Worker on a future turn. They must decide to place either 1 or both Workers as a single action.
 Pray
Pray
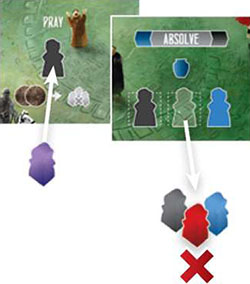
This action requires 1 Cleric (Black) and costs 2 Silver. After placing a Cleric and paying 2 Silver to the supply, players may immediately remove all Workers from 1 action space on their Player Board and return them to the supply.
The purpose of this action is to clear another action space of Workers so that players can use it again in the same Round.
For example, this player decided to place 1 Criminal (remembering that they are considered wilds) and paid 2 Silver to Pray. They chose to use this action to remove all the Workers from their Absolve action space, returning them to the supply.
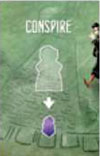
Conspire
This action requires any 1 Worker and immediately gains players 1 Criminal (purple). Any time players gain a Criminal, they must also gain 1 Suspicion.
 Commission
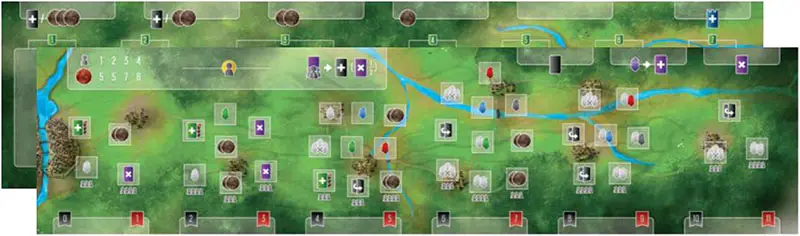
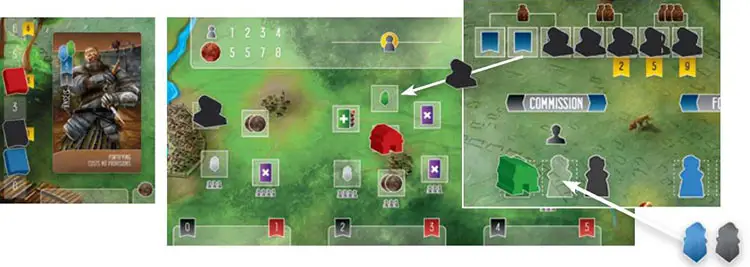
When taking this action, players are using their Faith Attribute to place their Monks onto the Main Board. Each players' Faith determines where they may Commission Monks. This restriction is indicated by the Faith flags shown along the bottom right of the Main Board.
From left to right, each region (the areas directly above where Outsider Cards are placed) require increasing amounts of Faith (the first region requires no Faith, the second region requires 2 or more Faith, the third requires 4 or more Faith, etc.
In order to Commission a Monk to a chosen region, there must also be an available space to place it (not already containing a Monk or Outpost . These are the square spaces on the Main Board with various immediate rewards pictured inside them. Also, note that some spaces are only available at higher player-counts.
For example, the player below decided to Commission a Monk. As they have previously Developed their Commission action, they only require 2 Workers. They placed 2 Workers and paid 1 Provision to the supply.
As they have a total of 3 Faith (2 from their Attribute Track and 1 from their Paladin), they decided to Commission their Monk to space in the second region of the Main Board, immediately earning 1 Scout (Green) from the supply.
Since they revealed an Influence flag under their Commissioned Monk, they also gained 1 Influence, moving their Influence Marker up the Attribute Track immediately.
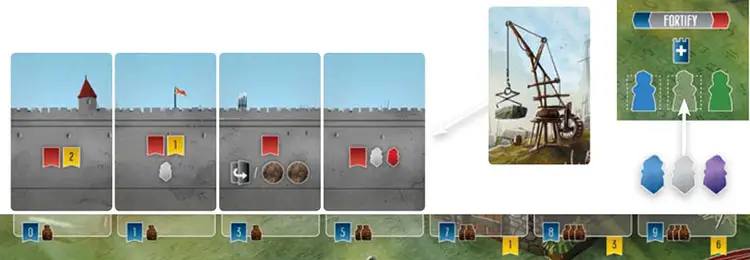
 Fortify
When taking this action, players are focused on using their Influence Attribute. This restriction is indicated across the top of Player Boards (the first Wall requires no Influence, the second requires 1 or more Influence, the third requires 3 or more, etc.
When Fortifying the city with Walls, players draw the top Wall Card from the Draw Pile and place it faceup along the top of their Player Board. Each Wall Card will show a collection of immediate rewards. Note that this will always include at least 1 increase to their Strength Attribute.
For example, the player above decided to build their fourth Wall. From the example on the previous page, we know they now have 5 Influence (after gaining 1 more from their Commission action and including 3 from their Paladin).
They placed the 3 required Workers onto their Fortify action space, but due to their Paladin (Anseis), this action did not cost them any Provisions. They drew the top Wall Card from the Draw Pile and placed it in the left-most empty space along the top of their Player Board.
This Wall Card immediately gained them 1 Strength, moving their Strength Marker up the Attribute Track and also 2 Workers from the supply (1 Labourer and 1 Fighter). Their next Fortify action will now require 7 Influence and 2 Provisions.
 Garrison
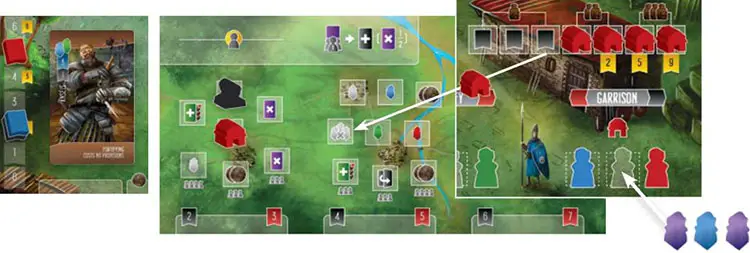
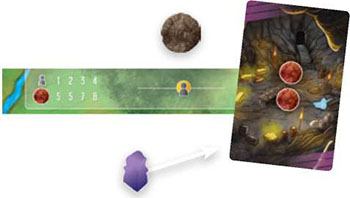
When taking this action, players are using their Strength Attribute to place Outposts onto the Main Board. Each players' Strength determines where they may Garrison Outposts.
This restriction is indicated by the Strength flags shown along the bottom right of the Main Board. From left to right, each region (the areas directly above where Outsider Cards are placed) require increasing amounts of Strength (the first region requires 1 or more Strength, the second region requires 3 or more Strength, the third requires 5 or more Strength, etc.
In order to Garrison an Outpost to a chosen region, there must also be an available space to place it (not already containing a Monk or Outpost . These are the square spaces on the Main Board with various immediate rewards pictured inside them.
Also, note that some spaces are only available at higher player-counts.
For example, the player below decided to Garrison an Outpost. They placed 3 Workers and paid 1 Provision to the supply.
As they have 5 Strength, they decided to Garrison their Outpost to a space in the third region of the Main Board, immediately gaining a Pray action (clearing all the Workers from 1 action space on their Player Board).
Since they revealed a Faith flag under their Outpost, they also gained 1 Faith, moving their Faith Marker up the Attribute Track immediately.
 Absolve
When taking this action, players are focused on using their Influence Attribute. This restriction is indicated by the printed numbers on the Jars along the bottom of Player Boards.
When Absolving, players move their left-most Jar to an available space (not already containing a Jar) on the bottom right of their Player Board. Each of these spaces show an immediate reward for players to gain.
In addition to this reward, each Absolve also increases players' Faith by 1 (moving their Faith Marker up their Attribute Track) and allows players to immediately remove 1 Suspicion Card from above their Player Board.
For example, the player below decided to Absolve. They placed 3 Workers and paid 1 Silver to the supply.
They do not require any Influence for their first Absolve. They decided to move their first Jar onto 1 of the available "Pay a Debt" spaces, immediately allowing them to flip an unpaid Debt Card.
They also remove 1 Suspicion Card from above their Player Board. Since they revealed a Faith flag under their Jar, they also gain 1 Faith, moving their Faith Marker up the Attribute Track immediately.
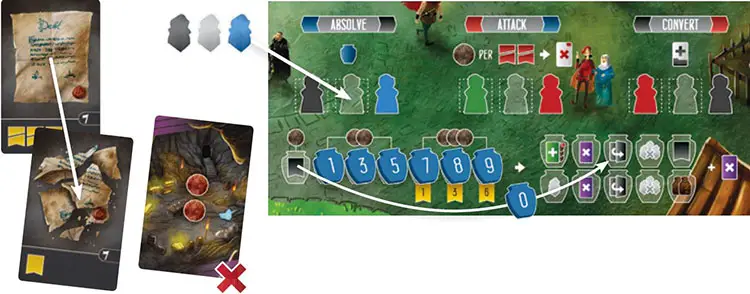
 Attack
This action requires 3 Workers (1 Scout, 1 Worker of any type and 1 Fighter. It may also require Silver, but not as a mandatory cost. This will be explained below.
When taking this action, players are using their Strength Attribute to Attack Outsiders. Which Outsiders they can Attack is restricted by the Strength flags shown along the bottom right of the Main Board (directly above each specific Outsider Card.
In order to Attack an Outsider, players must have an equal or greater amount of Strength. However, for every 2 Strength they lack, players may spend 1 Silver to the supply to make an Attack (in other words, 1 Silver for each card they want to skip past where their current Strength would allow them to Attack.
Think of this like they are hiring local warriors to help in the fight. When Attacking an Outsider, players are only concerned with the top right icons on each Outsider Card. These show immediate rewards they will gain for taking this action.
Note that this will always include at least 1 increase to their Influence Attribute. After Attacking an Outsider and gaining its rewards, players should keep it facedown alongside their Player Board.
For example, the player below has decided to Attack the Mercenary under the "7 Strength" card space. As their current Strength is only 5, they pay 1 Silver to the supply for the 2 Strength they are lacking.
They immediately gain 1 Influence, moving their Influence Marker up the Attribute Track. They also gain 2 Labourers from the supply and place the Mercenary Card facedown alongside their Player Board.
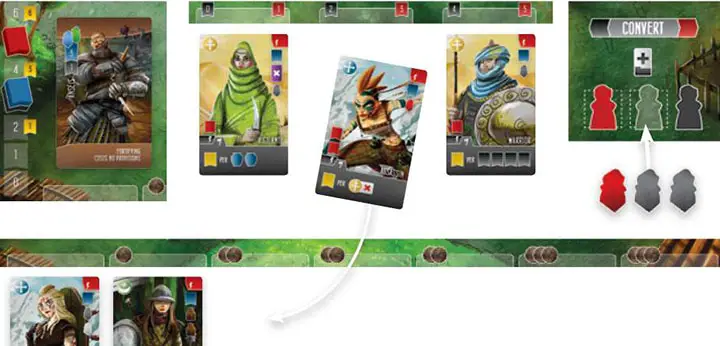
 Convert
This action requires 3 Workers (1 Fighter, 1 Worker of any type and 1 Cleric) and increasing amounts of Silver. The Silver cost is shown above the card spaces along the bottom of Player Boards.
The first Convert requires no Silver, the second Convert requires 1 Silver, the next 3 require 2 Silver and the last 2 require 3 Silver. Players must always place Converts below their Player Boards, filling empty spaces from left to right.
When taking this action, players are using their Faith Attribute to Convert Outsiders. Which Outsider they can Convert is restricted by the Faith flags shown along the bottom right of the Main Board (directly above each specific Outsider Card. In order to Convert an Outsider, players must have an equal or greater amount of Faith.
When Converting an Outsider, players are only concerned with the bottom icons on each Outsider Card. These show an end-game scoring bonus, as well as an immediate reward of 1 or more Strength.
After Converting an Outsider and gaining their rewards, players should keep the Outsider Card faceup along the bottom of their Player Board (remembering to pay the Silver cost for taking this action.
For example, the player below decided to Convert the Assassin under the "2 Faith" card space. This was possible as they had 4 Faith (3 from their Attribute Track and 1 from their Paladin).
To Convert the Assassin, they paid 2 Silver to the supply, due to the cost of the next empty card space below their Player Board. Converting the Assassin immediately gained them 2 Strength, moving their Strength Marker up the Attribute Track.
At the end of the game, the Assassin will score them 1 VP for each Saracen they have Attacked.
Tax and Suspicion
 Tax
Tax
Any time players gain Tax (red coin symbol, they must take the required amount of Silver from the Tax supply. Taking Tax is a mandatory action, so be careful. There are times where players may take an action that results in Tax being removed at a time that won't be beneficial for them.
 Suspicion
Any time players add a Criminal to their supply, they immediately gain 1 Suspicion Card. This should be drawn from the top of the Suspicion Draw Pile and placed faceup above the top right of their Player Board, for all players to see.
When players reveal Suspicion Cards they should immediately take the printed amount of Silver (0, 1 or 2) from the Tax supply (above the middle of the Main Board).
Should the Suspicion Draw Pile ever run out, shuffle the discards to form a new Draw Pile. In the rare case that there are no cards available in the Draw Pile or Discard Pile when players need to draw Suspicion, an Inquisition immediately occurs. Once it has been resolved, there will be more Suspicion Cards available for players to draw from.
In the case where a player needs to take more Silver than there is available in the Tax supply, they should take the rest from the main Silver supply. Taking the last Silver from the Tax Supply will immediately result in an Inquisition.
For this reason, when gaining more than 1 Suspicion at the same time, players should resolve each Suspicion Card separately.
For example, this player just collected 2 Criminals. The first Suspicion Card they drew has 2 Tax printed on the Card. As there is only 1 Silver left in the Tax supply, they added it to their own Supply and took the second Silver from the main supply.
Now that the Tax supply has been emptied, an Inquisition takes place. After this has been resolved, they must draw a second Suspicion Card for their second Criminal.
Debts and the Inquisition
 Debts
Debts
There are a number of ways that players can gain, pay and destroy Debts.
Gained Debts are placed "Unpaid" side face up in front of players. If left unpaid, Debts will lose players 3 VP at the game's end.
Paid Debts should be flipped from "Unpaid" to "Paid" and kept in front of players. These earn players 1 VP at the game's end.
Destroyed Debts are returned immediately to the Debt Draw Pile.
 The Inquisition
Any time the last Silver coin is taken from the Tax supply, an Inquisition occurs. At this point, the player, or players with the most Suspicion immediately gain 1 Debt. If no players have Suspicion, no Debts are collected.
Each player that gains a Debt from an Inquisition also returns half their Suspicion (rounded down) to the Suspicion Discard Pile above the top right of the Main Board. When discarding Suspicion, players should always return their most recently acquired Suspicion Cards first (from the top of their Suspicion pile.
There are a number of Townsfolk abilities that can trigger during an Inquisition. For example, the Conspirator allows players to discard 1 Suspicion Card before checking to see who has the most. Players may resolve their Townsfolk abilities in any order. However, they must all be resolved before any Debts are collected.
Once Debts (if any) have been collected and Suspicion discarded, the Tax supply must be refilled with Silver from the main supply.
Players are reminded of how much Silver must be added by the icons below the Tax supply.
For example, an Inquisition was just triggered. The first player had 1 Suspicion and the second had none. The last 2 players both had 3 Suspicion. Each of the last 2 players immediately gains 1 Debt and discard 1 Suspicion.
8 Silver should then be added back into the Tax supply, from the main Silver supply.
Passing
When a player passes, they can no longer take any actions in the current Round. However, they can still be affected by Inquisitions (potentially gaining Debts and losing Suspicion . Also, some Townsfolk abilities can still be triggered, even though a player has passed (Peddlers, Conspirators, Squires, etc).
Once all players have passed, follow the refresh steps outlined on Page 10 (step 7).
If this was the seventh Round, the game is over and scoring takes place.
End of the Game
The game ends immediately at the end of Round 7. At this point, players should add up their score for the following areas:
- Completed King's Orders
- Attribute Tracks
- Develops (if 6 or more completed)
- Debts (paid and unpaid)
- Silver / Provisions (1 VP for every set of 3)
- Commissions (if 5 or more completed)
- Fortifies (if 5 or more completed, plus VPs on specific Walls)
- Garrisons (if 5 or more completed)
- Absolves (if 5 or more completed)
- Converts
The player with the highest total score is declared the winner.
In the case of a tie, the tied player who scored the most Victory Points from the King's Orders is the winner. If still tied, the tied player with the least Suspicion is the winner. If still tied, all tied players share the victory.
Continue Reading
