Components
- 110 cards
- Rulebook
Object of the Game
The players take the role of Workers producing Tools, Barrels, Iron, Glass, and many other Goods. The player who manages their Production Chains best will gain the most Victory Points and win.
Setup
-
Separate the cards with a light blue border from the rest:
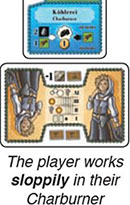
Each player receives a random Charburner as well as a Worker (brown background color). Remove the remaining Charburners and Workers from the game.
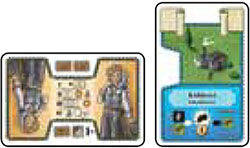
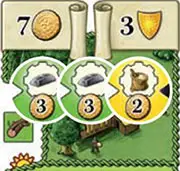
This player has a sloppy Worker in their Charburner.
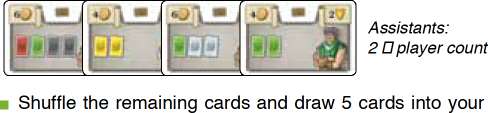
In a 2-/3-/4-player game, place 4/6/8 random Assistants, respectively, with a random side facing up at the side of the play area. Remove the remaining Assistants from the game.
-
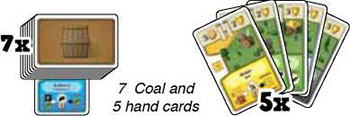
Shuffle the remaining cards and draw 5 cards into your hands. Place another 7 cards face down and sideways on your Charburners. Each card on your Charburner represents one unit of Coal (and is worth 1 Coin). The player who most recently worked the hardest becomes the first active player.
-
You can use each card in 3 ways:
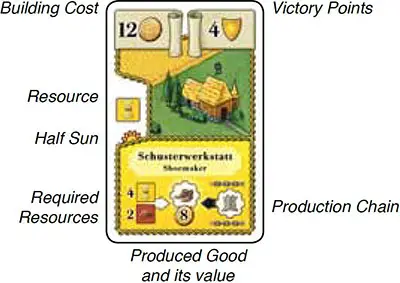
- as a Resource (depicted on the left side of the card),
- or as the depicted Building.
- Face-down cards on Production Buildings represent Goods that the Building produced.
Game Play
The game is played over several rounds. Each round consists of 4 phases, which are played in the following order.
- New Hand Cards
- Sunrise
- Sunset
- Produce and Build
I. New Hand Cards
The active player deals each player 2 cards into their hand. There is no hand card limit.
When the draw pile runs out of cards, shuffle the discard pile to form a new draw pile. In the extremely unlikely case that both the draw and the discard pile contain no cards, each player must discard half of the cards in their hand (rounded down).
II. Sunrise
-
The active player turns over cards from the draw pile, placing them in the middle of the play area as the Market Display, until there are 2 Half Suns.
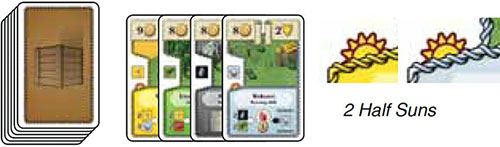
The Sun has risen and the Market is open.
Tip: In the Market Display, only the Resource part of each card matters, so you can place the cards on top of each other such that only the Resource is visible on each card.
Then all decide simultaneously in which of your Buildings you would like to work and what you would like to build in phase 4.
-
Working: Take your Worker card and place it below one of your Production Buildings. You have two options:
You can either produce orderly or sloppily, indicating this by rotating your Worker card so that the appropriate side is on top.
Note: If you decide to produce orderly, in phase 4, you will need to have access to all of the Resources depicted at the bottom left of the Building. If you do, you will receive 2 Goods.
If you decide to produce efficiently, in phase 4, you will need to have access to all of the Resources depicted at the bottom left of the building. If you do, you will receive 2 Production Goods.
If you decide to produce sloppily, you may skip one Resource of your choice, but you will only produce 1 Goods card.
In phase 3, additional cards will be placed in the Market Display, so you can hope that the Resources you are missing right now will still show up.
Also, you can play cards from your hand as Resources in Phase 4.
-
Building: You can place a card from your hand face down in front of you. This is the Building you are going to build this round.
III. Sunset
The active player turns over cards from the draw pile, placing them in a second row in the Market Display, until there are 2 more Half Suns. The Sun has set and the Market is closed.
IV. Produce and Build
-
This phase is played in turn order, beginning with the active player.
-
Each Production Building requires the Resources depicted at the bottom left to initiate Production. These Resources must be available in the Market Display in the required amounts.
You can make missing Resources available for you by discarding an appropriate card from your hand. The Market Display remains the same for all players.
You do not take any Resources away from it, you just check if what you need is there. Only the cards that you play from hand are discarded.
-
If you decided to produce orderly during phase 2, all of the required Resources must be available. If they are, you produce 2 Goods, taking 2 cards from the draw pile and placing them face down and sideways on the Building. Otherwise you produce nothing with that Building.
-
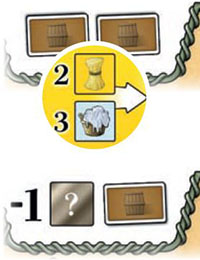
If you decided to produce sloppily during phase 2, all but one of the required Resources must be available. If they are, you produce 1 Good.
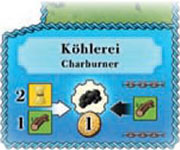
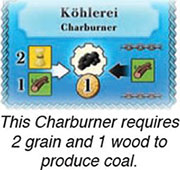
Example: You let your Worker produce sloppily in your Char- burner, which requires 2 Grain and 1 Wood. The Market Display only has 1 Grain, so you are missing 1 more Grain and 1 Wood.
Since you produce sloppily, you need 1 less Resource. So you only need to discard either 1 Wood or 1 Grain from hand to produce 1 Coal.
If you decided to produce orderly, you would have to discard both missing Resources from hand. If you did, you would receive 2 cards on your Charburner representing Coal.
-
Assistant: An Assistant at a Building requires all of the depicted Resources to produce a single Good. You can discard missing Resources from your hand, as usual. Each card you discard from hand only counts for one Building.
-
Production Chain
If a Building produced at least 1 Good, you can immediately use the Production Chain depicted at the bottom right any number of times.
The Production Chain shows which Resource from hand or which Good that you already have you can place on the Production Building.
This way you can refine additional Goods on top of the normal Production.
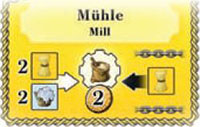
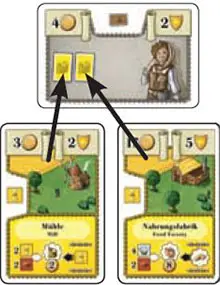
Example 1: If the Mill produces Flour, you can place any number of Grain cards from your hand face down on the Mill.
These cards represent additional Flour that you produced from your own Grain reserves. Before you place the Grain face down and sideways on your Mill, you must show it to the other players.
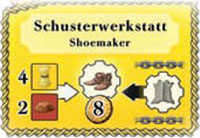
Example 2: If the Shoemaker produces Shoes, you can make additional Shoes from Leather you produced earlier.
Move the cards from your Tanneries (each card represents 1 Leather) to your Shoemaker (turning those cards into Shoes). Great deal, since Shoes are worth 8 Coins, but Leather is only worth 6 Coins!
If the Production Chain shows 2 Resources or Goods, you must place both depicted items on the Building at the same time.
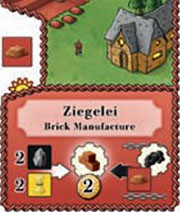
Example: The Brick Manufacture Production Chain requires 1 Clay and 1 Coal to produce Bricks.
If you have 3 Clay in your hand but only 2 Coal on your Charburner, you can place 2 Coal and 2 Clay on the Brickworks, effectively producing 4 Bricks.
Note: Assistants may start a Production Chain if their building produces.
At the end of production during Phase 4, your Worker leaves the building (allowing a just purchased Assistant to be assigned to the building), but current Assistants remain at their buildings (you may pay to move them during Phase 2 of the next turn).
Building
You can now build the Building you placed face down in front of you during phase 2. If you cannot or do not want to build it, you must discard the card.
You pay its Building cost by discarding Goods, totaling the values of the discarded Goods. You can overpay, but you do not receive any change.
Example: You would like to build a Building costing 7 Coins. You pay 2 Iron (each worth 3 Coins) and 1 Flour (worth 2 Coins), for a total of 3+3+2=8 Coins.
Assistant
After or in place of building, you can hire at most 1 Assistant per round.
Not only must you pay Coins for them, but you must also have Buildings in the colors depicted on the Assistant card. (Keep the Buildings).
Immediately place the Assistant at one of your Buildings.
Note:
- If you already have 2 Assistants, you cannot hire any more.
- There can only be one person (Worker or Assistant) in each Building.
- In phase 2, you can pay 2 Coins to move an Assistant to another Building.
At the end of phase 4, discard all of the cards in the Market Display. The next player in clockwise order becomes the active player.
The Cards
Each Building color stands for a certain Resource. There is the same number of Buildings in each color except green, which is the most numerous. Gray Buildings do not count as Production Buildings-they provide a permanent benefit.
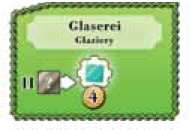
The Glaziery requires any 11 Resources to produce Glass.
In phase 1, you receive 1 additional card into your hand, unless you have more than 3 cards in hand already at the start of that phase.
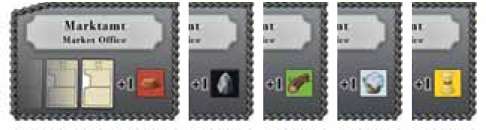
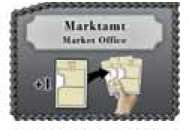
The Market Office adds the depicted Resource to the Market Display for you (which you can use as one of the 11 Resources needed for the Glaziery).
End of the Game
The game end is triggered when any player has 8 Buildings in front of them (including their Charburner). When that happens, finish the current round and play another complete round.
After that, each player totals the Victory Points from their Buildings and Assistants, adding 1 Victory Point to that total for every 5 Coins they have in Goods (rounded down).
The player with the most Victory Points wins.
In case of a tie, the player with the most Coins left after exchanging them 5:1 for Victory Points wins.
Continue Reading


