
A. Build a Farm Expansion

This action allows you to build exactly one of the farm expansion tiles faceup that are next to the board: either a building (shown by a brown border) or a feature (shown by a green border).
To build a farm expansion, spend action points equal to the farm expansion's level and pay the resources shown on the top-right of the tile.
Take the faceup farm expansion tile from the display and place it on an empty space (without sheep or another farm expansion) on your farmyard. Some farm expansions can be placed only on spaces with specific terrain (bushes, a tree, or a lake), which is shown on the left of the resource cost.
Farm expansions without a terrain requirement can be placed on a space with or without specific terrain. Farm expansion can be placed inside or outside of a pasture (one or more spaces on your farmyard enclosed by fences and/or buildings). However, the effects of some farm expansions are active only if the tile is located inside or outside of a pasture.
Once built, farm expansions remain on their spaces until the end of the game. They cannot be moved, removed, or built over. When you build a farm expansion, draw a tile from the stack of the same type and place it faceup in the previous tile's place.
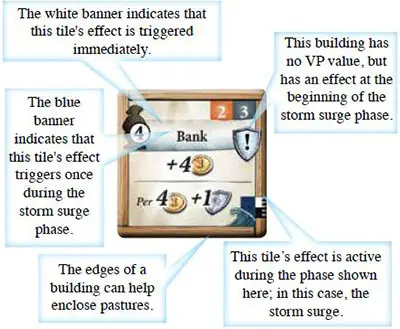
Note: Each player can build only one storm surge building during the game. No new storm surge building tiles are drawn!
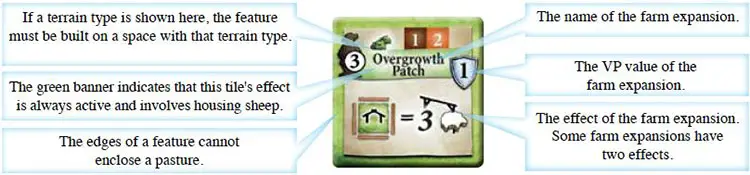
The icons on the lower half of each tile show the farm expansion's effects. Some farm expansions have multiple effects, the colors of the banner behind the tile's name show when the effects are active.
The back side of the reference sheet explains common icons. A detailed explanation of each farm expansion can be found in the appendix.

The shield in the top-right corner of a farm expansion tile shows the VP value of the tiTh at the end of the game. If the shield contains an exclamation mark "!", the VP value is 0, but the farm expansion has an effect which triggers at the beginning of the storm surge phase (the last phase of the game).
Building Tile Example:

Feature Tile Example:
The following rules apply for buildings (not features):
-
When you place a building tile on your farmyard, take the leftmost building marker from your income board and place it on the top-left corner of that tile. You have only four building markers, so you can build only four buildings during the game.

-
The brown edges of buildings can be used to enclose pastures (see "Housing Sheep" on page 10).
-
When you take a building marker and place it, it may uncover an icon on your income board. If you uncover an income icon, you will receive additional income starting in the next II Upkeep phase.
If you uncover a laborer icon, you may either assign a laborer on your income board to an action on your farmyard board or move one of your assigned laborers from one action to another on your farmyard board.

Laborers: For each laborer you have assigned to this action, you pay one fewer resource of your choice to build a farmyard expansion.

B. Contribute to the Dike

This action allows you to pay resources to construct dike segments and advance on the dike track.
To construct a dike segment, spend 1 or more action points and pay an equal number of a single type of resource (you may save some action points for drawing resource cards afterward). For each resource you pay, advance the matching resource marker one space on the construction yard track.
Note: After construction of a dike segment has begun with a certain resource, players must finish the construction of that segment using the same type of resource before starting construction of a new segment.
When a resource marker reaches the last space of the construction yard track ( ), the construction of the dike segment is complete; take an appropriate dike segment and place it on the leftmost empty dike space on the main board as a first level.
After you finish a level of dike segments, stack further dike segments from left to right on top of the previous level as a new level.
Note: The higher the dike gets, the more dike segments are needed to finish a level. The first level needs only three brown dike segments, which are as wide as four flood tokens. The second level needs four dark-green dike segments, which are as wide as three flood tokens.
The third level needs six light-green dike segments, which are as wide as two flood tokens. Since the cost to finish each dike segment remains constant throughout the game, it becomes increasingly costly to finish dike levels.
For each resource you spend, advance your dike point marker one space on the dike track. If your dike point marker ends on the same space as another marker, place your marker on top.
If your dike point marker would advance past the end of the track, instead move it to the third space of the track (1 dike point) and continue from there, adding 20 to your total dike points; count these points when determining which player is ahead on the dike track.
After a dike segment is completed, the resource marker stays on the last space of the construction yard track until any player begins constructing another dike segment with a different resource.
The next dike segment cannot be constructed from the same type of resource as the previous dike segment. After any player begins construction with a new resource, place the previous resource marker on its corresponding starting space.
You can construct more than one dike segment in the same turn: if you complete a dike segment and have action points remaining, you may begin constructing the next dike segment (with a different type of resource).

Laborers: For each laborer you have assigned to this action, increase by 1 the action value of any farmer placed on this action space. If you
spend the additional action points to construct a dike segment, you must still pay the resources as well. This effect applies only when you take this action, not while helping.

Asking for Help
After you have completed your action (including drawing any resource cards), you must ask an opponent of your choice for help. That opponent may construct dike segments (without spending action points) and also advances his dike point marker one space on the dike track for each resource paid.
If he chooses to contribute, he may pay up to as many resources as you paid to construct dike segments. Laborers have no effect when helping. It is possible for a chosen opponent not to pay any resources.
If your opponent pays one or more resources, you advance exactly one additional space on the dike track regardless of how many resources your opponent paid. In this case, you advance your dike point marker before your opponent does.
Players cannot negotiate or discuss when asking for help (e.g. you cannot ask who has useable resource cards in his or her hand, though the number of cards in each player's hand should always be visible).
In a 2-player game, some additional rules apply when asking for help.
Progress Tokens

Each time your dike point marker reaches a space on the dike track with a progress token (whether you are taking an action or helping), you immediately resolve the effect shown on that token. If a token shows two different effects, you
choose which to resolve. The progress token stays on the board, and other players can resolve the effects when their markers reach the space. A detailed description of the progress tokens can be found on page A1 of the appendix.
C. Build And/or Move Fences

This action allows you to build and/or move fences on the gaps between spaces on your farmyard board to enclose or reorganize your pastures. A pasture consists of one or more spaces on your farmyard board which are completely enclosed by fences and/or buildings.
Move fences: Spend one action point to move one fence on your farmyard board to another gap on your farmyard board (this does not cost any resources). You can resolve this effect this as many times as you can afford.
Build fences: Spend one action point and pay one resource of your choice to take the leftmost fence from your income board and place it on a gap on your farmyard board. You can resolve this effect as many times as you can afford, but you must pay the same type of resource for each fence.
If you uncover an income icon, you will receive additional income starting in the next II Upkeep phase. If you uncover a laborer icon, you may either assign a laborer on your income board to an action on your farmyard board or move one of your assigned laborers from one action to another on your farmyard board.

Laborers: For each laborer you have assigned to this action, increase by one the action value of any farmer placed on this action space. If you spend the additional action points to build a fence, you must still pay the resources as well.


Note: After you have completed your action, all pastures on your farmyard board that house sheep must be enclosed by fences and/or buildings (you may open pastures while taking this action, but all sheep must be in enclosed pastures when you finish your action).
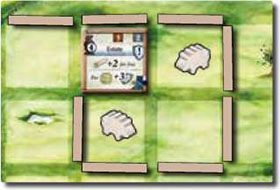
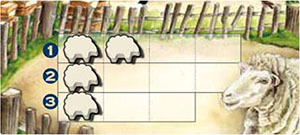
This pasture consists of three spaces, and is enclosed by fences and a building. You can house one sheep on each space inside the pasture.
On the left, a fence has been built to start a new pasture, but the spaces are not enclosed and cannot house sheep yet.
You can build a fence on any gap, even if building it in that gap does not currently contribute to enclosing a pasture.
D. Buy or Sell Sheep

This action allows you to buy or sell sheep at the sheep market. The value of sheep is shown on the bottom row of the value track on the main board. You cannot buy and sell during the same action.
Buy sheep: Pay one action point and coins equal to the current value of sheep to take one sheep from a space on the sheep market and house it on your farmyard board. You can resolve this effect as many times as you can afford, but you can buy sheep from only one row of the sheep market during each action.
You can buy only as many sheep as are available in that row, and you cannot buy more sheep than you can house on your farmyard board.
Sell sheep: Spend one action point and place one of your sheep on an empty space of the sheep market to gain coins equal to the value of sheep. You can resolve this effect as many times as you can afford, however you can sell sheep to only one row of the sheep market. You cannot sell more sheep than there are empty spaces in that row.

Laborer: If one of your laborers is assigned to this action, the cost for you to buy sheep is decreased by one coin, and you gain one additional coin for each sheep you sell.
This applies only when you take this action, not if you buy or sell sheep in any other way. Only one laborer can be assigned to this action.

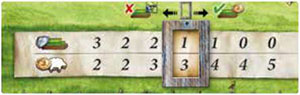
The value of sheep is shown on the bottom row of the value track. In this case, the value is 3 coins. This value applies for both buying sheep from the sheep market and selling sheep to the market.
Buying sheep: You can buy up to two sheep from row 1. You can buy one sheep from rows 2 or 3.
Selling sheep: You can sell up to two sheep to rows 1 or 3. You can sell up to three sheep to row 2.
E. Draw Resource Cards
This action allows you to draw resource cards and add them to your hand.
Spend any number of action points to draw an equal number of cards from the resource display and/or the resource deck and add them to your hand.
If you want to draw cards from both the display and the deck, draw the cards from the display first, then draw the remaining cards from the deck. After drawing cards all your cards, for each empty spaces of the resource display, draw a card from the resource deck and place it faceup on that space.

Laborer: For each laborer you have assigned to this action, increase by one the action value of any farmer placed on this action space.

Continue Reading
