This guide assumes that you already went through the game's components at least once (listed on the first page of the rule book), punched out all the cardboard, sorted everything and hopefully found a good storage solution. Do not open the Town Records Book or other obviously sealed game components. Familiarize yourself with the rules and make sure to have the game's box and all of its components in easy reach.
Find the party pad, take a sheet and fill in your party's name.
Each player chooses one of the available six starting character classes to play (Brute, Tinkerer, Spellweaver, Scoundrel, Cragheart, and Mindthief) and opens the corresponding character and miniature boxes, then takes that character's character mat, deck of level 1 ability cards and the five character tokens. Leave the attack modifier cards inside the character's box! (The ones with the crossed swords on the back).
Each player then takes a sheet of his or her class' corresponding character pad, fills out the name and writes the 30 gold every character starts with down in the Gold Notes section.
Shuffle the personal quest cards. Each player is dealt two random personal quest cards and chooses one to keep, returning the other to the personal quest deck (Pick one that you think goes with the character you created). Personal Quests do not have to be kept secret, although they can be, if the players so desire.
Each player receives a standard 20 card attack modifier deck from the game's box (crossed swords back).
These are numbered for players 1 to 4, with the number in the lower left corner of each card, and consist of six "+0", five "+1", five "-1" and a single "+2", "-2", "2x" and "Null" card each.
Hand each player a blue wooden experience tracker to keep track of their current experience at the right side of their character mat, starting at zero.
Hand each player a red wooden hit point tracker to keep track of their current health at the bottom of their character mat, starting at the number located below the level 1 indicator.
Separate road events 01 through 30 from the road events deck, then shuffle them. Do the same for city events 01 through 30. These are your starting city and road event decks. Put the rest of the road and city event cards back into the box.
Now create the city's available supply of items using all copies of the standard items 001 through 014. Put the rest of the item cards back into the box.

Unfold the world map board and place it amidst the players if you haven't already, and read the top half of the first page of the scenario book. Place the stickers on the map board as indicated in the scenario book.
Optional - Role Playing: Here would be the perfect time to engage in some role playing. Since all players somehow ended up at the Sleeping Lion, everyone could use the information on the back of their character mat in combination with their personal quest to wind up with a background story for their character. The personal quest could still be kept secret, of course. Then just come up with your own reasons for being there.
Optional - Encounter a city event: Draw the top card of the city event deck and read the front side. Note that event cards have content on both sides, and the back s hould not be read until the front is resolved.
As written further on the first page of the scenario book, you are encouraged to purchase some helpful items before heading out, using each character's starting 30 gold. The scenario book lists some recommendations for each class if you're unsure of what to buy. Remember that players cannot trade money or items. Track the amount of money you spent on your character sheet.
You are now ready to head out to your first scenario! Draw a road event card and resolve it. Then put the map board aside to make room for the upcoming scenario.
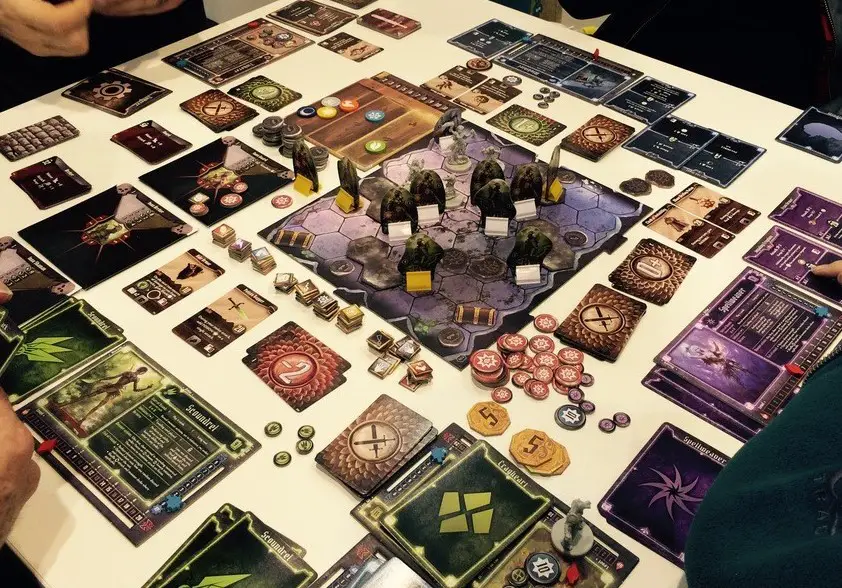
Set up the board according to page 2 of the scenario book using the map tiles I1b, G1b and L1a, as indicated by the map label next to the scenario layout, including the door tiles (The map tiles have different labels on each side). Place the money tokens and other overlay tiles off to the side. These are only to be placed on the map when the room tile is revealed.
Place the elemental infusion board next to the map tiles for everyone easy to see with all six wooden element discs set in the "Inert" column. The round track at the top of the elemental infusion board is not needed for the first scenario.
Take out the standard 20 card monster attack modifier deck (It's identical to the decks the players received earlier except it has the letter "M" written in the lower left corner instead of a number), shuffle it and place it next to the scenario map tiles. All monsters draw from this attack modifier deck.

Find the monster stat card for each monster listed at the bottom of the scenario layout (Bandit Guard, Bandit Archer and Living Bones). Rotate or flip the card so it shows the level set to 1 in the upper left corner of the card and place it inside a monster stat sleeve.
Find the three monster ability decks labelled Guard, Archer and Living Bones, containing 8 cards each, shuffle them and place them next to the corresponding monster stat card.
Find the cardboard standees for each monster type and put them in easy reach.
Place the monsters in the starting room indicated by the scenario layout depending on the number of players. Don't forget to randomly select the standees when placing them. Monster standees each have a number to determine the order in which they act during the turn.
(The upper left side of a hex - or corner depending on the map tile rotation - indicates which type of monster is placed on this hex for two characters, the upper right side for three characters, and the bottom side of the hex for four characters. Black means the monster is not present, white means a normal monster is present, and gold means an elite monster is present. Normal monsters should be placed on the map with their corresponding standees in white bases, and elite monsters should be placed in gold bases).

Read the introductory text provided with the first scenario "Black Barrow" until you reach the paragraph separated with a "1" circled in red. These are additional story points that are only read when entering the corresponding hex on the board.
Each player then is randomly dealt two battle goal cards in secret and chooses one to keep, discarding the other. Players can keep track of their battle goal progress using notes if necessary, and should keep their battle goals secret from one another until the scenario is over.
Then everyone decides which items they would like to equip from the ones they own and places them in the designated area below their character mat (adding in -1 cards to the attack modifier deck when applicable).
Each character can equip only one head item, one body item, one legs item, up to two one hand items OR one two hands item, and a number of small items equal to half their level, rounded up. Characters cannot own more than one copy of any item card.
Finally each player chooses the ability cards they would like to start the scenario with from the pool of those available. Since this should be your very first scenario, a player's hand should only consist of the set of level 1 ability cards for the character's class. Once a player has become familiar with the class, he or she can begin substituting out level 1 cards for the more complex level X ability cards. Remember that each player's maximum hand size is indicated on his or her character mat!
Continue Reading