Components
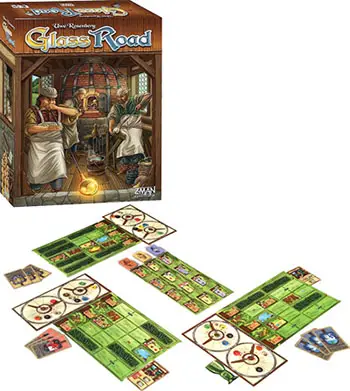
- 1 Building board
- 4 Landscape boards
- 4 Production boards
- Glass wheel Brick wheel
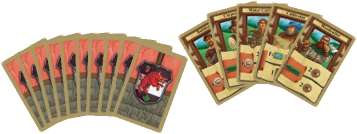
- 4 sets of 15 Specialist cards
- 40 Good tokens
- 51 small Landscape tiles
- 24 large Forest tiles
- 93 Building tiles
- 1 sheet with stickers for the Good tokens
- 1 Start player goblet
- Instructions
Object of the Game
In Glass Road, you will produce glass over four building periods. Aside from glass, you will need to produce bricks and collect wood and clay to build buildings.
Only the value of your buildings will determine your final score and whether you will win the game or not. To accomplish this task, you will need the help of a variety of specialists. When choosing your specialists, try to anticipate which ones your opponents will choose to use your own more effectively.
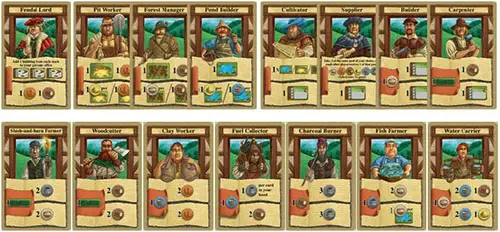
There is a total of 15 different specialists offering their services. They provide goods and Landscape tiles, and build buildings for you.
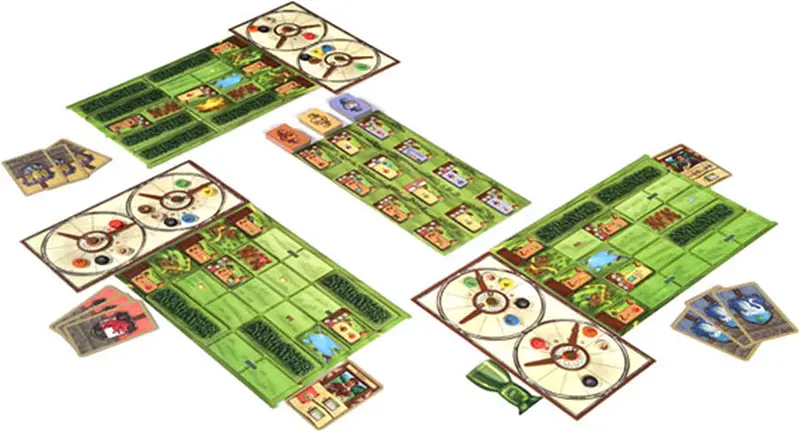
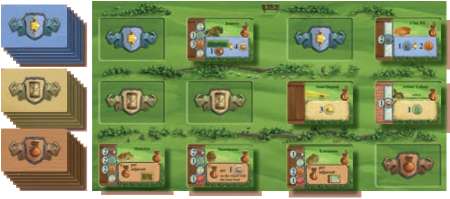
Setup
The Production and Landscape Boards
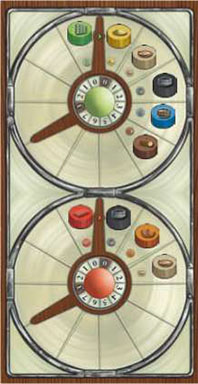
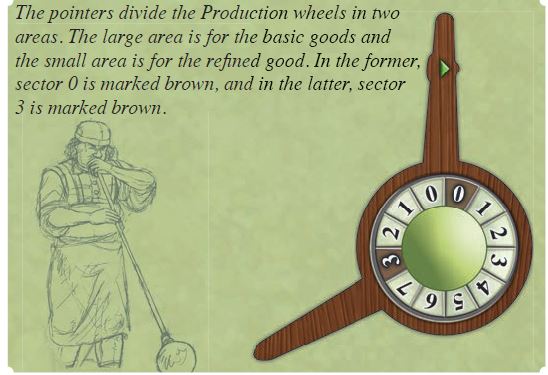
Rotate both of your Production wheels so that the longer pointer points upwards.
Place the depicted components on your boards as indicated on them. (With fewer than 4 players, remove the leftover boards, Good tokens and Forest tiles from the game).
The Production wheel on the top of your Production board represents your Glassworks.
You start the game with 0 Glass. Place the Quartz sand token in the brown sector 0, the Food token next to it in sector 1, the Charcoal token in sector 2, the Water token in sector 3, and the Wood token in sector 4.
The Production wheel on the bottom represents your Brickworks. As depicted, you start the game with 0 Bricks and 0 Charcoal. Place the Clay token in sector 1 on the right and the Food token next to it in sector 2.
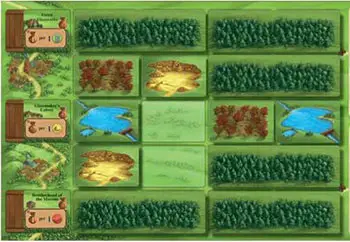
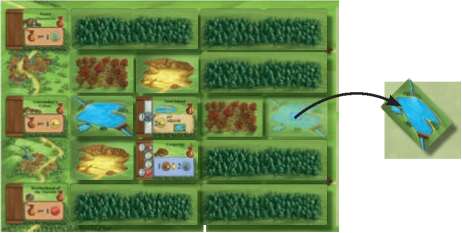
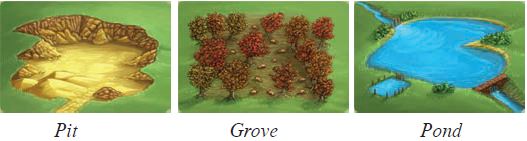
Place 6 Forests, 2 Pits, 2 Groves, and 2 Ponds as depicted on your Landscape board. Each Forest tile covers two Landscape spaces.
The Building Board and the Building Tiles
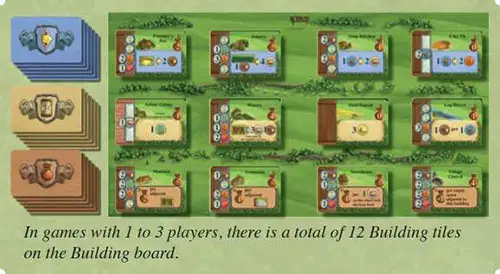
The Building board is two-sided. One side is used in games with 1 to 3 players, the other one is used in games with 4 players. Use the appropriate side of the Building board according to the number of players.
The back sides of the Building tiles display three different symbols (arrow, hourglass and purse).
Sort the Building tiles according to their back sides in separate stacks and shuffle each stack. Take about half of the tiles from each stack and place them face-down to the left of the Building board. You can add more tiles later if needed.
In games with 1 to 3 players, draw 4 Building tiles from each stack and place them separately on the spaces next to the stacks. Draw 5 Building tiles per stack in games with 4 players.
Game Play
Over the course of four building periods, you will build a variety of buildings. You begin the game with three Start buildings that are printed on the left-hand side of your Landscape board (you can upgrade them later in the game). There are three types of Building tiles:

Processing buildings

Immediate buildings with a one-time effect

Bonus buildings that provide bonus points at the end of the game for various accomplishments
Every Building tile is laid out like this:
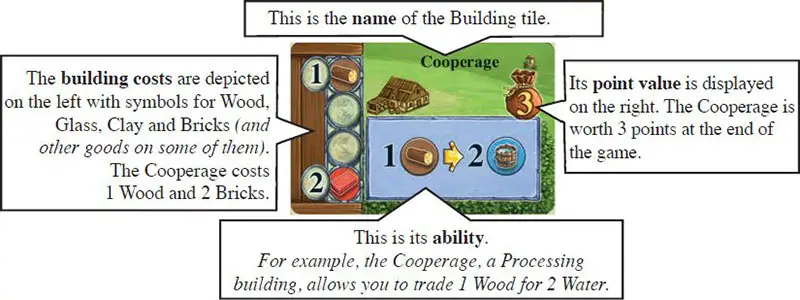
You need Wood, Glass, Clay, and Bricks to build buildings. Wood and Clay can be acquired directly with some Specialist cards. To produce Glass and Bricks, you will need a series of goods.
The production wheels are used to indicate the number of goods you have. The one on the top represents your Glassworks, the one on the bottom represents your Brickworks.

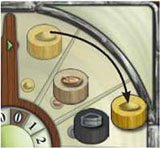
Example for how to use the Production wheel: when gaining 2 Quartz sand, move the Quartz sand token on the Glassworks wheel forward by 2 spaces in clockwise order.
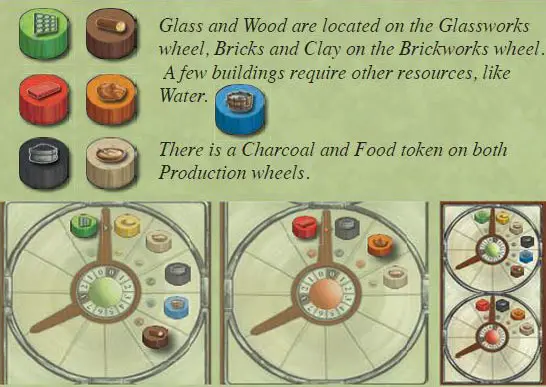
The various goods needed in this game are spread over both Production wheels.
Production
Whenever the brown sector 0 is empty (as depicted), the Production wheel immediately has to be rotated in clockwise order. (However, there is one minor restriction to this).

The arrows on the pointers remind you of the direction of rotation.
In the previous example, the brown sector 0 became empty after moving the Quartz sand token. Therefore, the Glassworks wheel has to be rotated by one sector.
There are five basic goods on the Glassworks wheel (and only three on the Brickworks wheel). Let us have a look at what happened due to the wheel rotation in the example.
Before, we had 2 Quartz sand, 1 Food, 2 Charcoal, 3 Water and 4 Wood. Now, we have one fewer of each of them: 1 Quartz sand, 0 Food, 1 Charcoal, 2 Water and 3 Wood.
In exchange, Glass went from 0 to 1. (The Glass token is on the other side of the pointer where the numbers increase in counter-clockwise order). This represents the production process: we produced 1 refined good out of 5 basic goods.
The Specialist Cards
Another important aspect of Glass Road is its card mechanism. Each player has an identical set of Specialist cards in hand. Every Specialist card provides two abilities.
At the beginning of each building period, you will choose a hand of 5 Specialist cards. Then the cards will be played over three card rounds. If you play a Specialist card that no other player has left in his hand, you will be able to use both of its abilities.
However, if at least one other player has that card left in their hand, each of you will only be able to use one of the two abilities.
Flow of Play
Here are the rules for the 3- and 4-player game.
The game goes through four building periods. Each building period consists of three card rounds.
At the beginning of each building period, secretly choose 5 Specialist cards out of the 15 that are available.
Put these 5 cards into your hand and set the other 10 cards aside, face-down. You may always choose from the full set of Specialist cards, regardless of the cards chosen in previous building periods.
Playing a Specialist Card
Over the course of three card rounds, each of you will...
- pick 1 card from your hand,
- and put it face-down in front of you;
- then you will reveal these cards one by one (i.e. turn them face-up)
- and resolve them immediately.
Whenever you reveal a Specialist card, your opponents must check if they have a copy of that card left in their hands. If they do, they must play their copy immediately.
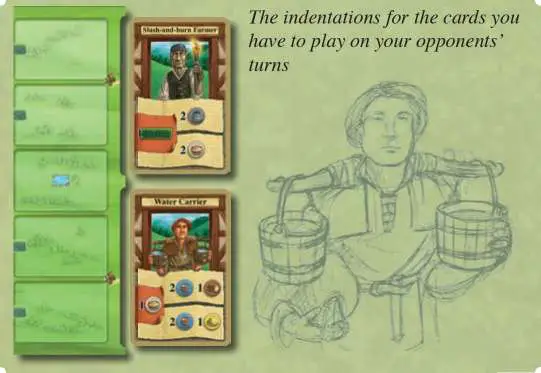
Place the cards that you must play from hand in the indentations on the right of your Landscape board. There are only two such indentations. This means that, per building period, you can only play two cards from hand outside your turn.
(If there is still space for another card in one of the indentations, you may not refuse to play a card from hand when forced to. Once both of your indentations are used, you may not and cannot play a card from hand outside your turn anymore).
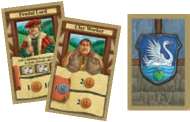
This player has played the Feudal Lord in the first card round and the Clay worker in the second card round. He is about to reveal the card he has picked for the third card round.
The Course of a Card Round
Immediately resolve the card you revealed or played from your hand. The next player must then reveal the card in front of them.
Repeat this process until all the picked cards have been revealed. After all of the picked Specialist cards have been revealed and resolved, set the revealed cards aside face-up (leave the cards you were forced to play in the indentations) and proceed with another card round by picking a new hand card and placing it face-down in front of you.
The current building period ends after three-card rounds.
Important Details on the Card Rounds
 On all three card rounds, reveal your face-down cards in clockwise order beginning with the player who has the Start player goblet in the current building period.
Resolve the cards in clockwise order as well. The first one to resolve their card is the player who has (placed it face-down and has now) revealed it. Then the players who were forced to play a copy of that card from their hands resolve their copies.
Quite often, two or more players will pick the same card. When another player reveals a card that you have placed face-down in front of you, you explicitly may not reveal (or resolve) your card. It stays face-down in front of you until it is your turn to reveal a card.
Further Details
At the end of a building period, some players may have 1 or 2 cards left in their hand that cannot be played in this building period anymore.
You can determine which card round you are currently in by counting the face-up cards that you have set aside.
Resolving a Specialist Card
Each Specialist card has two abilities. The cards have a similar layout.
Some of them provide Landscape tiles (Pits, Groves, or Ponds).
Other ones provide goods depending on the number of Landscape tiles you have.
Goods can be used to build buildings.
Many Specialist cards have entry fees. Other ones remove Forest tiles from your Landscape board: this makes room for new Building and Landscape tiles.
When resolving a Specialist card, there is an important distinction to make:
Whenever you are the only one to resolve a specific Specialist card, you may use both abilities of that card in any order. (You may not, however, choose to use one of the abilities twice).
Whenever you reveal your card and at least another player plays a copy of that card from his hand, you and the involved players may only use one of the two abilities of that card.
Details
When you resolve a card that other players have played as well, you may decide individually which ability you want to use (regardless of your opponents' choices).
Each Specialist card ability can only be used once per building period.
You may refuse to use a card ability. You may even play a card and not use it at all. The card is still considered played, though. Therefore, your opponents may still only use one of its two abilities.
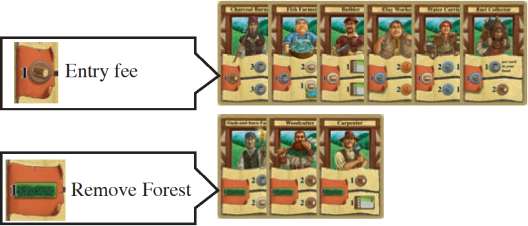
Some Specialist cards have an entry fee on their left. You have to pay this fee before using any of its abilities. Even if you may use both of its abilities, you only have to pay the entry fee once. You do not have to pay the entry fee if you play the card without using it at all.

If you were the only one to play the Charcoal burner, you would have to pay 1 wood to get 3+3=6 Charcoal using both abilities.
If other players had played it as well, you would have to pay 1 wood to get only 3 Charcoal via either ability.
At the end of a building period: Refill the buildings and pass the start player Goblet
A building period ends after three card rounds.
Refill empty spaces on the Building board with new buildings from the stacks. (Each row is refilled from the stack to the left of that row).
 Pass the Start player goblet to the next player in clockwise order.
In the 3-player Game Only
At the end of the third building period, the Start player goblet has to be passed to the player with the fewest buildings on their Landscape board.
In case of a tie, pass the Start player goblet to the next player in clockwise order (among the tied players).
Once the Start player goblet has been passed, another building period begins. The game ends after four building periods.
Details on Rotating the Production Wheels
As mentioned in the Introduction, some Specialist cards may provide goods that are indicated by the Good tokens on your Production wheels. Both wheels have two areas and each of these areas has one brown sector.
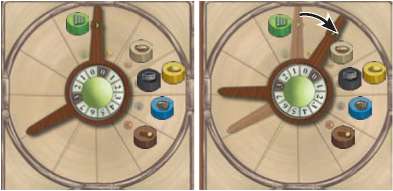
Whenever both brown sectors of a Production wheel are empty at the same time, immediately rotate that wheel by one sector in clockwise order (indicated by the arrow). Continue to do so as long as both brown sectors are empty.
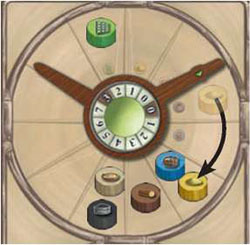
In this example, the Quartz sand token has been moved from sector 0 to sector 2.
(The Water token is on 2, Wood on 3, Food and Charcoal are both on 4). In the smaller area, Glass is on 2.
Both brown sectors are empty: as a result, the Production wheel must be rotated.
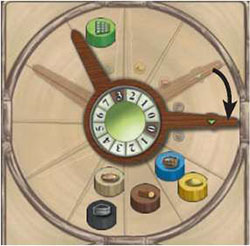
After one wheel rotation, the brown sector 0 is still empty.
However, the other brown sector is not empty anymore since the Glass token was moved from 2 to 3.
So the wheel will not be rotated again, for now.
Details
Whenever both brown sectors are empty, you cannot prevent the wheel from being rotated.
You may not rotate a Production wheel unless both brown sectors are empty.
You may not rotate the wheels in the middle of a transaction, e.g. when paying the building costs of a building or gaining goods via an action.
A wheel might have to be rotated multiple times in a row. This is considered a single process and may not be interrupted by anything else. (In particular, this "single process" may not be interrupted by anytime-actions, described in the next section).
Anytime-actions
There are actions that may be carried out at any time during the game and do not require a Specialist card. As long as you finish every action before starting another one, anytime-actions may literally be carried out at any time (especially outside your turn). Anytime-actions are:
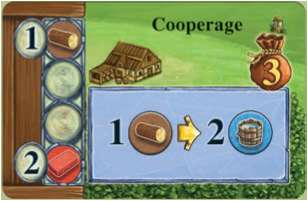
The top row of the Building board displays the Processing buildings. Once you have built such a building, you may do the depicted trade (indicated by the blue ability box) at any time during the game (even multiple times in a row).
For instance, you may trade 1 Wood for 2 Water with the Cooperage whenever you like. However, every single trade is considered an action and may cause wheel rotations.
You may remove Landscape tiles (i.e. Pits, Groves and Ponds) from your Landscape board at any time during the game (but you may not rearrange them). You may use the free space for other purposes.
In the example below, you might remove the Pond to make room for a new building. (Forest tiles, on the other hand, can only be removed with the help certain Specialist cards or buildings. Building tiles cannot be removed at all).
The Specialist Cards and Building
In this section, we will explain the Specialist cards in the context of each other (more details can be found in the appendix). We will also explain how to build buildings.
In some places, we will mention two values (like "2 or 4 Wood"). In these cases, the first value indicates what you will get for the card when you use one of its abilities, and the second value indicates what you will get if you use both of its abilities.
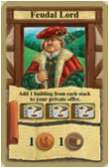
All players have access to the buildings on the Building board. You can play the Feudal Lord to get private access to a set of 3 buildings that only you can build (your private offer).
When using this ability, draw a Building tile from each stack of buildings and place it face-up in front of you. Its other ability provides 1 Wood and 1 Clay.
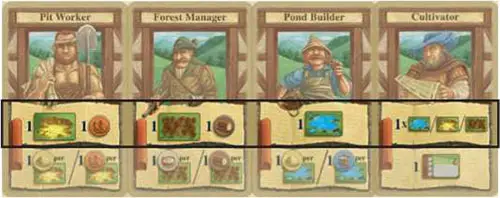
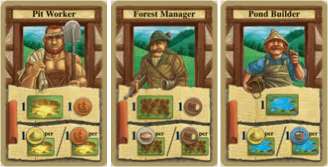
You can gain new Landscape tiles by using the Pit Worker, Forest Manager or Pond Builder. As its first ability, the Pit Worker provides a Pit, the Forest Manager a Grove, and the Pond Builder a Pond.
On top of that, you will get 1 Clay with the Pit Worker and 1 Wood with the Forest Manager. Their other ability provides a number of goods equal to the number of Landscape tiles you have of the respective type.
You can always choose from two options: the Pit Worker provides Quartz sand or Clay, the Forest Manager Food or Wood, and the Pond Builder Quartz sand or Water.
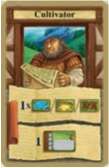
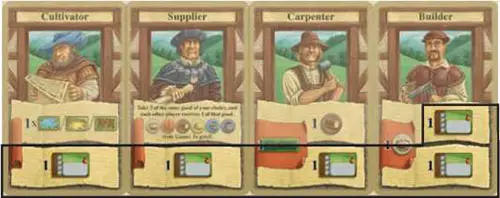
The Cultivator provides a Landscape tile of your choice. His other ability allows you to build a building.
How Does Building Work
When a Specialist card allows you to build a building, you may build any one of the available buildings on the Building board or one of the buildings from your private offer (created with the Feudal Lord) by paying its building costs. Most of the buildings are built with Wood, Glass, Clay or Bricks.
Empty spaces on the Building board will be refilled at the end of the building period.

Building tiles that show a wooden structure on the left, where the building costs are printed, have to be placed on an empty space of your Landscape board when built.
Building tiles that show a brick pattern instead are upgrades and have to be placed on top of the indicated Start building.
They may not be placed on empty spaces of your Landscape board. (Upgrading a Start building does not increase your number of buildings).
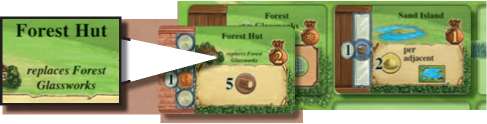
The Forest Hut is an upgrade for the Forest Glassworks, which is located at the top left of your Landscape board. Building tiles like the Sand Island are still considered buildings, even though their name suggests otherwise.
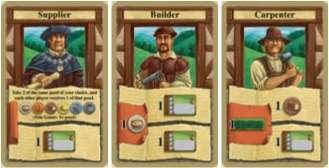
Beside the Cultivator, there are three more Specialist cards that you can build buildings with.
As its other ability, the Supplier provides you with 2 goods of the same type (except Glass and Bricks), but your opponents will also get 1 good of that type.
The Builder provides two building actions but requires 1 Food to build at all.
To use the Carpenter, you have to remove 1 Forest tile from your Landscape board. Its other ability provides 1 Wood.
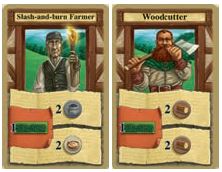
Removing a Forest tile is mainly a good thing. It makes room for new buildings. There are two more Specialist cards beside the Carpenter that remove Forest tiles.
If you remove a Forest tile with the Slash-and-burn Farmer, you will get 2 Charcoal and/or 2 Food. If you do so with the Woodcutter, you will get 2 or 4 Wood.
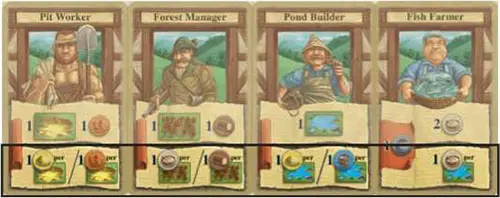
The next five Specialist cards are mainly used to collect goods and they all have entry fees. The Clay Worker requires 1 Water to provide 2 or 4 Clay.
The Fuel Collector also requires 1 Water to provide 1 Charcoal per card left in your hand. Its other ability provides 2 Wood.
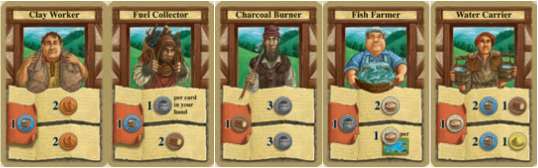
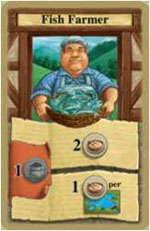
The Charcoal Burner requires 1 Wood to provide 3 or 6 Charcoal. The Fish Farmer requires 1 Charcoal to provide 2 Food and/or 1 Food per Pond you have ("smoked fish"). The Water Carrier requires 1 Food to provide 2 Water and 1 Wood, and/or 2 Water and 1 Quartz sand.
The Landscape Tiles
The number of Landscape tiles is supposed to be unlimited. Improvise if you run out.
End of the Game
The game ends after 4 building periods. Then all players may use their Processing buildings any number of times before the scoring begins. During the scoring, add up the values of your buildings.
The value of your Bonus buildings depends on their requirements. For instance, the Start building "Glassmaker's Colony" is worth half a point per Quartz sand. (Do not round this value).
The player with the highest score wins. In case of a tie, there are multiple winners.
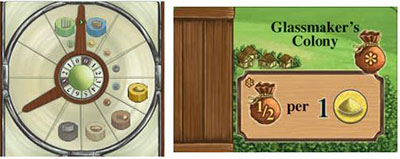
The Glassmaker's Colony is the only building in the game that may have a non-integer value. In this example, the 3 Quartz sand you have left are worth 1.5 points.
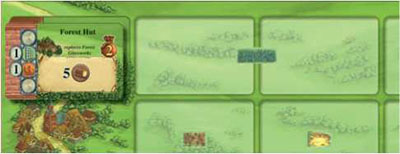
If you upgrade a Start building, you will only get points for the upgrade (but not for the upgraded Start building). In this example, the Forest Glassworks was replaced by the Forest Hut. You will get 2 points for the Forest Hut.
The 2-player Game
Play according to the multiplayer rules but with the following changes.
Do not place hand cards face-down in front of you during a building period. Instead, beginning with the Start player, players take turns to play a card face-up from their hand until one of them runs out of hand cards.
The building period ends immediately when this happens. Most often, one player will have some leftover hand cards that they cannot play anymore.
However, as in multiplayer games, no player should have more than 2 cards left in hand. If a player has 3 cards left, they may play one of them and use it by themselves.
Continue Reading