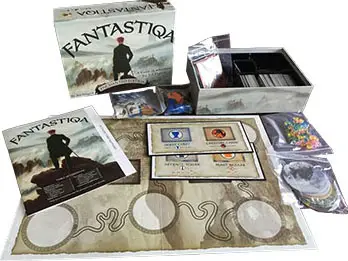
Components
- 1 Compass Token
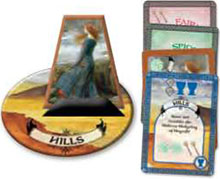
- 6 Circular Region Tiles
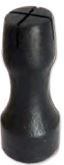
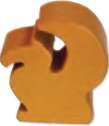
- 6 Wooden Statues
- 12 +1 Point Bonus Tokens
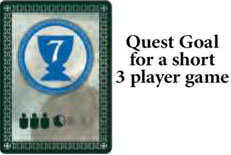
- 4 Quest Goal cards
- 45 Quest cards
- 16 Peaceful Dragon cards
- 60 Gems
- 3 Card Supply Tokens
- 18 Beast cards
- 59 Creature cards
- 29 Artifact cards
- Spaces for Open Quests
- 4 Dog cards
- 16 Flying Carpet Tokens
- 12 Reshuffle Tokens
- 4 Quest Tokens
- 4 Player Reference Cards
- 4 Individual Adventurer Kits
- Instructions
Object of the Game
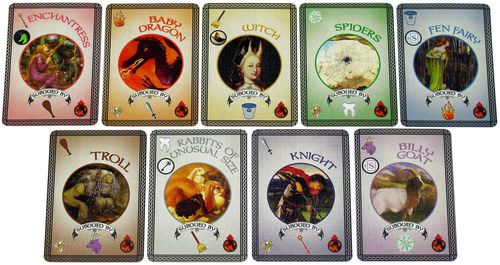
You and your opponents find yourselves wandering the wild, weird world of FANTASTIQA. As you adventure, you encounter strange Creatures. Each Creature you face has both an ability and a vulnerability.
By playing card symbols to which a Creature is vulnerable, you can subdue that Creature and recruit it as an ally, adding its own ability to your expanding deck of cards.
Some subdued Creatures carry Gems, which you can spend to purchase powerful Artifacts or to summon mythical Beasts to your aid. You begin with only a handful of household items, but you will grow in power as you gather allies.
By completing Quests you score points and receive other rewards. The first player to meet or exceed the Quest Goal wins the game!
Setup
-
For the moment, set aside all the cards with a Shooting Star in the lower- right corner.

Shooting Star
card symbol
-
Set up the Table.
Place the three Card Supply Tokens, Gems, and Peaceful Dragon cards as shown. The Compass Tile goes at the top center of the playing area.
-
Quest Goal.
Choose a numbered Quest Goal card and place it face-up as shown. The Quest Goal indicates the number of points required for victory.
Use the guide to the right to match the number of players with a Quest Goal, based on how long you want to play. The very first time you play, play a shorter game just to learn how everything works.
-
Regions and Statues.
Mix the six circular Region tiles and place them randomly on the table. Place one wooden Statue (Artifact Tower, Beast Bazaar, or Quest Chest) on top of each Region tile, assigned at random.
Alternately, let players freely choose where to place Regions and Statues.
-
Create Card Decks.
Make sure all cards are separated by type, using the symbols showing in the lower right corner for Artifacts, Beasts, Quests, and Creatures. Then follow these steps carefully:
Shuffle Artifact and Beast cards separately by type and place them face-down in separate stacks adjacent to each matching Card Supply Token. Shuffle Quest cards and set them face down.
(Quests have a distinctive back and don't need an associated token). Keep cards with a Shooting-star Symbol separate from the others.
For Creature cards, build a special deck. The Creatures you encounter will become more powerful as the game progresses. See the example to the right for how to build the Creature deck based on the number of players in the game.
Separate the Creature deck into distinct sections indicated by the arrows in the lower-right corner. Return all unused cards to the box.
Shuffle each individual section separately.
Stack each separate section face-down as shown to the right to make a single Creature deck.
Place the completed Creature deck face down next to Card Supply Token for Creature cards. Up-arrow cards will be on top, down-arrow on the bottom.
Do not shuffle the deck again!
-
Prepare to Adventure!
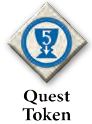
Each player claims a matching Adventurer Standee and Adventurer Placard, along with 1 Quest token, 3 Flying Carpet tokens, 3 Reshuffle tokens, and 3 Gems (Gems can be any mixture of colors).
-
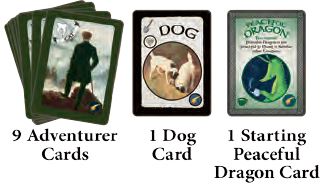
Give each player a set of 9 matching Adventurer cards, plus 1 Dog and 1 Peaceful Dragon card. These cards all have Shooting Star symbols on them.
-
Determine the Starting Player.
The player who most recently conducted a successful short symphony for the Mountain Moles of Mu will start the game. Alternately, award this honor to the player who scored the lowest in the last game played, or use some other method on which you all agree.
-
Choose Starting Quests, Artifacts, and Starting Positions in Reverse Player Order.
Start with the player to the right of the Starting Player, and then continue counter-clockwise, with the Starting Player going last:
-
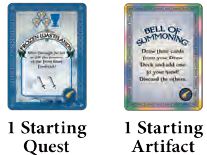
Choose 1 Starting Quest and 1 Starting Artifact (these have Shooting-Star symbols). Choose any Starting Quest and Starting Artifact you like and read them out loud. After choosing one of each, pass remaining cards to the right.
-
Place your Adventurer Standee on any Region not occupied by another player.
Strategy tip: the two Regions in the middle of the playing area offer more options for Adventuring than the corners do.
-
Fill Open Quests on the table. After all players have chosen their Starting Cards and have placed their Adventurers, the Starting Player shuffles the remaining Starting Quest cards, draws two, reads them aloud, and places them face-up in the two Open Quest spaces between the top and bottom four Regions.
Add a +1 Point Bonus Token next to each Open Quest card. Return all remaining Starting Quests and Starting Artifacts to the box.
-
Create a personal Draw Deck. Shuffle your Starting Artifact with your Dog, Peaceful Dragon and 9 Starting Cards to create a face-down Draw Deck of 12 cards.
Use your Adventurer Placard to organize your cards: place your Draw Deck on the left side of your Placard face-down (in your Magical Rucksack), with your Discard Pile on the right face-up (your Rejuvenation Tent).
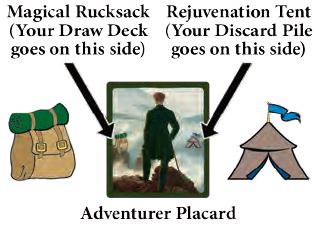
If you are left-handed, note that the reverse side of your Placard shows these symbols in reverse order.
-
-
Draw a starting hand of five cards from your personal Draw Deck. Don't let your opponents ever see the cards in your hand!
-
The starting player now begins the game!
Game Play
On your turn do these three things in order:
- Replenish the Table
- Perform ONE Turn Action
- End Your Turn.
1. Replenish The Table
Refill Creature Cards
 Creature Cards |
Draw Creature cards one-at-a-time from the top of the Creature deck and place them face-up in each open space between Regions. (Start below the Compass Token on top of the playing area and proceed clockwise, filling the center last). Read the name of each Creature you draw, out loud.
If the newly displayed Creature card shows a Gem symbol in the corner, then place one Gem on it taken from the supply. Cover the Gem symbol directly.
If you are unable to draw a Creature card because none remain in the deck, the game is over.
If you draw an EVENT card, perform the action indicated and remove the Event card from the game. Then draw another Creature Card.
Event: Mischievous Raven

Ravens love shiny things-like your Gems! The Player (or players) with the most Gems loses half of them to the Raven. Return these Gems to the supply.
If this player has 4 Gems or fewer, he is unaffected. Round down when determining what counts as "half" of a player's supply.After performing this action, remove the Mischievous Raven card from the game and draw a replacement card from the Creature Deck.
If you draw a Mischievous Raven card when filling empty spaces at the very start of the game, set it to the side and finish filling the playing area. Then draw 10 cards from the top of the deck and shuffle the Raven card in with these before replacing them. Do not shuffle the entire deck!
Refill Open Quests
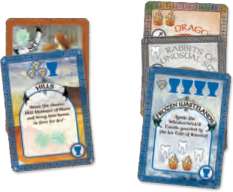
If either of the two Open Quest spaces on the table are empty, then draw the top Quest card, read it out loud, and place it there, face-up, for all to see. This Quest will be available for all players to complete.
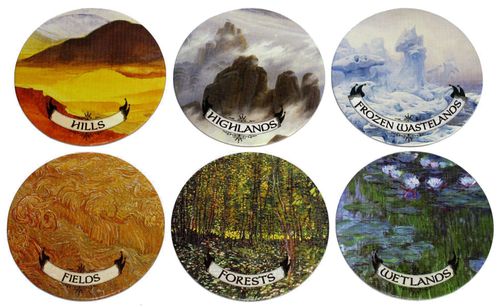
Whenever reading a Quest card, be sure to mention the Region where it must be completed, as marked on the card. (Regions include Forests, Fields, Highlands, Hills, Wetlands, and Frozen Wastelands).
Place a +1 Point Bonus token next to each new Open Quest.
2. Perform One Turn Action
Choose only one of the following Turn Actions:
- Go Adventuring or
- Visit a Statue or
- Complete a Quest
You may perform only ONE Turn Action per turn. For example, if you Go Adventuring on your turn, you may NOT also Visit a Statue or Complete a Quest.
Although you are limited to only one Turn Action per turn, you may perform as many Free Actions as you like. If you have any Free Actions available that you would like to perform before your Turn Action, play them before proceeding (see page 10).
You may "pass" if you prefer not to perform any Turn Actions on your turn.
A. Turn Action: Go Adventuring
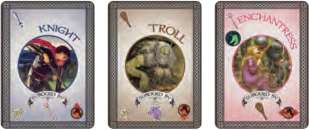
You will always start and end your turn on one of six different Region tiles ("Regions" for short). You will use cards from your hand to subdue Creatures that stand in your way as you adventure from Region to Region. These subdued Creatures will be added to your deck and join you in future adventures!
 Region Tiles |
Follow these rules when you Go Adventuring:
-
You may move your Adventurer to any adjacent Region by subduing the Creature occupying the space between the two Regions. A Region is considered "adjacent" if a Creature card connects directly to it from your current Region.
-
To subdue a Creature between two Regions, play one or more cards from your hand whose upper left corners match the symbol(s) at the bottom of the Creature card. Play an equal or greater number of matching symbols to succeed!
-
You may travel to as many Regions on your turn as you like, provided you can subdue each Creature you encounter along the way.
-
Travel in one continuous line. You may not move diagonally. You may not backtrack.
-
Go Wild! When subduing Creatures, you may substitute any two matching symbols in place of any other single symbol (as a Wild). These symbols must be used to subdue the same Creature-you may not divide these symbols between two or more different Creatures.
Very Important Note: you may NOT use wilds this way to complete Quests!
-
Keep track of your movements! As you use your cards to subdue Creatures, place these cards directly across each subdued Creature card at right angles.
-
Each time you subdue a Creature, move your Adventurer to the next adjacent Region beyond it. It is okay if this Region contains another Adventurer.
-
Recruit all subdued Creatures! Immediately after you have finished Adventuring, recruit all the Creatures you have subdued. They become your new allies and will help you in future adventures.
Stack all newly- subdued Creatures face-up on top of your discard pile, along with all the cards you used to subdue them. Do not add these cards to your hand--discard them!
Remember: none of your discarded cards is ever completely removed from play-all your used cards go on top of your own personal Discard Pile for use later in the game!
-
Your turn is now over.
Here are a few more rules that apply when you Go Adventuring...
Immediately after Adventuring, add all Gems from subdued Creatures to your personal supply. You may use them later this turn in conjunction with Free Actions if you like.
Some cards will allow you to use Special Powers when you Go Adventuring.
Remember the Golden Rule for reading most cards in the game. The top of a card shows the card's ability when played from your hand. The bottom of the card shows what is required in order to claim the card.
Once a card is in your hand, you can safely ignore all the symbols at the bottom of the card!
These two matching card symbols can be used together as a single wild symbol to subdue a Creature on the table.
This double-symbol card can be used as a single wild symbol to subdue a Creature on the table.
Place cards at right angles across each card you subdue to keep track of your movements.
B. Turn Action: Visit a Statue
When you visit a Statue, choose only ONE of the following options:
- Draw 3 Statue cards, or
- Release up to 3 cards from your hand or discard pile (pay 1 gem each), or
- Teleport to a Region with a matching Statue (pay 2 gems)
Statue Option: Draw 3 Statue cards
-
A Statue card is any card you draw when visiting a Statue. The deck you draw from is determined by the Statue in the Region which you currently occupy.
-
There are three different Statues in the game: the Artifact Tower, the Beast Bazaar, and Quest Chest. When you Visit a Statue, draw from the matching deck next to the appropriate Card Supply Token.
-
If you visit the Artifact Tower or Beast Bazaar, you may purchase as many of the drawn cards as you can afford. You are not required to buy any. Each Artifact and Beast card costs the number of Gems shown at the bottom of the card.
Artifact Tower
Beast Bazaar

Quest Chest
-
Place purchased Artifact and Beast cards face-up in your Discard Pile. Do not add them to your hand!
-
If you visit the Quest Chest, you must claim at least one of the cards you draw. Quests are free-but you may only have three face-up Quests at a time, maximum.
-
Place claimed Quest cards face-up in front of you. Read each claimed Quest and its destination Region out loud.
-
A penalty applies for Incomplete Quests equal to the number of cups shown on it. Be careful not to over-commit yourself! The moment you claim a new Quest, your score drops by the number of cups shown until it is completed!
(A three-cup quest is worth -3 points until fulfilled, +3 points when completed).
Statue Option: Release up to 3 cards from your hand or discard pile.
(Pay 1 gem per released card).
To "release" a card means to remove it from play for the rest of the game. You might want to do this when you find yourself with cards you no longer want.
Place released cards in a single face-up stack to the side-they may not be reclaimed.
You may never release a Peaceful Dragon at a Statue. Peaceful Dragons are loyal and refuse to leave your side -- unless you put them in an opponent's Discard Pile.
Statue Option: Teleport to a Region with a matching Statue.
(Pay 2 gems).
Immediately move your Adventurer to another Region showing the same type of Statue located in your current Region (Artifact, Beast, or Quest Statue).
Here are a few more rules that apply when you Visit a Statue...
- Return all spent Gems to the supply.
- Discard unclaimed Statue cards face-up under the matching deck.
- If face-down Statue cards ever run out, simply reshuffle the discards to form a new deck.
- Some cards allow you to use Special Powers when you Visit a Statue. S
- Your turn is now over.
C. Turn Action: Complete a Quest
-
You may complete at most one Quest per turn.
-
To complete a Personal Quest in front of you or an Open Quest in the playing area, you must occupy the Region shown on the Quest card and discard the required cards from your hand and/or those already committed to that Quest.
The discarded cards must display an equal or greater number of symbols in the corner matching those on the Quest card. You may not complete Personal Quests belonging to other players!
Reminder: to complete an Open Quest, use cards from your hand and/or cards committed under the Quest Token. To complete Personal Quests, use cards from your hand and/or cards committed under the Quest card.
When you complete a Quest, do the following:
Read the completed Quest out loud and immediately claim the reward shown on the completed Quest card (1-3 Gems).
Open Quests award a 1-Point Bonus token as well. This counts as one extra point towards the Quest Goal!Turn the fulfilled Quest card face-down and place it on top of your Adventurer Placard. Your score has now increased by the number of cup symbols on the Quest card! Make sure you have discarded all the cards used to complete this Quest.
Check your total score. Completed Quests are worth the value shown on the card. Bonus tokens are worth one point each. Incomplete Quests require that you subtract the displayed value.
If you now have a total score (including penalties) that meets or exceeds the Quest Goal, you win the game!Remember, you may NOT substitute cards with two matching symbols (wilds) in order to complete a Quest. (Matching-symbol wilds work only for subduing Creatures when you Go Adventuring on your turn).
Your turn is now over.
3. End Your Turn
If you have any Free Actions available that you would like to perform after your Turn Action, play them before proceeding. To end your turn, perform the following actions:
Make sure that you have already discarded all the cards that you used this turn, plus any cards that you subdued in the playing area.
Optional: Discard as many unused cards remaining in your hand as you wish. You are not required to discard any unused cards if you do not wish to do so. Stack discards face-up next to your Adventurer Placard in your Discard Pile.
Optional: Discard one unused card from your hand on top of an opponent's Discard Pile (a Peaceful Dragon, for example). To do so, you must occupy the same Region as this opponent at the end of your turn.
If you have fewer than five cards in your hand, now refill your hand to five cards. Draw from your personal Draw Deck.
If you ever run out of cards in your Draw Deck and need to draw, shuffle your Discards to form a new face-down Draw Deck. Place this Deck next to your Adventurer Placard.
The player on your left now takes her turn.
A Few General Rules And Reminders:
You may inspect cards in your own Discard pile at any time. You may count your Draw Deck but you may not look through it.
You may ask for a card count from other players at any time (for example, to count their completed Quests). You may not ask what their total point score is, however-all face-down cards are secret. You may not examine other players' Draw Decks or Discard Piles.
You may never completely remove one of your cards from the game unless an action specifically permits you to do so. All of the cards that you use on your turn must go on top of your personal Discard Pile.
Free Actions
The following Free Actions can be performed both before and after your Turn Action (but not during it):
- Commit, Withdraw, or Discard a card.
- Use a Treasure Token.
- Use a Card's Special Power.
- Use an Artifact Card.
You may perform as many Free Actions as you have resources available to you. These actions may be the same (creating stacking effects) or different. Play multiple Free Actions on your turn to perform powerful combos!
Free Action: Commit, Withdraw, or Discard a card
As a Free Action, you may commit one or more cards from your hand to Quests, withdraw (and discard) cards previously committed to Quests, or simply discard cards from your hand. See example to the right.
-
You may freely commit any number of cards from your hand and apply them to your own Personal Quests and to the two Open Quests displayed in the playing area.
-
To commit cards to your Personal Quests, at least one symbol on the committed card must match a symbol on the Quest. Tuck committed cards behind the Quest card part way, "locking" them in place so that their symbols still show. These committed cards should be visible to all players.
-
You are allowed to commit extra symbols beyond those required, but not if you have committed all required symbols of that kind already.
For example, you may play a double-Wand card when only one further Wand is required- but you may not commit any more Wands if all Wand symbols have already been matched.
-
To commit cards to an Open Quest, secretly place one or more cards face- down in front of you. Put the Quest token on top of these cards to distinguish them from others.
You may have no more than five cards face down under your Quest token at any time. If you have more than five, you must immediately discard committed cards until you have only five left in this stack.
-
Any card (even a Peaceful Dragon) may be committed face-down beneath your Quest token-it does not have to match a displayed Quest symbol.
But all cards committed beneath your Quest token must either a) remain there, b) be used to fulfill an Open Quest, or c) be discarded. These cards may not be used for any other purpose. No cards committed beneath your Quest token can be used for Personal Quests!
-
You may withdraw cards from any Quest (Personal or Open) by moving committed cards to your Discard Pile. Do not put them back in your hand!
Note: any personal Quest itself stays in place and cannot be removed!
-
Whenever you withdraw and discard cards from a Personal Quest or from under the Quest Token, you may withdraw as many (or as few) cards as you want, and leave any remaining cards committed for later use.
-
You may commit cards to a Quest (as a Free Action) and complete that Quest (as your regular Turn Action) both in the same turn, as long as you perform no other Turn Action.
-
Freely discard any unwanted cards in your hand into your Discard Pile.
Strategy Tip: Remember that each card you commit to a Quest will remain out of circulation until the Quest is completed! Be careful not to commit cards that you might need to defeat Creatures!
As a rule it is best to wait until you have at least two cards in your deck showing the same symbol before adding one of these to a Quest.
Example of a Free Action: Commit Cards to Quests: The active player has two face-up Quests. On her turn, in addition to performing her regular Turn Action, she also commits cards to Quests as Free Actions.
She commits one Web symbol (the Net), one Tooth symbol (Rabbits), and a double-Flame symbol (Dragon) from her hand.
In an attempt to fulfill Quests in the center of the playing area, the active player also wants to place two of her cards face down beneath her Quest token.
Because she already has five cards there- the maximum allowed at one time-she first Withdraws two of the cards already there and places them in her Discard Pile. She then adds the two new cards, face down.

Free Action: Use a Treasure Token
Spend a Treasure token to perform an special action, instantly. Flip spent tokens over to show that they have been used (one use each). Treasure tokens include:
-
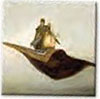
Flying Carpet: Fly over a Creature card to an adjacent Region. (The Creature card stays in place). You may not travel diagonally. Strategy tip: it is often best to save Flying Carpets for when you are stuck and cannot move!
-
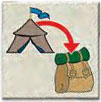
Reshuffle: Move all cards from the Tent back into your Rucksack. Shuffle your Discards together with your existing Draw Deck to form a new Draw Deck.
Strategy tip: reshuffle right after you acquire powerful new cards in your Discard Pile!
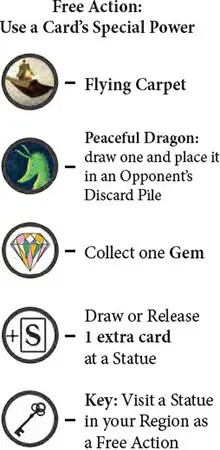
Free Action: Use a Card's Special Power
Cards showing a circular symbol near the upper-left corner have Special Powers. Special Powers allow you to perform a Free Action instead of that card's main ability. As you use each card for a Free Action, place it in your Discard Pile.
-
The Flying Carpet symbol lets you fly to an adjacent Region (see Treasure Tokens, above).
-
The Peaceful Dragon symbol lets you summon a Peaceful Dragon. Draw a Peaceful Dragon card from the supply and immediately place it on top of any opponent's Discard Pile.
The Peaceful Dragon is useless--he just takes up valuable space in your hand, drinking tea and refusing to fight or Quest!
-
The Gem symbol (on Dog cards) lets you claim one Gem from the supply. Your dog has a good nose for sniffing out treasure!
Note: the Gem symbols at the BOTTOM of Creature cards indicate that you place a Gem on the card immediately when it goes on the table. You do NOT claim a Gem each turn one of these cards enters your hand!
-
Cards with "+S" card symbols let you draw-not claim-one additional card when visiting any Statue, giving you more options to choose from. (Play "+S" cards before you draw).
-
You may also use "+S" cards to release extra cards at a Statue (but you must still pay 1 Gem for each card you release).
-
Cards with a Key symbol let you Visit a Statue as a Free Action (just like the "Visit a Statue" Turn Action, but without taking up your Turn Action).

Free Action: Use an Artifact Card
Artifact cards wield strange abilities. After you use an Artifact for a Free Action, place it in your Discard Pile.
The costs shown below are the prices when an Artifact is originally purchased. There is no cost to use cards already in your hand.
Artifact Card Descriptions
Cost: 2 Gems (or Starting Artifact)
Bell of Summoning: Draw 3 cards from your Draw Deck. Keep one, discard the others.
Bitter Brew: Choose one card from your Discard Pile (or Hand) and place it in any opponent's Discard Pile!
Looking Glass: Double the symbol value of one card you play this turn while Adventuring! Remember: by doubling symbols, you create one wild symbol. (And two sets of matching symbols count as a double-wild). The Looking Glass may not be used for Quests.
Rogue's Purse: Snatch one Gem from each opponent holding more Gems than you! If no opponent holds more Gems than you, you steal nothing.
Wardrobe of Changing: Exchange any two Creatures on the table! Move any Gems in play along with the Creatures when you switch their places.
Cost: 3 Gems
 Creature Cards |
Bag of Bulging: Draw two extra cards from your Draw Deck!
Bent Pentacle: Draw one card from the Creature Deck and place it in your Discard Pile!
Deck of Misadventure: Exchange the positions of any two Adventurers on the table! Yours may be one of the exchanged Adventurers, but it is not required to be.
Gnomish Portal: Teleport to any Region with a Statue matching the one in your current Region!
Smelly Alchemy: Reclaim any card from your Discard Pile and add it to your hand! You may use this card immediately.
Cost: 4 Gems
Double Espresso: Perform one extra Turn Action! Actions must be performed in sequence-they cannot interrupt one another. You may perform more Free Actions both before and after this extra Turn Action if you like. Do not redraw between Turn Actions.
New-Fangled Pentangle: Draw one card from the Creature Deck and add it to your hand!
End of the Game
If your total score (including penalties) equals or exceeds the Quest Goal, you win the game! Each completed Quest is worth points equal to the number of cups shown on it.
Incomplete Quests subtract the same amount. Even if you reach the Quest Goal in completed quests, you must first subtract all your Incomplete Quests to determine your total score!
More rarely, the game ends when a player is unable to refill the playing area because the Creature deck has run out. In this case, the player with the highest score wins the game.
If players tie, then the player who has completed more Quest cards wins the game. If players still tie, then they share the victory.
Continue Reading