Venice, also called Serenissima, the most venerable, flourished in the late middle ages as a merchant center. The old established families competed for political power and influence in this city state.
As the heads of these families, the players use their power and influence to build the most magnificent buildings and palaces along the Grand Canal. Those that move swiftly and cleverly may attain the highest office in Venice: the office of the Doge!

Components
- 60 houses
- 32 palaces
- 9 advisors
- 28 ballot markers
- 24 control rings
- 28 player cards
- 14 voting order cards
- 1 game board
- 1 rule booklet
- 1 rule summary/overview
Setup
Place the board in the middle of the table. Each of the advisor figures has a symbol on its top. Place the advisors on the spaces on the right side of the board with symbols matching those on the tops of the advisors.
Each player chooses a color and takes the houses, palaces, ballot markers, and control rings in this color. He places them before him on the table in his supply area.
Players place their ballot markers in their supply area face down so that other players cannot see their values. A player may always look at his own ballot markers.
Separate the 28 player cards by the color on their backs. Each player takes his set of 7 player cards and places them face down in his supply area.
When playing with three players, place the components of the fourth color back in the box.
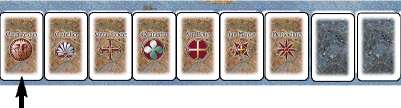
Separate the two sets of voting order cards by their backs and shuffle each face down.

Place the brown backed cards face up on the 7 brown spaces along the bottom of the board. Place the blue backed cards face down on the 7 blue spaces along the bottom of the board.

The order in which palaces are built only influences the number of houses needed to build them. The order has no influence on the end of the game as the game ends at the end of a game year, not during it.
Game Elements

The game material is limited. When a player has no more houses or palaces in his supply, he is out and cannot retrieve them from the board, except the houses by building a palace.
Thus, a player should carefully plan his placement of houses so that he does not run out at a time when he needs to place them to build a palace. Also, players should carefully plan their palace placements to put them in a position to win.
In the beginning, it may appear that the use of ballot markers is a bit random, but as the game progresses, players will begin to see patterns emerge from their opponents. By watching others carefully, players can place their ballot markers to their best advantage.
Control of the advisors is an important tactical element of the game. Because the advisors vote for the players that control them, they can be placed in areas voting later in this game year to strengthen a player's chance to win an election.
Because the voting order of the areas is chosen randomly for each game year, it is possible for an advisor to vote twice before his area votes and other players have an opportunity to take control of the advisor. Thus, wise players will look to take advantage of such situations when they occur.
Under some circumstances,a player may be able to win an election with just an advisor in an area. If no players place ballot markers in an area or the only ballot marker placed is a value 0 as a bluff, a single advisor can win the election with his single vote!
It may be a good strategy later in the game to try to win an election in an area with a high palace cost. The winner can abstain from taking control of the advisor to move a house into or out of the area and, thus, make it possible for him to build an important palace.
Also, in the later stages of the game, winning the election for the Quarantine with its possibility of two house moves can be extremely important to help a player build a much-needed palace, even in an area where he lost an election.
If two or more players tie for first in the voting, no player takes control of the Quarantia's advisors. All 3 become neutral and are placed on their symbols on the right of the board.
The players tied for first may each move 2 of their houses. Each house may be moved from any district to any other district.
In this case, there is no runner-up.
If there is a single winner, but two or more players tie for runner-up, no player takes control of the runner-up's advisor. Instead, it remains neutral. Each of the tied players may move 1 of their houses. Each house may be moved from any district to any other district.
Elections in the Districts
The winner of the election takes control of the district's advisor and stands it in the area of his choice (not its home district).If he abstains,he neutralizes the advisor and moves 1 house to or from this district. He then may place 2 houses from his supply in this district.
The runner-up may now place 1 house from his supply in this district.
All other players get nothing.
If two or more players tie for first in the voting, no player takes control of the advisor. It is neutralized and placed on its symbol on the right side of the board. Neither player may move a house. Each of the tied players may place 2 houses from their supplies in the district.
In this case, there is no runner-up.
If there is a single winner, but two or more players tie for runner-up, each tied player may place 1 house from their supply in the district.
When a player has the opportunity to place a house but has no more houses in his supply, he must abstain from placing the house and, thus, loses the opportunity to place a house.
Building Palaces

Whenever a player places or moves a house into a district, he immediately checks to see if he may build a palace there. Players may not build palaces in a district at any other time.
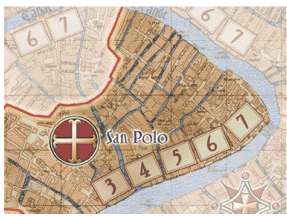
To build the first palace in a district, a player needs 3 houses in the district (note the number on the place for the first palace). For the second palace in a district (regardless of who built the first), a player needs 4 houses in the district (note the number on the place for the second palace).
The third palace requires 5 houses and so on. This represents the need for each subsequent palace to be greater and grander than those preceding it.
In each district, the players may only build 5 palaces on the 5 available spaces numbered 3 to 7. Beyond that, a player is not limited in the number of palaces he may build in a district nor is he required to build any palaces in a district,
If a player has enough houses in a district to build a palace, he removes the required number of his houses and returns them to his supply. He places one of the palaces from his supply on the next available palace space in the district.
If he has extra houses (beyond those needed to build the palace) in the district, they remain.
A player who has the necessary houses to build a palace may abstain. He may, for example, plan to move them later to another district.
If several players tie for first or runner-up and they can build palaces, they build at the same time, and each "pays" the same number of houses to build their palace. The number of houses needed is the number shown on the first available building space.
Example: There are 2 palaces In San Marco. Thus, the next palace will "cost" 5 houses. Anna has 4 houses in San Marco and Bernd has 3 houses there. Both tie for first in the election.
Each places 2 houses in San Marco, giving Anna 6 and Bernd 5. Both now build a palace for 5 houses each, placing them on the 5 and 6 numbered palace spaces. This leaves Anna with 1 house in San Marco.
The Board and the Figures
The board has a map showing the 6 central districts of Venice: Cannaregio, Castello, Dorsoduro, San Marco, San Polo, and Santa Croce. Red-brown lines and the Grand Canal mark the borders between these districts.
Each district has building spaces for 5 palaces. The Quarantia is located in the Doge's palace in the upper part of the board. During the middle ages, the Quarantia was a meeting place for politicians and advisors in Venice. The 6 districts and the Quarantia are the 7 playing areas. Each has a symbol for easy identification.
The symbols on the tops of the 9 advisors match the symbols for the 6 districts (1 each) and the Quarantia (3). The matching area is the home area for the advisor.

For example, the Castello district is the home area for the advisor with the shell symbol.
Game Play
The game is played over several game years. In each game year, each district elects an advisor and the Quarantia elects 3. Each game year has two phases.
In the first phase, the players place their ballot markers face down on the areas of their choice.
In the second phase, each area holds elections. The players turn over their ballot markers. The two players with the most votes in a district may build houses there. When a player has built the required number of houses in a district, he may convert the houses to a palace.
The game ends after the year in which a player has:
- at least 1 palace in each district or
- a total of 7 palaces in 5 districts or
- a total of 8 palaces in 4 districts.
Object of the Game
The player who accomplishes this is the new Doge and the winner of the game.
The Game Year
first phase: placing ballot markers
During this phase, players place ballot markers in the areas where they want votes. Each player places ballot markers:
- 4 times in a 3 player game and
- 3 times in a 4 player game.
After the 3 or 4 rounds of placing ballot markers, the first phase is complete.
Choosing Cards & Ballot Markers
Players choose the areas, one at a time, where they want votes and then the number of votes they want in those areas.
They choose the areas by selecting from their player cards and then 1-4 ballot markers to place in each area. Each player gets votes in an area based on the numbers shown on their ballot markers in the area.
First, each player selects the area where they want votes by choosing one of his player cards (each has one of the areas on it) and placing it face down in his supply area.
Next, he places 1-4 ballot markers from his supply face down on the card he just played. He may not take ballot markers that he has already placed on the board this game year.
Placing Ballot Markers
When all players have chosen their cards and placed their ballot markers on their cards, they turn the cards over simultaneously, moving the ballot markers off the cards without revealing the ballot markers. Note: the ballot markers remain face down until phase two!
The players now place the ballot markers they had placed on their player cards on the areas shown on the cards. They place them face down. A player may stack his ballot markers on top of each other.
The used player cards remain face up in the players' supply areas until the end of the phase. Thus, a player may not place more ballot markers in areas he has already "used" this game year.
When all players have placed their ballot markers in their selected areas, the round ends and another begins. Players again select cards and ballot markers for new areas.
If a player uses all of his 7 ballot markers before all the rounds in the phase are complete, he simply sits out the later rounds, choosing no cards and no ballot markers.
After the players have played 3 (with 4 players) or 4 (with 3 players) rounds, the first phase ends and the second begins.
Second Phase: Voting and Building
If a player has ballot markers left in his supply at the beginning of phase two, he may not use them in the remainder of this game year.
Order of the Voting
At the beginning of this phase, one set of voting order cards is face up and the other is face down. The areas will vote in the order shown on the face-up cards from left to right. Thus, the first vote is in the area shown by the left-most face-up card.
Example: The first area to vote is Cannaregio
When an area has finished voting, the voting order card for that area is set aside. Then, the next face-down card in the other set of voting order cards is turned face up.
Thus, the players will always know the order of the next 7 areas to vote.
Example: The next election is in the Castello district. The first card in the next set shows all players that the first
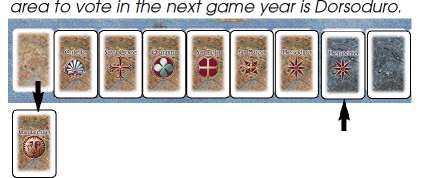
Then, the election is resolved in the area shown on the next card (to the right) in the current voting order set. This continues until 7 areas have held elections in this game year (all voting order cards in the set will have been used).
Now shuffle the used voting order cards and place them face down on the appropriate empty spaces along the bottom of the board.
Election Results
In the area where the election is being held, turn all ballot markers face up. Each player sums his ballot markers. The player with the highest sum is the winner, and the player with the second-highest sum is the runner-up.
If a player has only his value 0 ballot marker in the area, he is considered to have no ballot markers in the area. Thus, he cannot be the winner or the runner-up.
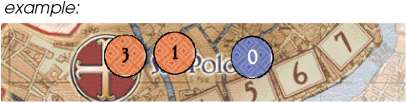
Example: Claudia (red) wins the election with 4 votes, Daniel (blue) although second in the area is not the runner-up as he has only his 0 ballot marker in the area. There is no runner-up in this area.
In addition to the ballot markers, players get 1 vote for each advisor that they control that stands in the area where the election is held. A player with no ballot marker or just a 0 value ballot marker in an area can still win or be runner-up if he has one or more advisors in the area.
The effects of the elections differ between the districts and the Quarantia. In any case, players who win or finish second in elections will be able to take control of and move advisors and/or build or move houses in the districts.
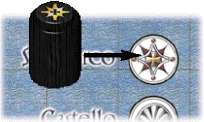
Taking Control of an Advisor

When a player takes control of an advisor, he places one of his control rings on top of the advisor. If another player has control of the advisor, he removes the other player's control ring and returns it to that player's supply.
Each player has only 6 control rings, and a player may only control 6 advisors at a time. If a player with control of 6 advisors, earns the right to control another, he must abstain.
Standing an Advisor in an Area
When a player takes control of an advisor, he must immediately choose the area where he wants that advisor to stand. He may not choose the advisor's home area but may choose any other area, including the area where the advisor is standing (he need not move the advisor). An advisor may only be moved at the moment a player wins an election in the advisor's home area.
Abstaining From Taking Control of an Advisor
A player may abstain from taking control of an advisor. When a player abstains from taking control of an advisor for the Quarantia, he may move 1 of his houses from any district to any other district. The winner may abstain from taking control of 1 or 2 advisors and move 1 or 2 houses, respectively.
When a player abstains from taking control of an advisor for a district,he may move 1 of his houses from the home district of the advisor to any other district, or move 1 of his houses from any other district to the home district of the advisor.
When a player abstains from taking control of an advisor, the advisor becomes neutral. The player takes the control ring from the advisor and returns it to the player who controlled it. He then places the advisor on its symbol on the right side of the board.
Election in the Quarantia
The Quarantia is the home area for 3 advisors. The winner of the election in the Quarantia gains control over 2 of the Quarantia's advisors. The runner-up of the election in the Quarantia gains control over 1 of the Quarantia's advisors. All other players get nothing.
First, the winner takes all 3 Quarantia advisors and neutralizes them. Next, the winner takes control of one of the neutral Quarantia advisors and stands it in the district of his choice.
If he abstains, he leaves 1 of Quarantia's advisors neutral and moves 1 of his houses.
Then, the runner-up chooses one of the neutral Quarantia advisors, takes control of it, and stands it in the district of his choice. If he abstains, he leaves 1 of Quarantia's advisors neutral and moves 1 of his houses.
Finally, the winner chooses one of the neutral Quarantia advisors, takes control of it, and stands it in the district of his choice. If he abstains, he leaves 1 of Quarantia's advisors neutral and moves 1 of his houses.
End of a Game Year
The game year ends when an election has been held in each of the 7 areas. The 7 voting order cards for the current game year will have been set aside and there is a set of 7 new voting order cards face up along the bottom of the board. These show the voting order for the next game year.
Shuffle the 7 voting order cards that were used in the game year just ended and place them face down on the 7 empty spaces along the bottom of the board. These will be turned over one by one in the next game year as the areas conduct their elections.
End of the Game
The game ends when at least one player has:
- at least 1 palace in each district or
- a total of 7 palaces in 5 districts or
- a total of 8 palaces in 4 districts.
The current game year is finished.
The winner is the player who has fulfilled one of the above three conditions.
If, at the end of the game, two or more players have fulfilled one of the winning conditions, the player among them who has built the most palaces is the winner. If there is still a tie for the winner, the player among those tied with the most houses on the board is the winner.
Continue Reading
