Baldur's Gate is cursed. The shadow of Bhaal has covered the city, and now the god of murder is whispering to those who would carve a path of bloody mayhem in his name. As if in answer to Bhaal's dark presence, monsters and other horrors crawl out of the sewers and shadows, shuffling along the streets and alleyways looking for prey.
You have been called upon by the Harpers to stop the evil that has infected the city. Joining forces with other heroes from all walks of life, you enter Baldur's Gate with your companions, ready to do whatever it takes to banish Bhaal and his followers to the shadows. Are you strong enough to resist Bhaal's corruption, or will one of you succumb to his madness?
In Betrayal at Baldur's Gate, each player plays an adventurer investigating the city of Baldur's Gate. As you explore the seedy corners of the city, you discover new tiles (buildings, streets, and catacombs). Each time you enter a new tile, you might find something . . . or something might find you.
Adventurers change over the course of the game (for better or worse), depending on how they deal with the city's surprises. The city is different each time you step out of the relative safety of the Elfsong Tavern.
At some random point during the game, one adventurer triggers a scenario called a haunt. When the haunt is revealed, one adventurer becomes a traitor bent on defeating their former companions. The rest of the adventurers become heroes struggling to survive. From then on, the game is a fight between the traitor and the heroes-often to the death.
This game has fifty haunts, and each one tells a different story. All of them are yours to explore as you live or die in Baldur's Gate
Components

- 2 haunt books
- 13 building tiles
- 14 street tiles
- 15 catacomb tiles
- 1 Elfsong Tavern/Inner Chamber/Kitchen start tile
- 1 Catacomb Landing/Kitchen Basement start tile
- 6 plastic adventurer figures
- 6 two-sided adventurer cards
- 30 plastic clips
- 8 dice
- 1 Turn/Damage track
- 45 event cards
- 22 item cards
- 13 omen cards
- 6 player aid cards
- 215 tokens
- Rulebook
Object of the Game
Explore the city of Baldur's Gate and make your adventurer stronger until the haunt begins. After that, your goal is to complete your side's victory condition first, either as a traitor or a hero.
Already familiar with betrayal at house on the hill
Here are the big changes:
A new haunt roll: When you make a haunt roll, roll dice equal to the number of omen cards already revealed. If you roll 6 or higher (6+), the haunt is triggered.
A new way to determine first player: Everyone takes a player aid card at the start of the game. Whoever has the card with the lowest number goes first!
Adventurers: Instead of explorers, this game has adventurers. Adventurers each have a unique adventurer power that can be used throughout the game.
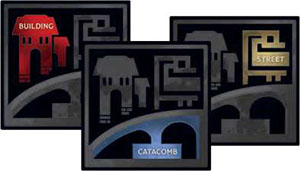
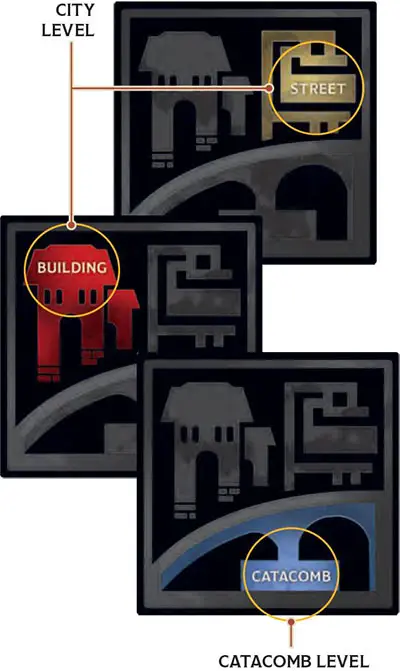
City levels: Instead of 3 floors in the house, the city of Baldur's Gate has 2 levels: city and catacomb. The city level includes building tiles and street tiles, while the catacomb level includes catacomb tiles.
Tile stacks: At the start of the game, lay out the 2 longer starting tiles and separate the rest of the tiles by the color of their backs, creating 3 stacks of tiles. Doorway color matters when exiting: When you exit a tile, look at the color of the doorway. The tile you discover will come from the tile stack with that color.
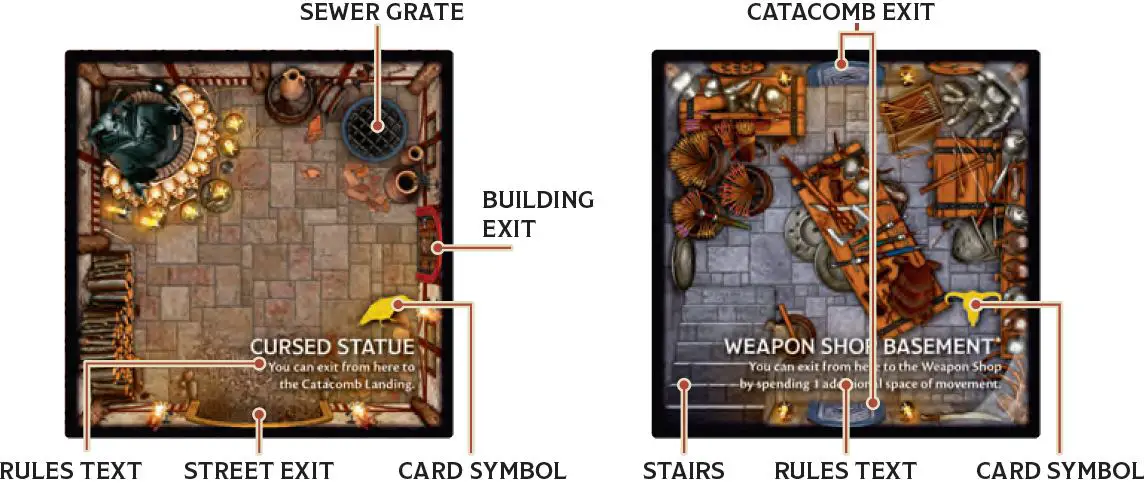
Sewer grates: Sewer grates allow a one-way drop to the Catacomb Landing tile.
Stairs: The Kitchen and Weapon Shop tiles have stairs that connect to their matching basement tiles. Both the Kitchen and the Kitchen Basement are on the board at the start of the game, which will allow you to travel between them. To use the stairs on the Weapon Shop or the Weapon Shop Basement, you'll need to find both of those tiles.
Stealing: You can steal an item or omen if you would deal 2 or more points of any type of damage, not just physical damage.
Setup
Set aside the Traitor's Tome and Secrets of Survival haunt books. You'll use them after the haunt is revealed.
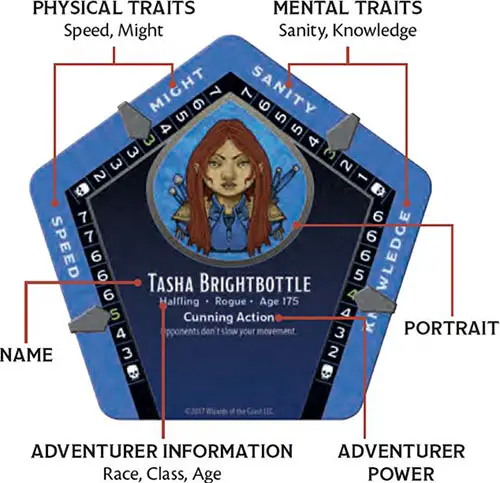
Each player chooses an adventurer card. There's a different adventurer on each side of an adventurer card. Pick one.
Attach 4 plastic clips to your adventurer card. Each one should point to one of the adventurer's starting values for Might, Speed, Knowledge, and Sanity. The starting value is colored green.
Shuffle the omen cards and put them face down in a stack where everyone can reach them. Do the same with the item cards and the event cards.
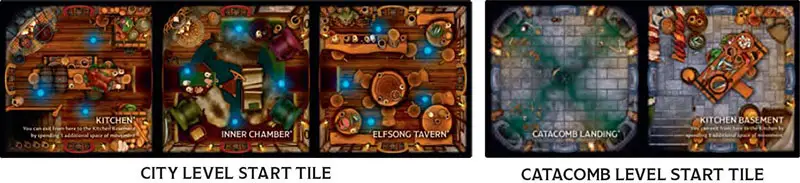
Find the 2 longer starting tiles (shown above): the Elfsong Tavern/Inner Chamber/Kitchen tile, and the Catacomb Landing/Kitchen Basement tile.
Separate the rest of the tiles by their back and shuffle each of the 3 stacks. Put the 3 stacks face- down where everyone can reach them.
Each player puts his or her adventurer's plastic figure on the Elfsong Tavern. (Each adventurer figure's primary color matches the color of the portrait on their adventurer card).
Put the dice in a pile within easy reach. See who goes first. Randomly distribute the player aid cards (numbered 1-6), one to each player. The player who has the lowest-numbered card will take the first turn. Players take turns going to the left following the first adventurer.
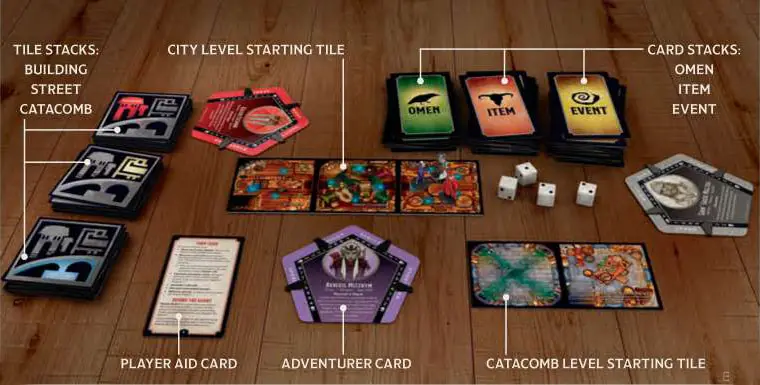 After setup, the table should look something like this. |
Game Play
Starting with the first player and going to the left, each player takes a turn exploring the city.
After the haunt begins, the game follows a slightly different order.
Traits
Each adventurer has four traits, shown as lines of numbers on the adventurer card: Might, Speed, Knowledge, and Sanity. Might and Speed are physical traits, while Knowledge and Sanity are mental traits.
Many cards, tiles, and other game effects adjust your traits up and down. When an effect increases or decreases a trait, you slide the plastic clip as many spaces as the effect says.
For example, Azadeh Rashka's starting Might is 3. If an effect increases her Might by 2, you would slide the clip 2 spaces toward the maximum value, raising her Might to 4. Each trait has a maximum value, the highest number in the line, which can't be exceeded even if an effect would increase it.
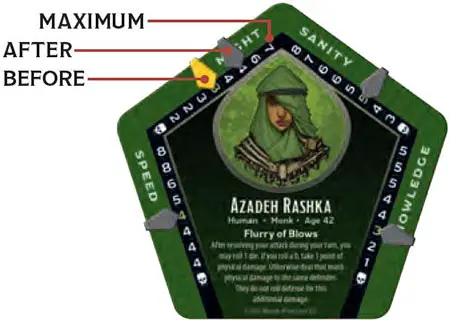
Each trait also has a skull symbol  below its lowest number in the line. Once the haunt begins, if any of your traits drops to the skull symbol, your adventurer dies. Before the haunt starts, no one can die-that is, no trait can go below its lowest number in the line (it stays at the lowest number instead).
A Note on Terminology: For simplicity's sake, these rules use "you" to refer to the character taking the action or affected by the card or tile, whether an adventurer (which includes heroes and the traitor) or a monster.
Rules that affect a particular kind of character (such as an adventurer) use that term.
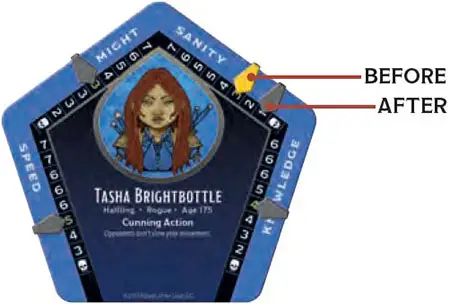
Tasha Brightbottle's starting Sanity is 3. If an effect reduces her Sanity by 2, you would slide the clip 2 spaces toward the skull symbol, dropping her Sanity to 1. (If her Sanity drops by more than 2, Tasha will die unless the haunt has not yet begun).
Damage: Many cards, tiles, and other game effects can inflict damage to your adventurer. When you take physical damage, you can divide it between Might and Speed as you choose.
You slide the clips for those traits a total number of spaces equal to the amount of damage you took. Mental damage works just like physical damage, but you divide the damage as you choose between Knowledge and Sanity instead.
On your Turn:
You can perform 6 different kinds of actions during each of your turns. You can perform these actions in any order, as often as each type allows in a turn.
- Move
- Discover a new tile
- Use item and omen cards
- Attempt a die roll
- Use your adventurer power
- Make an attack - after the haunt starts
If you drew an omen card before the haunt starts, you must make a haunt roll at the end of your turn.
What type of tile am I on?
Some effects care about what type of tile your adventurer is on. In general, building tiles have red/brown wood flooring, street tiles have tan cobblestone flooring, and catacomb tiles have blueish gray stone flooring.
These floor colors mirror the colors on the backs of the tiles and the door frames for ease of recognition.
A. Move
On your turn, you can move up to a number of spaces (tiles) equal to your adventurer's current Speed. You can perform actions (such as using an item or attacking) in the middle of your movement. However, whenever a game effect makes you draw a card for any reason, you must stop moving for the rest of your turn.
Moving Between Levels
In Betrayal at Baldur's Gate, there are two levels of the city. The city level (which is where you start the game) contains building and street tiles, while the catacomb level contains only catacomb tiles.
There are two ways to get between the catacomb level and the city level: sewer grates and stairs.
Sewer grates are one-way routes from certain street tiles on the city level to the Catacomb Landing on the catacomb level. Stairs (like the ones on the Kitchen and the Kitchen Basement) are two-way routes between two specific tiles.
Jumping down a sewer grate costs 1 space of movement, just like travelling between adjacent connected tiles, but travelling between two tiles with matching stairs costs 2 spaces of movement.
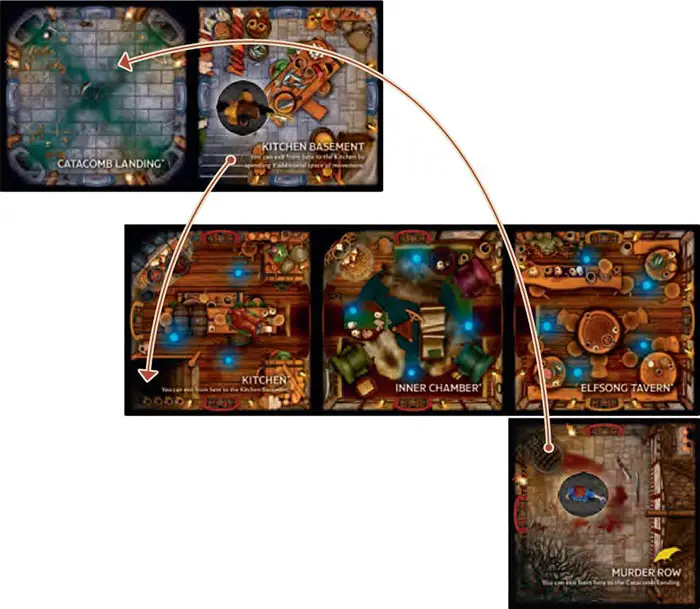
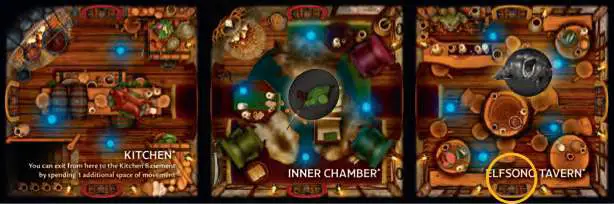
Examples Of Moving: With a Speed of 3, Tasha could move from Murder Row to the Elfsong Tavern, then to the Inner Chamber and onto the Kitchen. Or she could discover a new tile by exiting an open door on either the Elfsong Tavern or the Inner Chamber.
Alternatively, Tasha could move from Murder Row to the Catacomb Landing tile via the sewer grate with 1 space of movement. She could then move 2 additional spaces, discovering a new catacomb tile by exiting any open catacomb door.
On Aldan's turn, he could climb the stairs out from the Kitchen Basement up to the Kitchen with 2 spaces of movement, continuing if he had any Speed left.
B. Discover a New Tile
When your adventurer exits through a doorway, and there isn't a tile on the other side, look at the color of the doorway you are exiting from.
Find the next tile in the stack that has the same color as the door you are exiting from (red for building tiles, yellow for street tiles, and blue for catacomb tiles) and turn it over. Connect it to the doorway you just exited. Then move onto that tile. You have discovered it.
When you connect the tile, the color of the doorways you attach doesn't matter.
Add each new tile as logically as you can, creating connected tiles by connecting doors whenever possible. If it's impossible to match up all doors, you instead create a false feature, such as a blocked alley or boarded-up door (not uncommon in a city as old as Baldur's Gate).
You can't move through false features. You can move through a door if it connects to another door on an adjacent tile. Doors are always open.
Some tiles have symbols, representing an omen, item, or event card. Tiles also might have rules text printed on them, which applies each time an adventurer enters (or, in some cases, exits) the tile. If a tile has both rules text and a symbol, draw the card for the symbol first. Then follow the instructions on the tile.
Some tiles affect movement. A few tiles have additional rules, which are clarified in "Special Tiles".
Do I have to match doors by color?
Doorway color matters only when exiting, as it dictates which type of tile you find. When placing a tile, you can connect any open doorway on the tile to the door you exited, no matter the color or size.
Can I seal off a level by placing a tile?
You can't place a tile in such a way that it seals off a level (that is, leaves no way to connect other tiles to that level).
If the only possible placement of a tile would seal off a level, discard that tile and draw new ones from the same stack until you draw one that leaves a free doorway once it is placed.
If all the remaining tiles of that type would seal off the level, then the person whose turn it is rearranges the level until there are more free doorways.

Discovering a New Tile
Vort Dormall is exiting via the yellow street exit, so you will draw the next tile from the yellow street tile stack and attach it to the door he exited from.
What happens if we get to the end of a stack of tiles?
If you go through a whole stack of a certain type of tile, shuffle any tiles of that type you previously set aside and start a new stack with them, then continue with the new stack.
If you run out of tiles for the catacomb level, you can't discover any more tiles on that level-you've found them all.
However, if you run out of tiles for buildings or streets on the city level, you can discover building tiles where there should be street tiles and vice versa.
Drawing Event, Item, and Omen Cards
Some tiles have symbols printed on them that match symbols on the cards 

 . The first time you discover a tile with a symbol, you must end your move on that tile and draw the appropriate card. Only the first player to discover the tile draws the card (and ends their movement there).
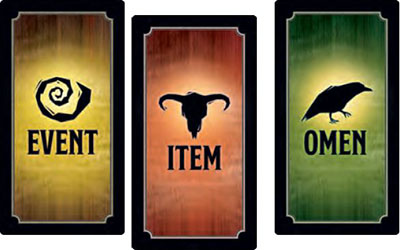
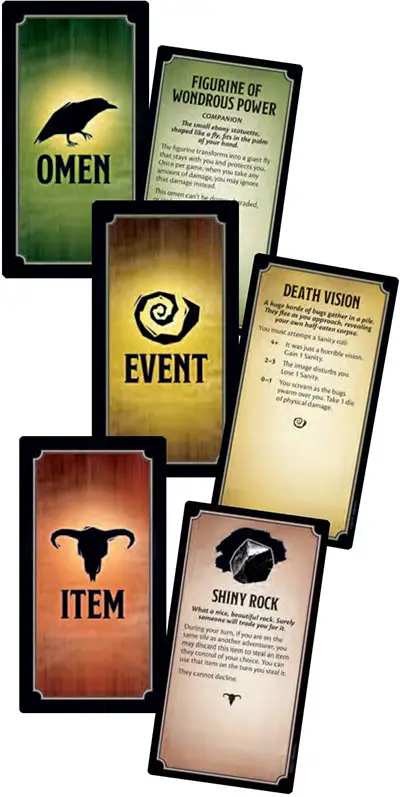
If the tile has an event symbol (a spiral ), draw an event card. Read it out loud. Follow its instructions, which might require you to attempt a die roll. Then discard the card unless it says otherwise or has an ongoing effect.
If the tile has an item symbol (a bull's head ), draw an item card. Read it out loud. Place it face up in front of you; you now control the item. (You're carrying or wearing it). You can use the item once immediately and once on each of your turns, unless the card says otherwise.
If the tile has an omen symbol (a raven ), draw an omen card. Read it out loud. Place it face up in front of you; you now control the omen. You might have to do something immediately. At the end of your turn, if the haunt has not yet begun, you must make a haunt roll.
If you discover a new tile because of a tile's or card's effect, and that new tile has a symbol on it, you draw the appropriate card for that new tile. If a tile is added to the board through some other means (such as a haunt's instructions), the first player who enters that tile does not draw a card.
Even though your movement ends when you draw a card, you can still take other actions on that turn (such as using an item).
C. Use Item and Omen Cards
All adventurers can use items. Some monsters can too, if the haunt's rules allow it. You can use each item once at any point during your turn. Most omen cards are treated like items: You keep the card in front of you and use it just like an item. There's no limit to the number of items you can carry.
For each item, an adventurer (or monster that can carry items) can perform only one of the following actions with that item during a turn.
Drop the item. (If you do, put a pentagonal Item Pile token on that tile and the pile of cards and/ or tokens-if dropping more than one-near the tile). Another adventurer (or you, for that matter) can later pick up some or all of the items in the pile.
Pick up the item. If you are picking up items from a pile, you can pick up as many as you want. Remove the Item Pile token if all items are picked up.
Trade the item by giving it to another adventurer on the same tile (assuming you both agree).
Steal an item an opponent controls.
Use the item. Using an item means making any attack or die roll with it or taking any other action in which the item is involved in any way. For example, an adventurer couldn't attack with the Crossbow and then trade it to another adventurer on the same turn.
If an item would adjust one of your traits above the maximum number for the trait printed on your adventurer card, make a note of how much that item puts that trait "over the top".
If you lose that item, you lose from that "over the top" number, not from the printed maximum. For example, if an item adds 2 to your Might, but you gain only 1 Might before hitting the maximum, you'd lose only 1 from your maximum Might if you later lose that item.
Some items can be traded (or stolen with an attack), but they can't be dropped or picked up. The item card's text will state whether you can take a certain action with that item.
Weapons: The Berserker Axe, Book of Spells, Crossbow, Explosive Runes (event), Javelin of Lightning, Necklace of Fireballs, and Ring of the Ram are weapons. Weapons can be used only while making an attack, not while defending.
You can use only one weapon per attack, but you can carry more than one. Using a weapon during an attack is optional.
Companions: The Figurine of Wondrous Power, Homunculus, and Meenlock omen cards are companions that follow the adventurer who controls them. Companion omens don't have physical or mental traits. They only way you lose control of a companion is if you die. It remains on the tile where you died.
Item and Quest Tokens
Many haunts put one or more pentagonal item tokens or triangular quest tokens in the city, which have special rules for their use. Unless the haunt says otherwise, item tokens and quest tokens can be traded, dropped, or stolen just like item and omen cards.
How do I track once-per-game effects?
Sometimes adventurer powers (Wild Shape for example), tiles (such as the Beloved Ranger Statue), or cards (like Figurine of Wondrous Power) have things that each player can do once per game.
If you would like to track the use of those features, you can use the circular adventurer tokens that match the portrait of your adventurer.
D. Attempt a Die Roll
Many times during the game, you'll need to roll one or more dice. Each die has faces with 0, 1, or 2 dots. There's no limit to how many times in a turn you can roll dice.
For example, you might need to make a die roll for a card you drew by moving onto a tile that also requires a die roll. You can't, however, attempt the same roll more than once per turn. (For example, you can't keep rolling on the same turn to try to find an item in the Forgotten Cache, or for a haunt-specific roll).
If a card, tile, or other game effect instructs you to roll a specific number of dice, do so and add the number of dots on each die to get the result of the die roll. Then do what the effect says for that result.
Trait Rolls: Sometimes a card, tile, or haunt tells you to attempt a roll based on one of your adventurer's traits (Might, Speed, Knowledge, or Sanity).
When that happens, roll dice equal to the number your adventurer currently has in that trait. For example, if you must attempt a Sanity 3+ roll, and you currently have a Sanity of 4, roll 4 dice and add the dots together to get the result.
If you rolled 3 or more dots, you succeeded. Whether you succeed or fail, the card or tile's text will tell you the results of your attempt.
An attack roll isn't a trait roll, even though it involves Might or some other trait (see "Make an Attack", below).
Task Rolls: Some haunts require you to make a roll to succeed at a particular task (such as searching for clues). You can attempt only one such roll per turn. That's true even if different types of rolls could satisfy that task (such as either a Knowledge roll or a Sanity roll to search for clues).
Damage Rolls: If an effect says to "take 1 die of physical damage", roll a die. You distribute damage between Might and/or Speed as you choose, equal to the number of dots rolled.
For effects that inflict more than 1 die of damage, simply add the dots on all the dice you roll. Taking mental damage works the same way, except that you distribute the damage between Knowledge and Sanity as you choose.
E. Use your Adventurer Power
Each adventurer has a unique power that they can use throughout the game. While some (like Gretchen Titchwillow's Wild Shape) are limited to once per game, most adventurer powers can be used once during each of your turns, if the right situation presents itself.
Some (like Aldan Pyrite's Protection) can be used at any time.
F. Make an Attack
You can't attack anyone until after the haunt starts.
Once during your turn, you can attack an opponent on the same tile. (An opponent is an adventurer or monster that wants to stop your movement or interfere with you).
When you make an attack, roll a number of dice equal to your Might. Your opponent rolls the same trait for defense. Whoever rolls the higher result defeats that opponent and inflicts physical damage against the other adventurer or monster.
The amount of damage equals the difference between the two rolls. (For example, if you roll a 6 on your Might roll and your opponent rolls a 5, you would inflict 1 point of physical damage). If there's a tie, no one gets hurt.
Defending is not attacking: When rolling defense against an attack, you cannot use any power, effect, or card that benefits you "when attacking" (including weapons).
Sometimes an effect lets you make an attack with a trait other than Might. You do this the same way as a Might attack, except you and your opponent use the other trait. For example, if you make a Speed attack, you and your opponent roll dice based on Speed. Speed attacks also deal physical damage.
When an effect lets you attack with Sanity or Knowledge, then you inflict mental damage.
You can't use a trait to attack an opponent who doesn't have that trait. For instance, if a monster doesn't have Sanity, you can't make a Sanity attack against it.
Sometimes when you defeat your opponent, you do something other than inflicting damage. For instance, you might be able to steal an item (see "Special Attacks", below).
Monsters are only stunned when you defeat them, not killed, unless a haunt specifies otherwise. You can attack a stunned monster if there's another benefit from doing so (such as stealing an item from it or killing it with a special item). Stunned monsters still roll dice to defend, but an attacking hero who loses won't take damage.
You can make a haunt-specific action (as described in the haunt's rules) and still attack on your turn, unless the action specifies it is used instead of attacking normally.
What happens if the rules in the book and the rules on a card conflict?
If this happens, use the rules on the card. If multiple cards conflict, discuss the conflict and come to the best logical conclusion on how the rules should be interpreted.
Special Attacks
Distance Attacks: The Crossbow's effect is an example of a distance attack. It allows you to attack someone on another tile within your line of sight: a path that leads through an uninterrupted straight line of doors.
You take no damage if the subject of your distance attack defeats you. Some monsters can also make distance attacks.
Stealing Items: If you attack a character on your tile and would inflict 2 or more points of damage, you can steal an item or omen instead of inflicting the damage. (The item's or omen's card says if it can't be stolen). You can't steal an item or omen by making a distance attack.
What happens if two effects happen at the same time?
If this happens, the active player's effects from cards, powers, and so on always take priority. For example, say the active player is attempting an attack to steal an item from a defender who controls the Figurine of Wondrous Power omen card.
The defender can't use the omen card's power to ignore damage until the active player decides if they are going to steal an item instead of inflicting damage.
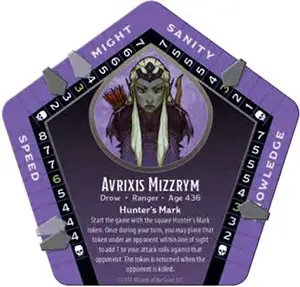
Example of Combat: Let's say your adventurer, Avrixis Mizzrym, just attacked a Cultist of Bhaal. She has a Might of 4, so you roll 4 dice for her attack.
You get a 5 on your attack roll. The traitor rolls an 8 for the Cultist's defense! Avrixis has to take 3 points of physical damage.
You choose to lower her Might 2 spaces (to 3) and her Speed 1 space (it stays at 4) by sliding the plastic clips to the new numbers. Avrixis is still alive, but she's hurt!
The Haunt
Once the haunt begins, the game changes dramatically. Now it's a desperate struggle to win before your opponent does!
Making a Haunt Roll
Before the haunt starts, each time you draw an omen card, you must roll a number of dice equal to the number of omens revealed. This is called a haunt roll. If the result of the roll is 6 or higher (6+), the haunt starts.
The player who starts the haunt with this roll is called the haunt revealer. For example, if you draw an omen card on your turn, and it's the fifth omen card drawn during the game, you need to roll 5 dice and get a result of 6 or higher on your haunt roll to start the haunt.
After the haunt starts, if you discover a tile with an omen symbol, you still draw an omen card, but you don't make a haunt roll.
Revealing the Haunt
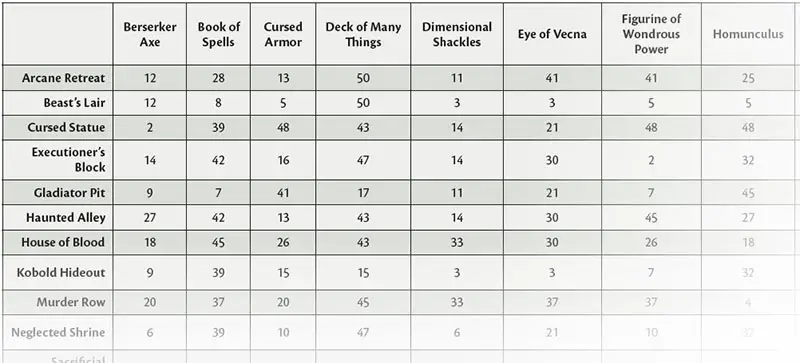
When a player makes a haunt roll and starts the haunt, that player (the haunt revealer) looks at the haunt chart on the first two pages of the Traitor's Tome booklet. The chart shows which haunt has been revealed-and who is the traitor.
The chart lists omen cards across the top and tiles along the left side. Look at the name of the omen card that was drawn before the haunt roll and the tile that the haunt revealer's adventurer was on when the omen was drawn. Find the corresponding haunt number. This is the haunt you're going to play.
The haunt's entry below the chart states which player becomes the traitor. Give the Traitor's Tome to that player. The haunt revealer is not necessarily the traitor.
Special Cases: If two or more people could be the traitor, and one of them is the haunt revealer, then that person is the traitor. If neither one is the haunt revealer, then the next player to the haunt revealer's left is the traitor.
Optional Rule: Selecting the Haunt
This optional rule lets you avoid repeating haunts you've already played. If you consult the chart and get a haunt that you've revealed already and you don't want to play again, look for the next tile with an omen symbol that is closest to the haunt revealer's adventurer figure.
Match that tile to the original omen on the chart to find a new haunt number. Continue going from tile to tile in this way until you find a haunt that you haven't played yet. If you find one that you haven't played, move the haunt revealer's adventurer figure to that tile before beginning the haunt.
If you get through all the placed tiles without success, reveal the next omen card and consult the chart based on the tile the haunt revealer's adventurer figure is on. Once you find a haunt you haven't played, replace the omen that triggered the haunt roll with the last omen card tied to that haunt.
Heroes and Secrets
Don't tell the traitor what your goals are, unless you're sure he or she already knows them or you're doing something required by the haunt. Sometimes you have an advantage over the traitor because that player doesn't know what you're trying to do.
You can still play these haunts again and again after you know how they work, but until then, the heroes shouldn't disclose the Secrets of Survival for their haunt.
Haunt Setup
Do the following at the start of the haunt.
-
The traitor takes the Traitor's Tome and leaves the room. He or she reads only the haunt that is starting now. That player also needs to know the rules described in "The Traitor's New Powers" and "How Monsters Work".
If the player doesn't know those rules, he or she should take the rulebook when leaving the room and read those sections (or have another player explain them). The player aid card also has helpful reminders for the traitor.
-
The rest of the players become heroes. They look up the haunt with the same number in Secrets of Survival and read it together. (The heroes should also briefly discuss their plan for survival).
-
When everyone is ready (including the traitor), the traitor returns to the room. The heroes and the traitor do anything the haunt tells them to do in the "Right Now" section. (For example, sometimes you'll have to put tokens on the board or draw cards).
Playing the Haunt
The first turn always starts with the player to the traitor's left and continues to the left away from the traitor. Each of the heroes takes a hero turn. After each hero has taken a turn, the traitor takes his or her traitor turn.
After the traitor turn, any monsters controlled by the traitor get a monster turn. (This means that the traitor gets two turns: one for their own actions and one for the monsters). Then the first hero to the left of the traitor takes a turn, and so on.
The heroes and traitor are all still adventurers. They can do the same things they did before the haunt was revealed, except they don't make further haunt rolls (even if one of them draws an omen card). The traitor must tell the heroes what they're doing each turn, but not why; the same condition applies to the heroes.
After the haunt begins, adventurers can die. If any of your adventurer's four traits moves down to the skull symbol ^, then that adventurer dies. Sometimes during a haunt, a hero's "death" turns that adventurer into a traitor instead.
Certain haunts require something to be done a number of times equal to the number of adventurers or heroes. Unless the haunt states otherwise, that number includes any adventurers or heroes who have died during the haunt.
Sometimes the traitor is transformed or otherwise disposed of at the start of the haunt, but the traitor still gets a turn after all the heroes do. Even if the traitor dies, as long as the monsters can complete the haunt's goals, the monsters still get their turn (under the traitor's control).
During the haunt, if a hero makes a Knowledge roll to learn something and succeeds, all the other heroes learn that information as well.
What happens if a haunt's rules and the regular rules conflict?
If this happens, use the rules in the haunt. All of these rules are in effect unless a haunt says otherwise.
Moving Past Opponents
For each opponent on a tile with it after the haunt starts, an adventurer or monster must use 1 extra space of movement to leave that tile. (Heroes and NPCs slow down the traitor and monsters, and vice versa).
No matter how many penalties to movement you have on a turn, you can always move at least 1 space. This is also true if a monster rolls a 0 for movement.
Stunned monsters or stunned NPCs don't slow movement in this way.
The Traitor's New Powers
When your adventurer becomes a traitor, if you are being impeded by a previously drawn event card (such as the Crawling Claw or Wererat Bite), you are freed from that effect if you would like to be. In addition, you can use the following abilities (unless a haunt says otherwise).
-
You can use any beneficial text on a tile while ignoring any harmful text. You can pass through the Assassin's Run without rolling. You can stand on the Shrine to Bhaal without taking any damage. You can still end your turn on the Gladiator Pit and gain 1 Might.
-
You can choose not to be affected by an event card. If you choose to be affected by the card, you do so after reading it but before making any rolls or doing any other action stated on the card. You then must accept the result of any rolls or penalties.
-
After you finish your turn, you take a monster turn with the monsters, if any. Even if the traitor dies, you still control the monsters.
(In some haunts, the monsters are still able to complete a haunt's goals after the traitor is dead).
Haunts with No Traitor
A few of the haunts are fully cooperative, with no traitor. In those cases, play continues from the person to the left of the haunt revealer and to the left as normal. If there are monsters driven by AI in the rules, their monster turn occurs after the haunt revealer's turn each round.
Haunts with a Hidden Traitor
A few of the haunts feature a hidden traitor, whose identity is secret from all the other players. When a haunt calls for a hidden traitor, count out small monster tokens of one color, numbered from 1 up to the number of players.
Shuffle the tokens and deal out one to each player, face down (with the "S" showing). Whoever gets the token numbered 1 is the traitor. Play continues from the person to the left of the haunt revealer and to the left as normal.
Haunts with hidden traitors do not appear in the Traitor's Tome. Instead, the goal and abilities of the traitor are described under the haunt in Secrets of Survival, which everyone reads.
Unless the haunt says otherwise, the hidden traitor can choose to be revealed at any time by turning the token numbered 1 face up. (For example, they might do this in response to a trap or a hazard, to prevent the effect or damage using normal traitor rules).
Whenever an adventurer dies, that player turns over their token to reveal their identity. No other player (except the traitor) can reveal a face-down token at any time. You might say that you aren't a traitor, but the other players have only your word for it.
Unless the haunt says otherwise, any adventurer can attack any other adventurer at any time, under real or feigned suspicion of being the traitor. (Of course, the traitor benefits from sowing suspicion and mistrust among fellow adventurers).
Unless the haunt says otherwise, everyone must converse only where everyone at the table can hear them; they can't leave and have side conversations elsewhere.
How Monsters Work
Monsters behave a little differently than adventurers do. All of the following rules are in effect unless a haunt says otherwise. Each monster moves and takes all its actions before the next one goes.
-
Monsters move differently. At the start of a monster's turn, roll a number of dice equal to its Speed. The result is the number of spaces that monster can move that turn. For groups of the same type of monster (Goblins or Kobolds, for instance), just roll once for the whole group. Each monster of that type can move that many spaces that turn.
-
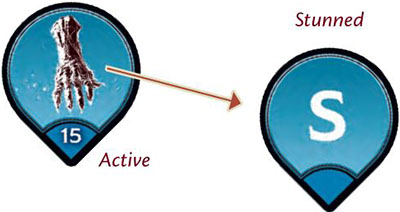
Most monsters can't be killed. If a monster would take any damage, it is stunned and misses its next turn. When a monster is stunned, flip its token over to the side with the "S".
At the end of the monster's next turn, flip it back. Stunned monsters can't slow an adventurer's movement. Even if a haunt says to do something other than stun monsters when they take damage, they can still be stunned by effects that specifically stun monsters.
-
Like adventurers, a monster can attack only once during its turn. Monsters often use traits other than Might to attack. They can't make any of the special attacks (unless a haunt says otherwise).
-
Like the traitor, monsters can ignore any harmful text on a tile. They can use stairs and sewer grates to move between levels, or pass through the Assassin's Run without rolling. However monsters cannot benefit from text on a tile that increases a trait, such as the Gladiator Pit or the Beloved Ranger Statue.
-
Monsters can use the special movement options described on cards (such as the Arcane Gate token from the Arcane Gate event card).
-
Monsters can't explore new tiles.
-
Monsters can't carry items (unless the haunt says otherwise). If a monster that is allowed to carry items is stunned, it drops all items; place an Item Pile token on the tile. The monster can't pick up the items until it has a turn in which it is no longer stunned.
How NPCs Work
NPCs are characters that are added to certain haunts. They are normally under the protection of the heroes and as such are controlled by them.
All of the rules for NPC tokens are listed in the haunts that require them. If they are allowed to be stunned, they follow the same stunned rules as monsters.
What happens to my stuff if I die?
If you have a companion (the Figurine of Wondrous Power, Homunculus, or Meenlock), the companion's card stays near the tile where your adventurer died.
If another adventurer moves onto the tile, he or she takes control of that companion (and takes that omen card). Any other items you have drop to the floor (even if they say they can't be dropped!).
Put an Item Pile token there and set aside your cards and/ or tokens near the tile. Other adventurers can go to the tile to pick up your items (and take those cards and/or tokens).
End of the Game
The first side (the traitor or the heroes) that completes its goal for the haunt wins the game.
A haunt's goal is described under "You win when..". and doesn't necessarily require killing the traitor or heroes.
At least one hero must survive for the heroes to win. However, some haunts' goals allow the traitor to win the game even after they die. For instance, the monsters that player controls might be able to win without the traitor's help.
When one side completes its goals for the haunt, someone from the winning side reads the "If You Win . . ". section from that side's haunt book out loud.
Continue Reading
