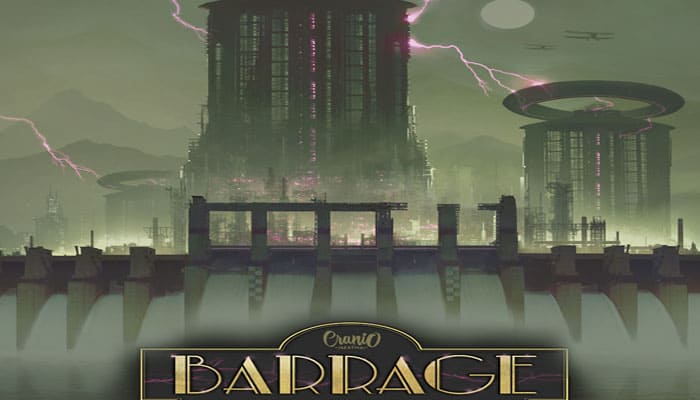
Components
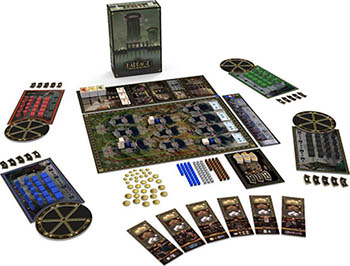
- 1 Patent Office Board
- 1 Double Sided Map
- 1 Management Board
- 1 Energy Track
- 4 Company Boards
- 4 Construction Wheels
- 12 Cardboard Punch Boards
- 202 Wooden Components
- 148 Tiles
- 35 Plastic Components
- 2 Rulebooks
Object of the Game
In Barrage each player is one of four CEOs representing four national companies aiming to prevail in the race to produce energy.
You will buy and use technologies to build dams and hydro-electric powerhouses and to connect them by building conduits. This allows you to use the water you have stored to produce energy and fulfill contracts.
The player with the most Victory Points at the end of the game is the winner.
You can score Victory Points (VP) in the following ways:
At the end of each round
-
By producing the most Energy Units in the round.
-
By producing enough energy (at least 6 Energy Units) and therefore activating the scoring of the Bonus tile for the current round. There is a Bonus tile for each round and each tile assigns Victory Points for one type of structure you have built or one type of element you own.
During each round
-
By getting Income on your Company Board.
You will activate income by building a certain number of Structures.
-
By fulfilling Contracts that reward with VPs.
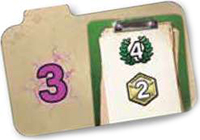
With a production of 3 Energy Units, you can fulfill this Contract to score 4 VPs (and also get 2 Credits).
-
By using Advanced Technology tiles that reward with VPs as a special effect.

When using this Technology tile, you will score 3 VPs for each Powerhouse you have built.
At the end of the game
-
By achieving the goal of the Objective tile. Each Objective rewards the top 3 players according to the given goal.

If you are the first player according to the request, you will score 15 VPs. If you are second, you will score 10 VPs. If you are third, you will score 5 VPs.
-
For the remaining Machineries and Credits available in your supply and the Water Drops held in your Dams.

You will score 1 VP for each set of 5 items between Excavators, Concrete Mixers and Credits.
You will score 1 VP for each Water Drop held by your Dams.
When you score VPs, move your VP marker on the VP track around the Map accordingly. If you make more than 100 VPs, flip your VP marker on the other side in order to show the related symbol.
Setup

1 Place the Map in the center of the table. The side with no icons is recommended once you have mastered the game.
2 Place the Energy Track and the Management board next to the Map as illustrated.
3 Place the Machineries (Excavators and Concrete Mixers) next to the Map to form the general supply.
4 Divide the Credits into their different values and place them in the general supply.
5 Place the Water Drops in the general supply.
6 Shuffle the Headstream tiles and randomly place 4 tiles face up in the designated spaces on the Map. Put the remaining tiles back in the box.
7 Remove the Bonus tile shown in the Setup image and shuffle the others. Randomly place 5 Bonus tiles face-up in the designated spaces of the Energy Track.
Shuffle all the Bonus tiles and randomly place five of them on the Energy track. Put the remaining tile back in the box.
8 Shuffle the Objective tiles and randomly place 1 Objective tile in the designated space at the end of the Energy Track. Put the remaining tiles back in the box.
9 Shuffle the National Contract tiles. Pick a number of Contracts equal to the number of players minus one and place them face-up in the designated spaces on the Management board. Put the remaining tiles back in the box.
10 Divide the Private Contract tiles according to their back. Shuffle the three piles separately and place them face down in the designated space on the Management board. Pick the first two tiles from each pile and place them face-up next to their respective piles.
11 Divide the Neutral Dams Setup tiles according to their backs, then randomly draw one tile from each pile. Place the Neutral Dams in the building spaces of the basins indicated on the tiles you picked.
There is always a level 1 Dam in the Mountains, a level 2 Dam in the Hills and a level 3 Dam in the Plains. Place 1 Water Drop behind each Neutral Dam. Put all the starting setup tiles back in the box.
12 Leave the Patent Office board and all the Advanced Technology tiles in the box. You will not need them for the introductory game.
Place the Patent Office board next to the Map. Divide the Advanced Technology tiles according to their backs and shuffle the three piles separately.
Place the three piles face down in their corresponding spaces on the left of the Patent Office board. Pick the first three tiles from the pile I and place them face-up in the designated spaces on the right of the board.
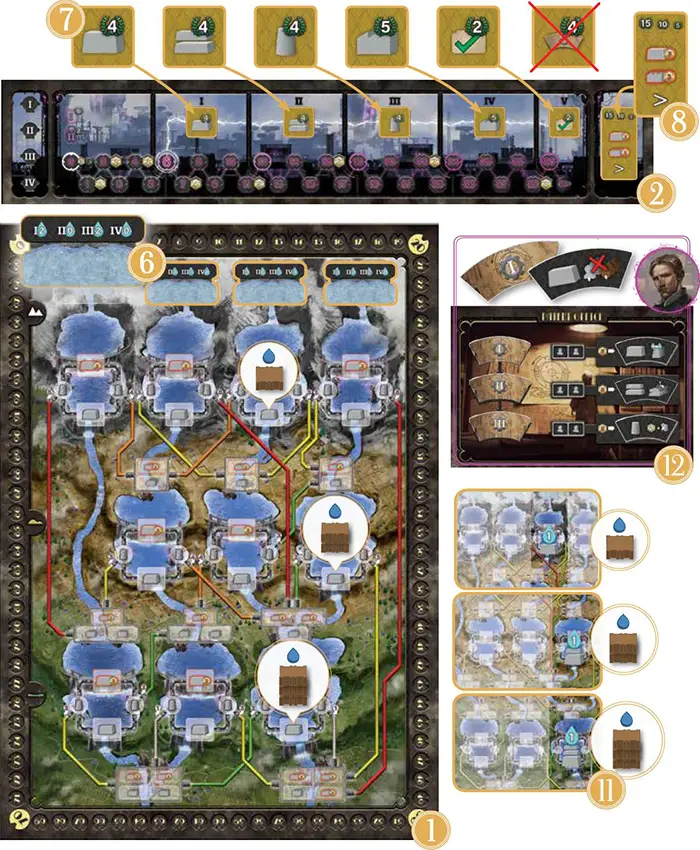
Introductory Player Setup
1 For the introductory game assign the Company boards and Executive Officer tiles to the players according to the table below. Place each Executive Officer tile on the left of the associated Company board.
2) Each player receives every component in the color associated with their Company board and a Construction Wheel which must be placed next to their Company board as illustrated below.

3 Each player receives 6 Credits, 6 Excavators and 4 Concrete Mixers.
4 Each player receives the Starting Contract tile matching their Company, as shown on the table above.
5 Place the Turn Order markers on the designated spaces at the beginning of the Energy Track according to the order shown in the previous page table.
In a 3-player game, the 4th space in the turn order will not be used. In a 2-player game, the 3rd and 4th spaces will not be used.
6 Place the Energy markers in the starting space of the Energy Track, with the "30" icon face-down.
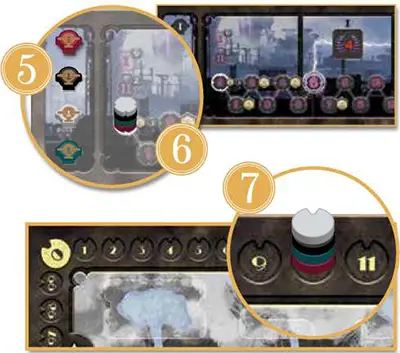
7 Place the Victory Point markers in space number "10" on the scoring track around the Map, with the "100" icon face-down.
Players select their Company boards, their Executive Officers and their Starting Contracts. Randomly pick a number of Company boards- equal to the number of players and place them in the center of the table (if you are playing a 2- or a 3-player game, put any remaining board back in the box).
Take a number of Executive Officer tiles equal to the number of players and randomly combine v them with each Company board (put any remaining tile back in the box) Randomly pick a number 1 of Starting Contract tiles equal to the number of -players and place them face-up) in the center of the table (if you are a playing a 2- or 3-player game, put any remaining tile back in the box)
Randomly pick the first- player who will select one of the available Company Boards with its associated Executive Officer tile and an available Starting Contract. In a clockwise direction all the other players will then select their combination of Company board, Executive Officer tile and Starting Contract tile.
The Turn Order markers are placed in the opposite order to that with which players selected. Therefore the first, player to select- will place the belonging Turn Order marker in the last position while the last player to select will place the belonging marker in first position.
Put the basic wild Technology tiles back in the box (the ones with the "?" symbol) They will not be used in the full game.
Game Play
The game is divided into five rounds, each of which is made of five phases to be played in the following order:
- Income and Headstreams
- Actions
- Water Flow
- Scoring
- End of Round
I. Income and Headstreams
This phase can be played simultaneously by all players.
All players get the active income on their Company boards.
Income is represented by the symbol '!'. The active income is illustrated inside structure spaces (there is a smaller reminder above the same space).
In order to activate income you must build structures. When you build a structure, you must take it from your Company board from left to right.
By building the second Base, Elevation and Conduit, you will receive the first income related to that element. By building the fourth piece of the same structure, you will receive the second income (more profitable than the first).
By building the fifth piece, you will receive the third income. The first two types of income in each line are different for each Company board. The third income is the same for all companies (7 VPs).
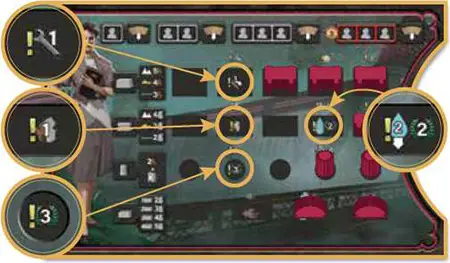 After Paul (red) has built many structure pieces, he activates the depicted income on his Company board. |
Powerhouses do not provide income; they boost the production of energy, instead.
Place Water Drops on the Headstream tiles according to the number indicated on the tile for the current round.
Each Headstream tile shows a symbol indicating how many Water Drops you must place on that tile during the first four rounds (during the fifth and last round Water Drops won't be placed on the Headstream tiles during this phase).
These Water Drops will start flowing on the Map during the Water Flow Phase.
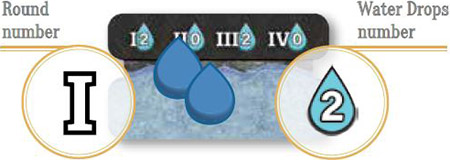
During the first round you will place 2 Water Drops on this Headstream tile.
II. Actions
Players play their turns one after the other following the turn order indicated by the Turn Order markers on the Energy Track.
When it's your turn, you MUST place Engineers onto ONE free action space in order to perform the corresponding action.
Each action space requires from one to three Engineers (this request is illustrated by the Engineer icons in the action space). Each action space is connected to a specific action.
Action spaces with a red outline require a payment of 3 Credits in order to place your Engineers there.

In order to perform this action you need to place 2 Engineers on the action space on the left, or 3 Engineers on the action space on the right: in this case you will also need to pay 3 Credits.
Take the requested Engineers from your personal supply. If you don't have the amount of Engineers (or the additional Credits) in your supply required by the action space, you can't perform the corresponding action. Furthermore, you cannot place Engineers in an action space without performing the corresponding action.
Your turn ends once you have performed an action. If it's your turn and you don't have Engineers left in your supply, you must pass.
The Actions Phase is over once all players have passed.
There are different types of actions, divided between the Company boards and different sections of the Management board.
Construction Action
There are four action spaces on each Company board, each connected to a construction action. This action allows you to build a structure.
All players have their own action spaces (they cannot be used by any of the other players).
These spaces' requests increase from left to right: the more structures you build during a round the more Engineers you will need.

In order to build the first structure piece in one round, you need 1 Engineer. In order to build the second structure piece you need 2 Engineers. In order to build the third and the fourth structure pieces you need 3 Engineers.
Lastly, in order to build the fourth structure piece in the same round, you must pay 3 Credits as well.
In order to perform a construction action you must follow these steps:
-
Place the requested engineers in the first available action space on your board starting from the left.
If you place your Engineers in the space with a red outline you must pay an additional fee of 3 Credits.
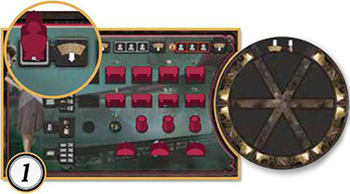
-
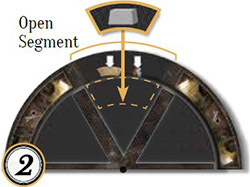
Put the technology tile related to the structure you want to build in the open segment of your construction wheel.
Take the Technology tile displaying the symbol of the structure you want to build (or the wild symbol) from your supply. If you have neither the Technology tile of a given structure nor a wild tile you cannot build that structure.
-
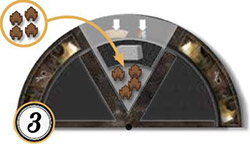
Put the machineries you must use to build that structure in the open segment of your construction wheel, below the tile you have just placed.
Different costs are applied to each structure (for a detailed explanation of construction costs, see the next page). If you don't have all the required Machineries, you cannot perform the construction action.
-
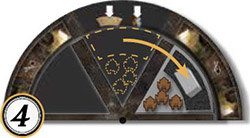
Rotate your Construction Wheel by one segment.
Move the Construction Wheel clockwise, so that both the Technology tile and Machineries are shifted from the open segment to the next segment.
-
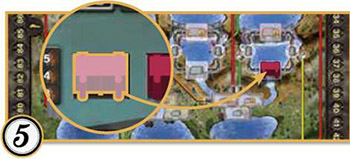
Place the structure piece on the Map.
Take the first corresponding structure piece from the left of your Company Board and place it in one corresponding available building space on the Map (if you are building an Elevation, place it over one of your existing Dams).
If you build a Powerhouse or a Base in a building space with a red outlined icon, you must pay 3 extra Credits. Should you discover an income space after building, you will immediately receive that income bonus.
You will receive it again during Income Phase.
You can build 4 types of structures. Each structure has a different function and a different cost.
 The Base

It is used to create a Dam that collects and holds the water you will need for production.
It can be built in any available building space with the Base icon.
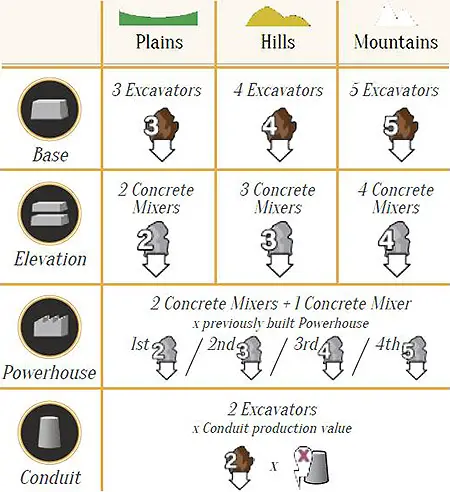
It costs 3 Excavators if built in the Plains area, 4 Excavators if built in the Hills area and 5 Excavators if built in the Mountains area.
If built in a building space with a red outlined icon it has an extra cost of 3 Credits.
You cannot build two Bases of the same color in the same basin.
 The Elevation

It is used to increase the amount of water that a Dam can hold.
It is always built over a Base or another Elevation belonging to your color (there aren't building spaces with the Elevation icon).
It costs 2 Concrete Mixers if built in the Plains area, 3 Concrete Mixers if built in the Hills area and 4 Concrete Mixers if built in the Mountains area.
Do not pay 3 additional Credits if you build it over a building space with a red outlined icon.
There can never be more that two Elevations on the same Base (a Dam s maximum level is three).
 The Conduit

It is used to bring Water Drops from a Dam to a Powerhouse during the production.
It can be built in any available building space with the Conduit icon.
It costs 2 Excavators multiplied by the production value of the Conduit you are building (eg. if the Conduit has a production value of 4, it will cost 8 Excavators).
 The Powerhouse

It is used to activate the production of energy.
It can be built in any available building space with the Powerhouse icon.
It costs 2 Concrete Mixers plus 1 extra Concrete Mixer for every Powerhouse you have already built.
If built in a building space with a red outlined icon it has an extra cost of 3 Credits.
You cannot build two Powerhouses of the same color in the same basin.
Machineries, Credits and Technology tiles
-
Excavators and Concrete Mixers are unusual resources. When you use them to build a structure they are not 'spent' forever: they are invested for a certain amount of time on the Construction Wheel until they will be available again after a complete rotation.
When you get a resource (in any way), take it from the general supply and add it to your personal supply (do not put it on the Construction Wheel). The Machineries you get are immediately available to you.
-
Credits are never placed on the Construction Wheel. When you spend them, put them back in the general supply.
-
There are five types of Technology tiles, one for building each of the four structure pieces, and one wild Technology tile that can be used to build any of the four structures. All Technology tiles work in the same way: they stay on the Construction Wheel until they return to the entry space and are available again.
Management Action
Place the required Engineers in an available action space of your choosing on the Management board, and immediately perform the action corresponding to that space.
The Management board is shared by all the players, meaning that players are in competition with one another to occupy the action spaces: the first player to place Engineers in an action space makes this space unavailable for all the other players for the entire round (except for the Bank).
Every Management action has two spaces where you can place your Engineers, one on the left and one on the right of the action symbol: the action space on the right costs more than the first, but it gives you a second chance to perform an action if the first space is already occupied. Both action spaces can be occupied by the same player during the same round.
Some actions have a cost indicated in the action symbol. This cost must be paid when the Engineer is placed together with any extra fee for spaces with a red outline. You must have all the required Credits to be able to place your Engineer in a given space.
You cannot place an Engineer in a space if you cannot perform the action.

The actions on the Management board are divided into different sections for each category so that actions of the same type with similar effects are in the same area of the board.
Turbine Station
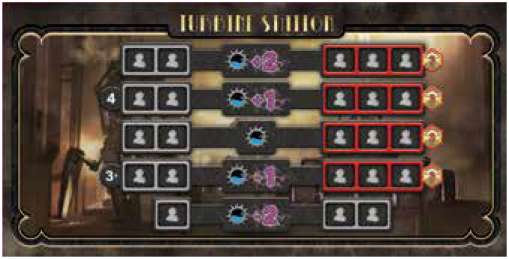 This section allows you to activate the production of energy. |

Whenever you see this symbol you can activate a production, eventually applying the bonus or malus indicated by the number in purple.
In order to be able to perform a production action you must have:
- At least one Water Drop on a Dam of your color or a neutral Dam;
- A Powerhouse of your color already built on the Map;
- A Conduit (of any color) which directly connects the relevant Dam to your Powerhouse.
Take as many Water Drops as you wish from the relevant Dam and move them along the Conduit to reach your Powerhouse.
You'll immediately produce a quantity of Energy Units equal to the Conduit's production value multiplied by the number of Water Drops you decided to move.
You can decide to move any number of Water Drops held in the Dam you are using.
If you are using a Conduit belonging to another player, give that player 1 Credit for each Water Drop you move. That player will also score 1 Victory Point for each Water Drop.

The various production action spaces have different energy bonuses: once you have calculated the total amount of produced energy, you must apply the production bonus/malus of the action space you used.
You cannot perform a production action if the total amount of produced Energy Units is less than 1.

Production Effects
Move your Energy marker on the Energy Track by a number of spaces equal to the amount of Energy Units produced.
The Energy Track records the total amount of energy produced by each player in the current round.
If you produce more than 30 Energy Units, flip your Energy marker showing the "30" symbol upwards, go back to the beginning of the track and continue scoring (for Credits gain and Bonus tile activation, consider your marker to be on the "30" space).

Paul (red) has just produced 7 Energy Units. He has already produced 5 Energy Units with a previous action. His marker records the total amount of 12 Energy Units produced this round.
You can fulfill a Contract in your supply. A Contract can only be fulfilled if the amount of energy you produced in that single action is at least what is depicted on the Contract.
Calculate only the amount of Energy Units produced with a single action, not the total amount produced during the round. You can immediately collect the reward shown on the Contract and turn it face-down, but you cannot fulfill this Contract again in this game.
Also, you can only fulfill one Contract per action.
This means you cannot put two production actions together to fulfill a Contract, and you cannot fulfill two Contracts with one production action even if the amount of energy produced would be enough to fulfill both of them.

With a total production value of 7, Paul (red) could fulfill both of his Contracts, but he must choose only one to fulfill. He chooses the 3 value Contract to move his marker of 2 more steps on the Energy Track and rotate his Construction Wheel by two segments.
National Contracts
If you produce with a single action an energy value more than or equal to the amount of energy required by an available National Contract you can directly fulfill that Contract instead of a Contract you own.
National Contract tiles do not go into the players' supply, but they can be fulfilled by the first player producing the amount of required Energy Units. Take the National Contract tile and put it face down in your personal supply.

The first player who is able to produce 14 Energy Units (or more) with a single production action can decide to fulfill one of the illustrated National Contracts.
Where Does The Water Go?
The Water Drops moved to a Powerhouse thanks to the effect of a production action will then follow their natural course flowing through basins, rivers and Dams. When water arrives at a Dam it stops until the Dam is full; however if the Dam is already full the water simply overflows and continues its course towards the lower basins.
Water Management
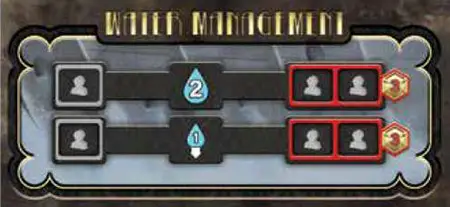 This section allows you to add Water Drops to the headstreams. |
 Place 2 Water Drops on one or two Headstream tiles.
You can decide on which Headstream tile to place them and you can also divide the Water Drops between two headstreams. You can even place only one Water Drop, if you wish. These Water Drops will only flow down during the Water Flow Phase.

When you place 2 Water Drops you can decide to place them on two different Headstream tiles.

Place 1 Water Drop on a Headstream tile. The drop you have just placed flows down immediately following the water flow rules.
You can decide on which Headstream tile to place it.
There is no limit to the number of Water Drops which can be present on a Headstream tile.
You can also add water to headstreams as a result of certain Contracts and as an Income. Moreover, headstreams automatically produce water during the Headstreams Phase.
Bank
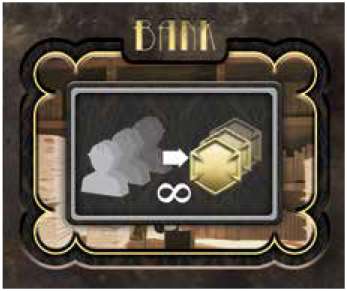 This section allows you to gain Credits. |
Take a number of credits equal to the number of engineers you placed in this action space.
The Bank is a single action space that works differently from the others: you can place here any number of Engineers with a single action. This is also the only non-exclusive action space. A player can always place Engineers in the Bank, even if the space is already occupied by their or other players' Engineers.
You can also gain Credits as a result of certain Contracts, as an Income, and in the Scoring Phase.
Workshop
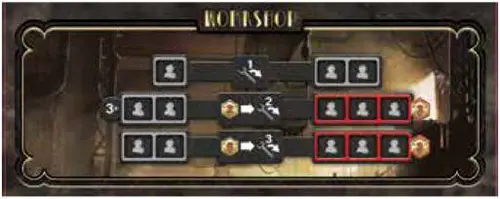 This section allows you to rotate the Construction Wheel to speed up the return of Technology tiles and Machineries. |
Rotate your construction wheel by the number of segments depicted in the action symbol.
If there is a cost depicted in the action symbol, pay that cost. After each rotation of the wheel (each segment) you must immediately take back any Machineries or Technology tiles that is back in the open segment.
Machinery Shop
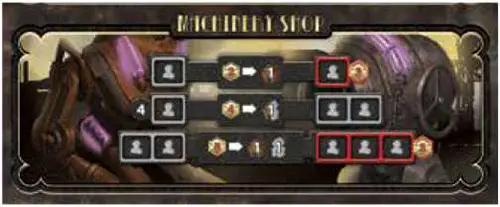 This section allows you to purchase Machineries. |
Pay the amount of credits indicated on the left side of the action symbol and receive the machineries indicated on the right side.
Take the Machineries from the general supply and place them in your personal supply on your Executive Officer tile.
You can also receive Machineries as an effect of certain Contracts and as an Income.
Contract Office
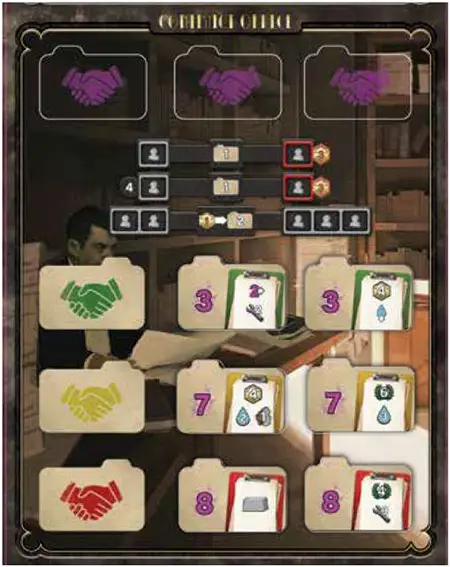 This section allows you to acquire the available Contract tiles. |
 Take ONE available Private Contract tile for free.
 Pay 1 Credit and take TWO available Private Contract tiles.
You can choose which Contracts to take, but only among those face-up. You cannot pick National Contract tiles. Place them face-up in your personal supply next to your board.
The picked Contract tiles are replaced by the tile on the top of the corresponding pile (so that there are always 2 contracts available for each level), but only at the end of your turn.
You cannot have more than 3 contracts face- up in your personal supply.
If, after performing this action, you have more than three Contracts in front of you, you must immediately discard them until you have only three. You are free to choose which Contracts to discard.
Already fulfilled Contracts (face down) are not counted.
Patent Office
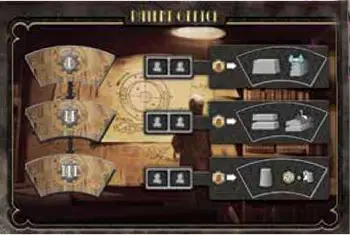 This section allows you to acquire Advanced Technology tiles. |
Pay 5 credits and take the corresponding advanced technology tile.
There are three action spaces, each of which is associated with a tile. Take the tile and add it to your personal supply: it will become immediately available during this round.
Advanced Technology tiles allow you to build structures in the same way as the basic technology tiles, but they have an additional special effect which is activated only when you use them.
The picked tiles will be replaced only at the end of the round.
III. Water Flow
At the end of the Actions Phase, when all players have placed all their Engineers, the Water Flow Phase begins.
All the water drops on the headstream tiles flow down according to the normal rules, following rivers and basins.
Water Drops are moved one at a time filling the Dams they flow into. When a Dam is full (the number of Water Drops equal to the Dam s maximum capacity, that is, its level) the next Water Drops flow past it. The Water Flow Phase is over once all the Water Drops have been placed or removed if they have reached the lower basin.
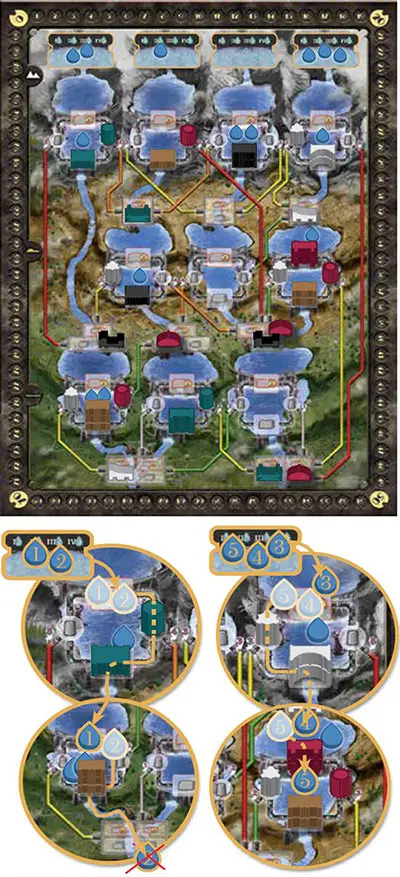
Drops 1 and 2 start flowing downstream. They reach the Mountains level 1 Dam, already at its full capacity. Both drops overflow and continue their movement.
Then they reach the Plains level 3 Dam, that can store one more drop. Drop 1 is captured by the Dam; Drop 2 overflows (now the dam is at full capacity) and finally reaches the end of the map, where it is lost.
Drops 3, 4 and 5 start flowing. Drop 3 is immediately captured by the Mountains level 2 Dam, filling it. Drops 4 and 5 keep flowing. Then, Drop 4 is captured by the upper Hills Dam, filling it. Drop 5 overflows and gets captured by the lower level 2 Neutral Dam.
IV. Scoring
The first player on the energy track scores 6 victory points; the second scores 2 victory points.
This bonus is awarded only to players who have produced at least 1 Energy Unit. In case of a tie for the first position, sum up both bonuses (6 and 2 VPs) and split them evenly between all the players who tied, rounded up.
Any other player won't get the bonus for the second position. In case of a tie for the second position, all the players who tied get 1 VP.

Paul (red) is on the lead on the Energy Track, so he scores 6 points.
Joanna (black) and Sophia (white) share the same spot, so they split the 2 VPs awarded to the second player on the track (1VP each).
Gain credits according to your position on the energy track.
Take the amount of Credits indicated by the Energy Track space your marker has reached or surpassed. If your marker is on the number "0" space, then you will gain 3 Credits but lose 3 Victory Points (as illustrated on the "0"space).

Paul (red) gains 4 Credits, Joanna (black) and Sophia (white) gain 3 Credits. Viktor (green) gains 3 Credits too, but he loses 3 VPs.
Score victory points thanks to the bonus tile of the current round.
The Energy Track is divided into five numbered sections, one for each round of the game. The Bonus tile of the current round is the leftmost visible one.
Full Reward: If your Energy Marker is in the section related to the current round (or further), you will activate the scoring of the Bonus tile.
Reduced Reward: If your Energy Marker is in a previous section than the current round section, you will activate the scoring of the Bonus tile, but you must reduce the Bonus tile reward by 4VPs for each section you are behind.
Players can never lose VPs from the Bonus tile scoring. If the reduction you get from being behind the current section is higher than the reward you would get from the Bonus tile, you simply score no VPs.
No reward: If your Energy Marker is before the number "6" space on the Energy Track, you won't activate the scoring of the Bonus tile.

Its the end of the third round. Sophia (white) gets the full reward: she has built 2 Powerhouses so she scores 10 VPs (5 VPs for each Powerhouse).
Viktor (green) gets a reduced reward: he has built 3 Powerhouses so he scores 11 VPs (5 VPs for each Powerhouse minus 4 VPs for being one section behind).
Joanna (black) gets a reduced reward: she has built 1 Powerhouse so she doesn't score VPs (5 VPs for each Powerhouse minus 8 VPs for being two sections behind).
Paul (red) gets no reward, even if he has built 3 Powerhouses, because he produced less than 6 Energy Units during the last round.
Discard the bonus tile of the current round.
Remove from the game the leftmost Bonus tile. This will uncover a -4 VPs symbol to remind of the VP reduction for being behind on the Energy Track when calculating the Bonus tile reward.
If you remove the last Bonus tile, the game ends.

V. End of Round
Update the turn order, changing the position of the Turn Order markers.
The player who produced the least energy in the current round becomes the first player, and so on. If there is a tie in the amount of energy produced by two players then invert the order of play of the previous round.
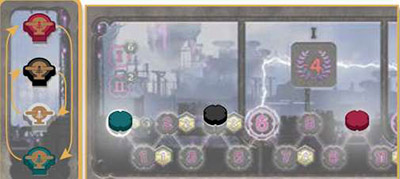
Viktor (green) has produced the least energy, so he goes first in the next round. Paul (red) produced the most, so he jumps to the last position. The other players produced the same amount of energy, so they switch position on the turn order track.
Move all the Energy markers back to the space number "0" on the Energy Track.
All players take their Engineers from action spaces back in their personal supply.
If there are any Advanced Technology tiles left on the Patent Office board, discard them by putting them back in the box.
Take three new Advanced Technology ' tiles and place them face-up in the designated spaces. First, pick the tiles from pile "I"; when depleted, pick them from pile "II" and finally from pile "III".
The End of Round Phase will be not played during the last round.
End of the Game
The game ends after the Scoring Phase of the fifth round. The final scoring then takes place.
Gain Victory Points according to the Objective tile.
Each Objective tile indicates a certain condition. Determine the players' classification according to that condition. The first player scores 15 Victory Points, the second player scores 10 VPs and the third player scores 5 VPs.
In case of a tie, evenly divide the Victory Points of the respective tiers among the players who tied (round up if necessary).
Score Victory Points for the resources you have left available in your personal supply.
Add the resources (Excavators, Concrete Mixers, Credits) together. Score 1 Victory Point every 5 items of any type. Any resources still on the Construction Wheel are not counted.
Score 1 Victory Point for each Water Drop held by your Personal Dams.
The player with the most Victory Points wins.
In case of a tie, the player who produced most Energy Units during the last round is the winner (the last round ends before the End of Round phase, so each player's position on the Energy Track should be preserved).
Continue Reading

