
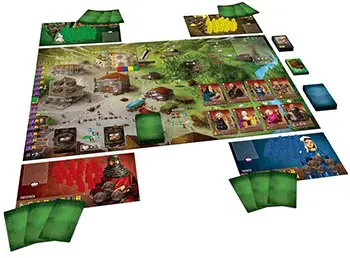
Components
- 1 Main Board
- 5 Double-sided Player Boards
- 40 Apprentice Cards
- 40 Building Cards
- 35 Clay
- 40 Wood
- 40 Stone
- 50 Silver
- 25 Gold
- 30 Marble
- 10 Player Markers (In 5 Colors)
- 100 Workers (In 5 Colors)
- 22 Debt Cards
- 10 Black Market Cards
- 11 Reward Cards
- 6 Multiplier Cards
Object of the Game
The aim of Architects of the West Kingdom is to be the player with the most Victory Points (VP) at the game's end. Points are gained by constructing various Buildings and advancing work on the Cathedral.
Throughout the game, players will need to make a lot of moral decisions. However, only at the game's end will their Virtue be judged. A few underhanded deals here and there might not seem like much, but fall too far and you will be punished. The game ends once a set number of constructions have been completed.
Setup
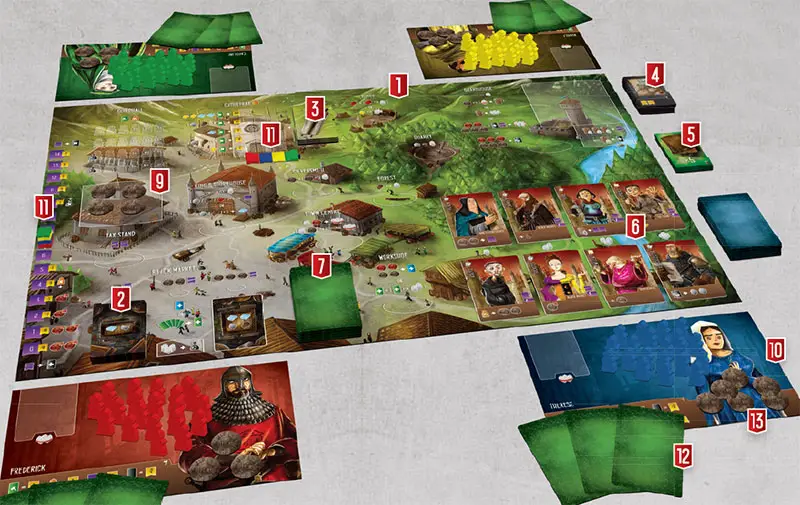
Follow these steps to set up Architects of the West Kingdom:
Place the Main Board in the center of the playing area.
Shuffle all Black Market Cards and place them in a pile on the left Black Market space, "Small Market" side faceup.
Shuffle all Reward Cards and place a number of cards in a facedown pile to the right of the Cathedral. This number should be equal to 2 per player, plus 1. For example, 9 cards in a 4 player game. Return any unused cards to the box.
Place all Debt Cards in a pile near the Guardhouse, "unpaid" side faceup.
Place all Multiplier Cards in a pile near the board.
Shuffle all Apprentice Cards and place them in a facedown pile to the right of the board. From the top of the pile, reveal and place 1 Apprentice Cards faceup in each of the 8 spaces to the right of the Workshop.
Shuffle all Building Cards and place them in a facedown pile to the left of the Workshop.
Place all Clay, Wood, Stone, Gold, Marble and Silver in a Supply near the board.
From the Supply, place 4 Silver in the space above the Tax Stand.
Each player takes 1 Player Board (side 1 faceup, unless using the Variable Setup rules) and 20 Workers in their chosen color.
Each player places 1 of their colored Player Markers underneath the Cathedral and the other on number 7 of the Virtue Track.
From the pile of Building Cards, deal 4 to each player. From their hand, each player chooses 1 card to keep, placing it facedown in front of them. All players then pass their remaining cards to the player on their left. Players then choose 1 of these cards to keep and pass on the remaining cards again
Of the last 2 cards they receive, players must choose 1 to keep and place the remaining card facedown under the Building Card pile. Players can now pick up their chosen 3 cards to form their starting hand of Building Cards.
Note that players are not permitted to know what Building Cards their opponents hold in their hands throughout the game.Randomly choose a starting player. They receive 3 Silver from the Supply. The 2nd player receives 4 Silver. If there is a 3rd player, they receive 5 Silver, the 4th player receives 6 Silver, and so on.
The Main Supply
All the following items are considered to be unlimited: Debts, Clay, Wood, Stone, Gold, Marble and Silver. Players should use the Multiplier Cards if any of the above items run out.
Variable Setup
For a more variable game, all players should use side 2 of their Player Boards (randomly dealt or chosen). This gives each player a unique ability throughout the game.
It also determines how much Silver, Virtue and other items they begin with. Refer to the Appendix for more information.
First Time Players
When playing for the first time or teaching others, there are 3 key concepts to understand:
-
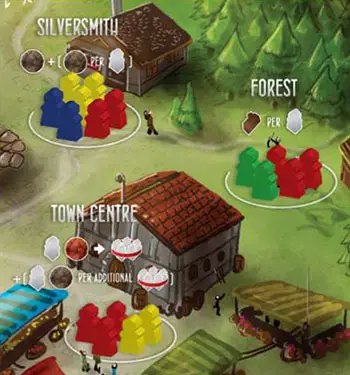
Worker Investment - Each player has 20 Workers. Each turn they will place just 1 of these onto the Main Board. As a general rule, the more times a player visits the same location, the more they benefit from it.
For example, placing their first Worker in the Forest will reward players 1 Wood. Placing their second Worker will reward 2 Wood. Their third will reward 3 Wood, and so on.
-
Capturing Workers - While at the Town Center, players can recruit locals to capture groups of Workers. This might be because they believe that a player's Workers are being greedy, or involved in shady dealings.
Captured Workers are placed onto the capturing player's Board. On a later turn they can throw them in Prison, earning 1 Silver per Worker for their troubles. However, the targeted opponent can later visit the Guardhouse to release them at no cost. This is the primary way of returning Workers during the game.
-
Virtue - A lot of choices will alter players' positions on the Virtue Track. Ending the game with a lot of Virtue will award Victory Points, while low Virtue will cause players to lose them. However, being devious isn't all bad.
Sitting low on the Virtue Track allows players to skimp on their Taxes during the game.
Game Play
Proceeding clockwise from the starting player, each player takes their turn in full. On their turn, players must place 1 of their Workers from their Player Board to a chosen location on the Main Board.
Players continue taking turns until a set number of constructions have been completed. Once this happens, all players take 1 last turn before the game ends.
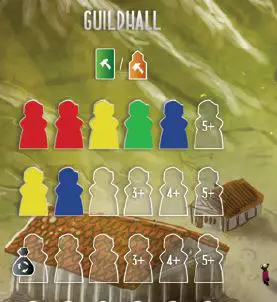
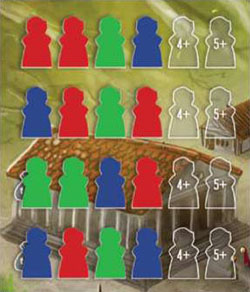
The number of constructions required to trigger the end game is determined by the Worker spaces in the Guildhall. Note that some spaces are only used at higher player counts, as shown by the 3+, 4+ and 5+ icons.
Special Rule: If a player starts their turn with no Workers on their Player Board, their entire turn is spent returning any 1 Worker from the Main Board to their Player Board.
They do not get to place this Worker until their next turn. The chosen Worker cannot be taken from the Guildhall, Black Market, Prison, or an opposing player's Board.
Placing Workers
There are 3 different location types where players can place Workers.

Most locations show a large open circle. There are no restrictions for how many players may use the same location, or how many Workers they can have at a single location.
Players may use the Town Center action to capture from any of these locations.

The Black Market is the only location with smaller open circles. Only 1 Worker may be placed at each of these spaces. The only way these Workers are removed is during a Black Market Reset. Players cannot use the Town Center action to capture Workers from the Black Market.

The Guildhall contains several locations with the outline of a Worker. When placing Workers here, always fill from left to right, top to bottom. Workers placed here should be laid down on their side.
Once placed, a Worker will remain there for the rest of the game. Players cannot use the Town Center action to capture Workers from the Guildhall.
The Prison is another location where Workers can be placed. However, players cannot freely place Workers into the Prison on their turn. Workers can only be placed here using the top Guardhouse action, during Black Market Reset or by various card actions.
Players cannot use the Town Center action to capture Workers from the Prison.
A note to new players: Always be mindful of how many Workers you have in Prison. Having too many there during the Black Market Reset may result in you losing Virtue or gaining a Debt Card.
Board Locations
Quarry, Forest, Mines And Silversmith
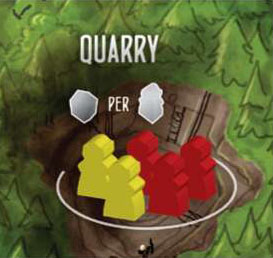
These are the 4 main resource gathering locations. When placing Workers at 1 of these locations, players will gain the indicated resource. How much they gain is determined by the number of their own Workers present, after placing 1 there.
Note that opposing Workers do not affect how many resources a player will receive (at any location).
The Mines offer a choice of Clay or Gold when placing Workers there. Players cannot split their workforce to collect some of each. They must either gain Clay (1, plus 1 per Worker) or Gold (1 for every 2 Workers .
For example, if a player placed their fifth Worker at the Mines, they could gain either 6 Clay or 2 Gold.
Note that a player's first Worker can only gain 2 Clay, as at least 2 Workers are required to gain Gold.
The Silversmith rewards 1 Silver, plus 1 additional Silver for each Worker placed there. For example, if a player placed their fourth Worker at the Silversmith, they would gain 5 Silver.
King's Storehouse
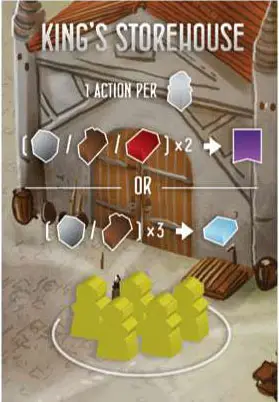
This location allows players to take up to 1 action for each Worker they have there.
The available actions are to trade any 2 pictured resources (Clay, Wood or Stone) for 1 Virtue, or any 3 pictured resources (Wood or Stone) for 1 Marble.
There are also several Apprentices who will allow their owner to take further actions here.
Players may take the same action multiple times if they choose.
For example, Yellow just placed their fifth Worker at the King's Storehouse, they decided to trade 2 Clay for 1 Virtue (1st action), then 1 Wood and 2 Stone for 1 Marble (2nd action). They also used their Merchant Apprentice twice to pay a total of 4 Silver for 2 Gold (3rd and 4th action) and their Trader Apprentice to exchange 3 Clay for 1 Marble (5th action).
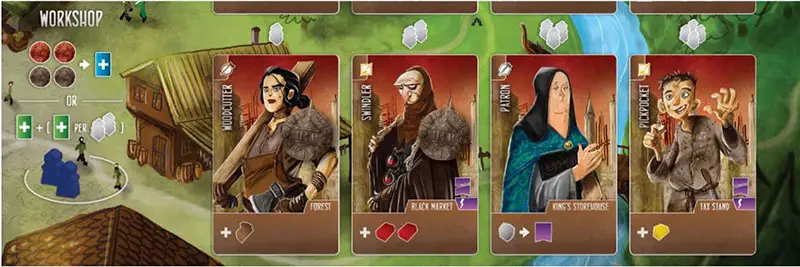
Workshop
The Workshop allows players to either hire 1 Apprentice or work on new Building Plans.
Hired Apprentices gain players additional actions or abilities. To hire an Apprentice, players must first pay a total of 4 Silver. 2 of these are Tax (red coins . Tax is always placed directly into the space above the Tax Stand. All other Silver is placed back into the Supply.
When placing their first Worker in the Workshop, players can only hire an Apprentice from the left-most column. If placing their second Worker, they could hire from the first or second column. Therefore, if they place their fourth Worker, they can hire any of the available Apprentices. Players are reminded of this restriction by the Worker icons seen between the 2 Apprentice Card rows.
There is way to hire Apprentices with fewer Workers than required. Players may place 1 Silver on an Apprentice Card to skip it. Any Silver placed must always be placed on the left-most card of a row, followed by the next card in the row if skipping more than 1 card.
For example, Blue has placed their second Worker in the Workshop. They want the Pickpocket, but can only choose from the first two columns. They place 1 Silver on the Woodcutter, allowing them to hire from the first 3 columns in the bottom row. They then place another Silver on the Swindler, allowing them to hire the Pickpocket.
After hiring an Apprentice, players should place them faceup in front of them. The empty space on the Main Board should then be filled.
First, shift to the left any Apprentice Cards (along with any coins on them) currently sitting to the right of the empty space. Then fill the right-most space by revealing the top card from the Apprentice Card Pile.
There are a few rules to observe when hiring an Apprentice:
The 2 rows of Apprentices are independent of each other, but act the same way.
Players cannot hire more than 5 Apprentices. However, they may discard Apprentices at any time to free up space for new ones. Discarded Apprentices should be placed facedown under the Apprentice Card Pile.
Some Apprentices have an immediate Virtue effect shown on the right of their card. Any Virtue gained or lost takes effect when hiring the Apprentice. Discarding an Apprentice does not reverse this effect.
Any Silver placed on an Apprentice is collected by the player hiring them in a later turn.
Multiple Silver coins may be placed on the same Apprentice Card if skipped multiple times by players.
Players are allowed to hire more than 1 of the same Apprentice.
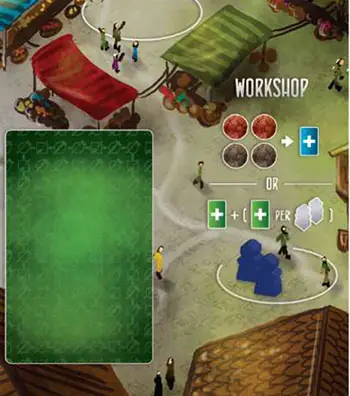
The second action available at the Workshop is to work on new Building Plans. When choosing this action, the current player gains Building Cards from the top of the Building Card Pile.
The number of Building Cards they gain is always 1, plus 1 additional card for every 2 Workers they have at the Workshop.
For example, Blue would draw a total of 2 cards to their hand.
The maximum hand limit for Building Cards is 6. If a player has more than 6 at the end of their turn, they must choose to discard cards until they have no more than 6. Discarded Buildings should be placed facedown under the Building Card Pile.
Town Center
The Town Center allows players to recruit locals to capture Workers from any of the "large open circle" locations on the Main Board.
For each Worker a player has at the Town Center, they may spend 1 Silver to capture 1 group of Workers (of a single color) from 1 location (up to 2 locations for 2-3 player and solo games . Note that the Silver from the first capture is Taxed (remember to always place Tax in the space above the Tax Stand.
There are a few rules to observe when capturing Workers:
Players may capture from up to 2 locations in a single turn with 2-3 players (and solo play), but only from 1 location with 4 or more players.
Each capture requires 1 Worker and 1 Silver (the first Silver is Taxed).
Players may choose to make fewer captures than they have Workers available at the Town Center.
Players may capture from the Town Center, including capturing the Worker they just placed.
Players can never capture from the Guildhall, Black Market, inside the Prison, or from another player's Board.
Example 1: Yellow just placed their 2nd Worker at the Town Center. They pay 1 Tax to capture all 3 Red Workers from the Forest. They then pay 1 more Silver to make a second capture. If this was a 2-3 player game, they could capture from the same, or different location. Since there are at least 4 players in this example, they must capture again from the Forest. They decide to capture both Green Workers from the Forest.
Example 2: Red has placed their 3rd Worker at the Town Center. They pay 1 Tax and 2 additional Silver to the Supply to make 3 captures. They capture all 3 groups of Workers from the Silversmith, including their own.
After capturing opposing Workers, players should place them on the top left section of their Player Board. On a later turn, they can send them to Prison to gain 1 Silver per Worker. When a player captures their own Workers, they are placed back into their own supply.
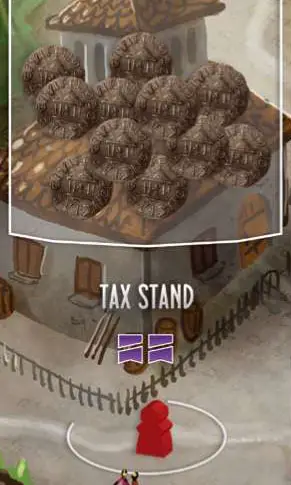
Tax Stand
This location allows players to take all the Silver from above the Tax Stand and place it into their own supply. However, this will cause them to lose 2 Virtue. Players are not allowed to place a Worker here if there is no Tax to steal.
For example, if Red placed a Worker in the Tax Stand, they would take all 11 Silver and lose 2 Virtue.

Reminder: Red coins indicate Tax. When paid, these must be placed into the space above the Tax Stand.
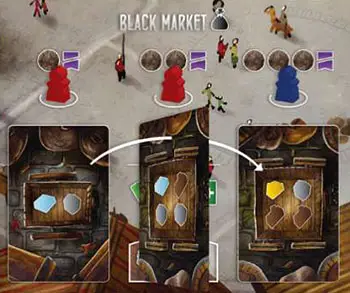
Black Market

While some believe in honorable, hard work, others will gladly take a shortcut to get ahead. The Black Market has 3 spaces for players to place a Worker. Each space is paired with an action below it. Once a Worker is placed on a space, no other Workers may be placed there.
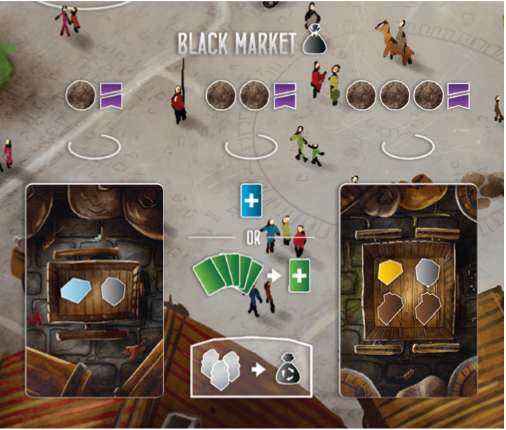
For example, the current options available would be:
Pay 1 Silver and lose 1 Virtue to gain 1 Marble and 1 Stone.
Pay 2 Silver and lose 1 Virtue to either: Hire any faceup Apprentice (and also gain any Silver on the hired card), or Draw 5 Building Cards, keeping 1 and discarding the other 4 to the bottom of the Building Card Pile.
Pay 3 Silver and lose 1 Virtue to gain 1 Gold, 1 Stone and 2 Wood.
Note: Players do not collect or affect the Black Market Cards in any way when gaining the printed resources. They will be refreshed during a Black Market Reset (explained on page 17).
Guardhouse
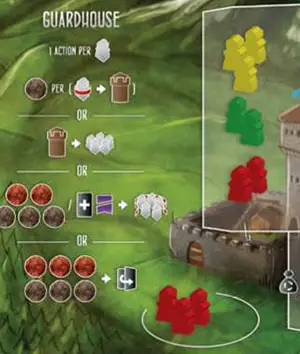
This location allows players to take 1 action for each Worker they have there. The available actions players can take are:
Send all captured Workers from their Player Board to the Prison, gaining 1 Silver for each.
Release all their own Workers from Prison, placing them back onto their Player Board.
Pay 5 Silver (2 Tax, or take 1 Debt and lose 1 Virtue to release all their own Workers from other players' Boards, placing them back onto their Player Board.
Note: Minimum of 1 captured Worker is required to take this action.Pay 6 Silver (3 Tax) to pay off 1 Debt.
For example, Red could take up to 3 actions at the Guardhouse. They send 3 Yellow and 2 Green captured Workers from their Player Board to the Prison, gaining a total of 5 Silver. For their second action they release their 2 Workers from Prison, placing them back onto their Player Board. They decide to do nothing for their third action.
Players may take actions in any order they choose and may pay off multiple Debts in the same turn (Resolve each Debt action separately.
When paying off a Debt, players should flip the Debt Card, keeping it in front of them. This immediately gains them 1 Virtue, plus additional benefits from any Debt-related Apprentices the have.
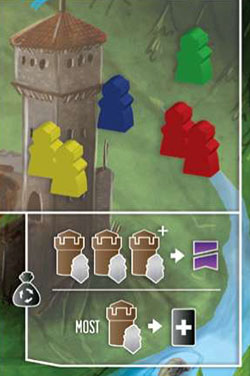
Guildhall
The Guildhall is where players place Workers to construct either a Building  from their hand, or advance work on the Cathedral
  . When placing Workers here, lay them flat and always place from left to right, top to bottom.
When playing with less than 5 players, not all columns are used. Note that the right- most column is not used in this 4 player example. Therefore, the next Worker to be placed would be on the second row, to the right of the Blue Worker.
Constructing Buildings and advancing work on the Cathedral will be explained over the page.
Constructing Buildings and The Cathedral
When placing a Worker in the Guildhall, players can either construct a Building from their hand, or advance work on the Cathedral.
Constructing a Building

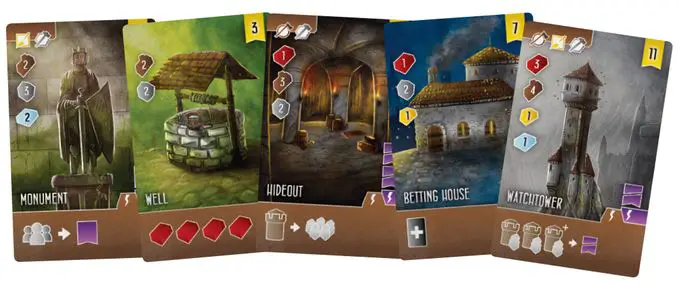
When constructing a Building, players should display the card faceup above their Player Board. Each card has various costs, requirements, rewards and effects:

Some Buildings will require players to have hired Apprentices with certain skills (Carpentry, Tiling and Masonry . In order to construct a Building displaying 1 or more of these icons at the top left, players will need to have at least 1 hired Apprentice with a matching symbol in front of them.
Note: Apprentices used to construct a Building are not discarded.

All Buildings have a resource cost. In order to construct a Building, players must pay the indicated resources on the left of the card. All spent resources are returned to the Supply.

Some Buildings will show an immediate increase  or decrease
  in Virtue on the right side of the card. Players must move their Player Marker up or down the Virtue Track to show this change.

All Buildings will either have an end-game  or immediate
  effect. End-game effects are triggered right before final scoring takes place. All immediate effects must be triggered once the Building has been constructed.

The Well does not require any Apprentice skills to construct. It costs only 2 Wood and 2 Stone.
Once built, it will allow the current player to immediately gain 4 Clay. At the game's end it will score 3 VP.
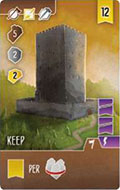
The Keep requires all 3 Apprentice skills, 5 Wood, 2 Stone and 2 Gold to construct.
Once built, it will cause the current player to lose 2 Virtue. At the game's end, it will score 12 VP, plus an additional 1 VP for every 3 captured Workers.
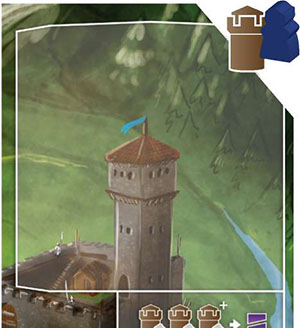
Advancing Work on the Cathedral

Rather than pursuing their own endeavours, players may also dedicate some time and resources to constructing the Cathedral. To do this, players should follow these steps:
Pay the indicated resources to the left of the Cathedral, 1 level above where their Player Marker currently sits (all players start below the lowest level.
Discard any 1 Building Card from their hand, facedown to the bottom of the Building Card Pile.
Move their Player Marker 1 level up the Cathedral.
Reveal the top card from the Reward Card Pile and gain its benefits. Once resolved, Reward Cards are removed from play.
Note: If there are no Reward Cards left in the pile, players just gain 1 Virtue.
At the game's end, players will score Victory Points equal to the number shown in the yellow flag to the left of their current level in the Cathedral.
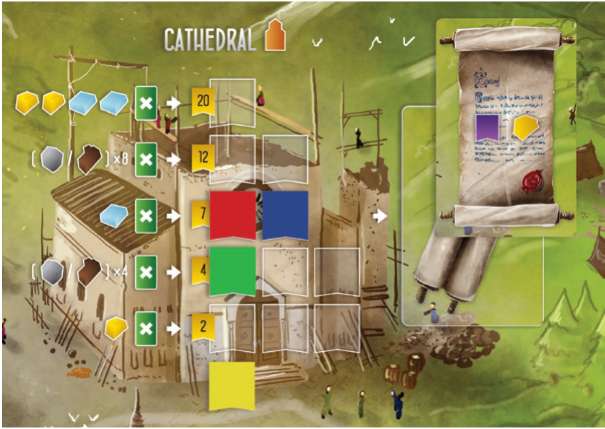
For example, Yellow currently sits at the bottom of the Cathedral. To advance to the next level, they place a Worker in the Guildhall, pay 1 Gold and discard 1 Building Card. They reveal the top Reward Card, which gains them 1 Virtue and 1 Gold. If they remain at this level at the game's end, they will score 2 VP for their work on the Cathedral.
Important rule: Players can only advance their work on the Cathedral if there is an available space. In this example, Green could not work on the Cathedral until Red or Blue advance further.

Note: The cost shown here is 4 Stone or Wood, in any combination. Likewise, the 4th level of the Cathedral is 8 Stone or Wood, in any combination.
Virtue Track
Each player's Virtue is recorded by their Player Marker on the Virtue Track. Any time players gain Virtue , or lose Virtue , it is immediately shown by moving their Player Marker up or down the Virtue Track. Depending on how much Virtue they have at the game's end, they may gain or lose Victory Points. This is equal to the numbers shown in the yellow flags  next to the upper and lower levels of the Virtue Track.
There are a number of icons along the Virtue Track. Their effects are as follows:

For each Virtue players gain above 14, they may destroy 1 unpaid Debt they hold. Unlike paying off Debts, this action has no additional effects (no Virtue is gained or any Apprentice abilities activated . Any destroyed Debts are instead returned to the Debt Card Pile.

For each Virtue players lose below 0, they must take a Debt Card. This is taken from the Debt Card Pile and placed with the "unpaid" side faceup in front of them.

Once players have 3 or less Virtue, they start skimping on their Taxes. For each "avoid Tax" icon at their current Virtue level, players may ignore 1 Tax on all future costs.

Once players have 10 or more Virtue, they can no longer place Workers in the Black Market. Should they drop below 10 Virtue, this no longer has any effect.

Once players have 4 or less Virtue, they can no longer work on the Cathedral. Should they rise above 4 Virtue, this no longer has any effect.
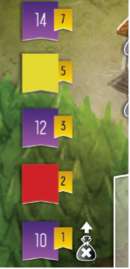
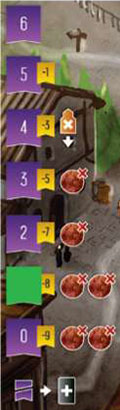
For example, Yellow currently has 13 Virtue and cannot visit the Black Market. If they end the game here, they will score 5 VP. On their turn they take an action resulting in a gain of 3 Virtue, they move their Player Marker 1 space up the Virtue Track. With the excess 2 Virtue, they destroy 2 Debts from in front of them.
Red currently has 11 Virtue. They decide to steal from the Tax Stand, losing 2 Virtue. As they now have less than 10 Virtue, they may visit the Black Market on their next turn.
Green currently has 1 Virtue and cannot work on the Cathedral. If they end the game here, they will lose 8 VP. On their turn they place a Worker in the Workshop to hire an Apprentice. Due to their position on the Virtue Track, they ignore both Tax on this action, paying only the 2 Silver to the Supply.
Black Market Reset

While the King may at times seem unaware of all that goes on in his kingdom, he will occasionally order checks to make sure all workers are held accountable for their actions.
There are 2 ways a Black Market Reset can be triggered:
All 3 spaces at the Black Market have Workers placed on them.
A Worker is placed in the Guildhall on 1 of the left-most spaces on the bottom 2 rows.
Regardless of how the Black Market Reset is triggered, the action that caused it should first be resolved. After doing so, the following steps should be taken:
All Workers currently in the Black Market are moved to the Prison.
The top Small Market Card (left) is turned over and placed on top the Large Market (right.
Players with any Black Market Reset based Apprentices may take their actions in any chosen order.
All players with 3 or more Workers in Prison lose 1 Virtue.
The player, or players with the most Workers in Prison each take 1 Debt Card, placing it "unpaid" side faceup in front of them.
For example, Red just placed a Worker in the Black Market. As all 3 spaces are now filled, this will cause a Black Market Reset at the end of their turn. Both Red Workers and the single Blue Worker are sent to the Prison and the Black Market Cards are refreshed.
Blue uses their Gatekeeper's ability to release 2 of their 3 Workers from Prison. No players have 3 Workers in Prison, so no one loses any Virtue. However, Yellow and Red are now tied for having the most Workers in Prison (2 each). Therefore, they each receive 1 Debt Card.
Should there ever be no cards left in the Small Market Pile to turn over during reset, take all the cards from the Large Market Pile and shuffle them to form a new Small Market Pile.
End of the Game
The end of the game will be triggered once the last Worker is placed in the Guildhall. The current player finishes their turn, then each player (including the current player) has 1 final turn before the game ends (1 final round.
The 2 right columns of the Guildhall are not used in this 3 player example. Therefore, when Blue placed the last Worker in the Guildhall (bottom right), this triggered the end of the game. All players, including Blue, will have 1 final turn before scoring takes place.
It is important to note that in the final round, players may still place Workers in the Guildhall. These Workers should be placed to the side of the Guildhall.
Scoring
Once the game has ended, players should immediately resolve any end-game effects from their constructed Buildings. Note that all Apprentice abilities and board effects remain active during this time. For example, if a player was to gain Virtue above the top of the Virtue Track, they could use it to destroy unpaid Debts.
Each player should then add up their score for the following areas:
Gain VP for all constructed Buildings, including end-game bonuses.

6 Gain VP for level of work done advancing construction on the Cathedral.

Gain or lose VP for final position on the Virtue Track.

Lose 2 VP for each unpaid Debt.

Gain 1 VP for each Gold and 1 VP for each Marble on their Player Board.

Gain 1 VP for each set of 10 Silver on their Player Board.

Lose 1 VP for every 2 Workers in Prison (1 Worker on its own has no effect).
The player with the highest total score is declared the winner. In the case of a tie, the player with the highest Virtue is the winner. If still tied, the tied player with the most remaining Silver is the winner. If still tied, all tied players share the victory.
For example, Red would score a total of 38 VP for the following:
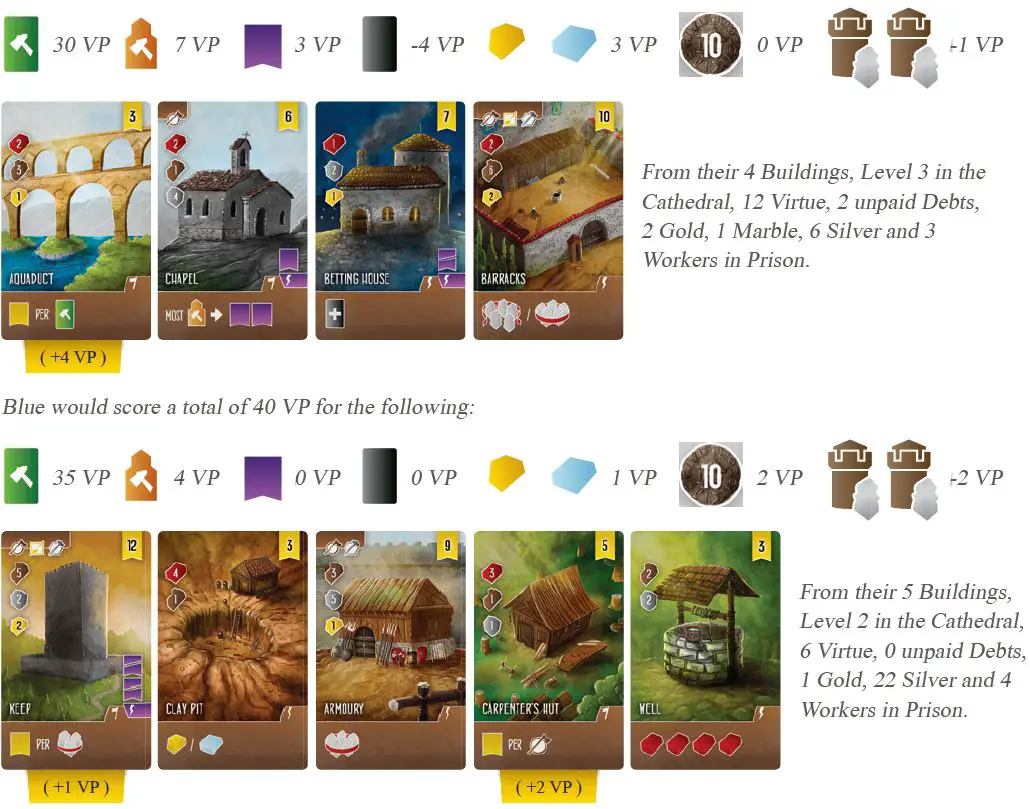
Continue Reading


