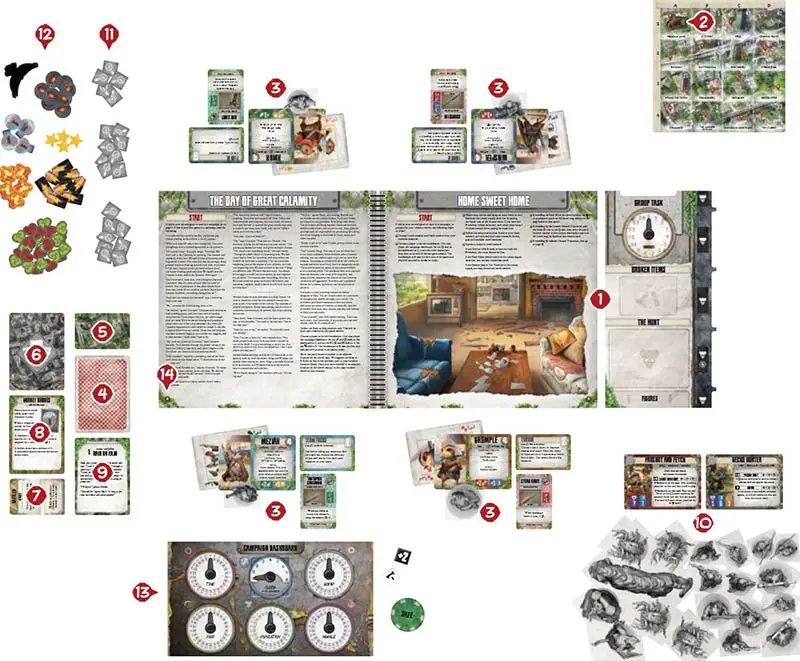
Components
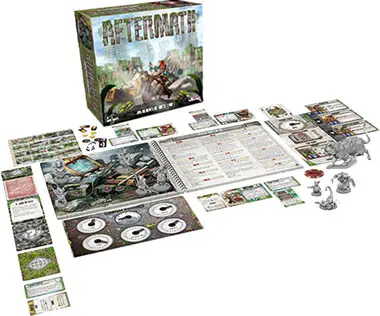
- 1 Adventure Book
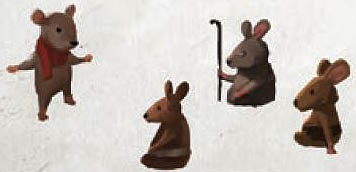
- 23 Plastic Figures
- 2 Resolution Dice
- 1 Campaign Dashboard and 1 Sideboard
- 1 Downtown Travel Map
- 47 Card Discovery Deck
- 4 Character Cards
- 37 Basic Action Cards
- 4 Character Influence Cards
- 51 Item Cards
- 17 Status Cards
- 20 Ability Cards
- 17 Encounter Cards
- 8 Mission Cards
- 22 Enemy Cards
- 10 Environment Cards
- 13 Vehicle Travel Cards
- 1 Situation Token
- 1 Party Location Marker
- 25 Wound Tokens
- 1 Scavenge Tokens
- 8 Battery Tokens
- 4 Objective Tokens
- 5 Fire Tokens
- 8 Roach Tokens
- 4 Hornet Drone Tokens
- 1 Dustfeather Token
- 3 Heavy Object Tokens
- 1 Fishhook Token and 2 Trap Tokens
- 3 Aim Tokens
- 1 Milk Carton Boat Token
- 1 Truck Standee
- 1 Jeep Standee
- 2 Enemy Blade Bike Standees
- 2 Skate Raider Standees
- 1 Smokey Standee
- 7 Plastic Standee Stands
- 7 Plastic Dial Connectors
- 1 Discovery Deck Box
- 1 Banished Deck Box
- 4 Character Deck Boxes
- 1 Colony Supply Deck Box
- 14 Plastic Baggies
Object of the Game
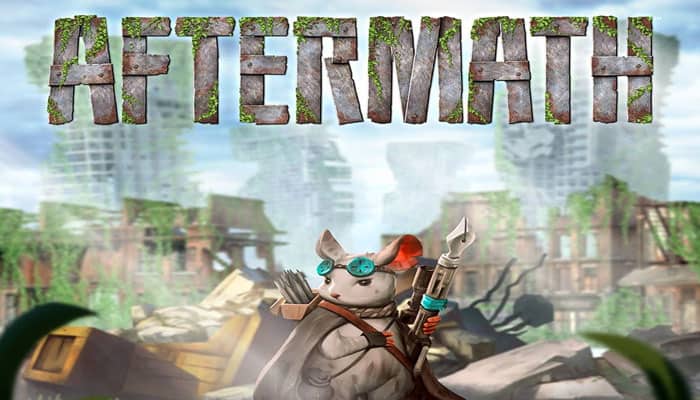
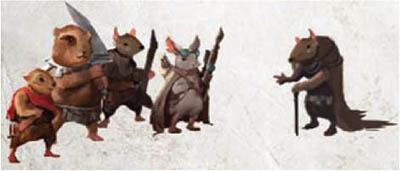
Aftermath is a cooperative adventure game for 1-4 players. In it, players take on the role of small rodents trying to survive and thrive in a post- apocalyptic world where humans have mysteriously disappeared.
In each Aftermath game session, players must explore the dangerous and shattered world, forage for supplies, accomplish missions, compete with rival rodents, and contend with vicious predators, all while racing against time, as leaving the colony unprotected for too long could result in tragedy.
Aftermath is played as a campaign game, meaning that each session has an impact on the overall state of your colony and advances certain story arcs in the narrative. To win the campaign, players must accomplish the characters' personal goals while preventing the colony from disbanding.
Setup
To set up a game of Aftermath, follow these steps:
Place the Adventure Book in the center of the play area and put the sideboard to the right side of it.
Place the Downtown travel map near the Adventure Book and place the party location marker on the Abbigail Lane space (the upper leftmost space) of the map.
Each player chooses a character, collecting its character deck box and laying its contents out in front of them. If playing with 2 players, the players may choose to control 2 characters each. If playing with 1 player, that player must control 2 characters. For the purpose of interpreting rules, a player with 2 characters is treated as 2 players with 2 separate turns.
Shuffle the basic action cards and form an action deck.
Shuffle the item cards and form an item deck.
Shuffle the encounter cards and form an encounter deck.
Form a face up deck of status cards.
Form a face up deck of environment cards.
Form a face up deck of mission cards.
Form a face up deck of boss enemy cards, a separate face up deck of all other enemy cards, and a pile of enemy figures.
Gather all scavenge tokens and turn them all face down (difficulty number side up). Separate the face down scavenge tokens into piles by difficulty number.
Form separate piles of wound tokens, battery tokens, objective tokens, fire tokens, roach tokens, hornet tokens and the Dustfeater token.
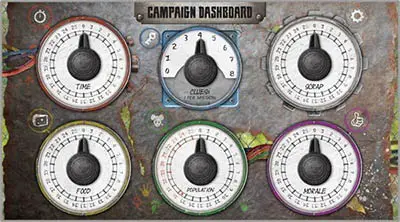
Set aside the campaign dashboard, situation token, and resolution dice. Return all other cards and tokens to the game box until the Adventure Book calls for their use.
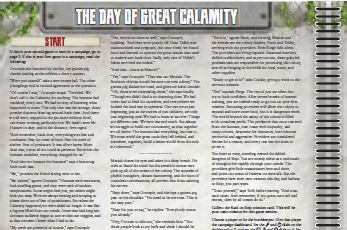
If this is your first game in a campaign, start the game by going to page 2 in the Adventure Book. If this is your second game or later in a campaign, start the game by going to page 3 in the Adventure Book.
The Adventure Book
Reading Entries
When the Adventure Book, or another game effect, instructs a player to go to a page in the Adventure Book, find that page and start by reading the first entry on that page which is always titled start. Never read a numbered entry on a page until instructed to do so. Other entries are read as follows:
 : read when visiting the matching space.
 read when visiting the matching space if the token is present.
 : read during the Check Threat Step when the situation is safe and there are 4 or more threat (black) action cards on the threat track.
 : read during the Resolve Calamity Step when a player triggers it by drawing the action card.
 : read at any time to gain more information about leaving that page.
Increasing Dials
Whenever a game effect instructs  +X,
+X,  +X, etc., increase the appropriate dial on the campaign dashboard by X. A dial cannot go above its highest value. The
  dial cannot go above 15 until instructed otherwise. The
  dial can only increase once per mission.
Traveling
When leaving a page, if the Adventure Book instructs players to travel to an adjacent location on the travel map, they must move the party location marker orthogonally (never diagonally) to an adjacent space on the travel map and then turn to the page listed on the new space.
Always keep your mission location (listed on the main mission card) in mind. Players can only complete that mission by traveling to that location and exploring that Adventure Book page and subsequent pages at that location.
Note: Most often players will want to take the most direct route to their mission location, as taking longer routes will cost the players more time and put their colony at greater risk.
Leaving a Page
When all non-defeated characters have left a page, or the Adventure
Book directs you to go to a new page, resolve all of the following:
-
Finish the current player's turn, including Check Threat.
-
The bookkeeper passes the campaign dashboard to the player on their left who becomes the new bookkeeper and will take the next turn of the game.
-
Remove all enemy figures and cards from play and, if the situation is hostile, place those figures and their cards in The Hunt box, removing any wounds from them.
-
Move all character figures to their cards. Remove any remaining tokens from play (do not return tokens to the supply). Discard all cards on the threat track and group task slot. Reset the group task dial to 0.
Revisiting a Page
If players go to a page that they've already been to during that same mission, do not populate that page with or tokens and all entries that do not have the  are ignored.
Safe and Hostile Situations
While exploring a page, there are 2 kinds of situations: safe and hostile. Use the situation token to remind players of the current situation.
Safe: When the situation is safe, the enemy figures are just considered strangers and will not move or attack. Characters can attempt to communicate with these figures in hopes of avoiding a fight (see the Communicate section on page 8).
Hostile: When the situation is hostile, the enemy figures cannot be reasoned with and will move toward and attack the characters. If the situation is hostile and all enemies in play are defeated or otherwise removed from play, the situation becomes safe.
Generating an Encounter
Enemies enter play during encounters. To generate an encounter, retrieve the listed enemy cards and shuffle them together. Then deal them face up onto the threat track in the next slots not already containing enemy cards.
Place each of the figures (or tokens) for those cards on the space on the map. In cases where the map has more than one space, divide the enemy figures among the available spaces as evenly as possible. The encounter is either hostile or safe. Flip the situation token to match.
When placing enemy cards on the threat track, if a slot already contains a threat card, place the enemy card over that threat card leaving the threat card partially visible.
Random Encounters: Sometimes an encounter instructs the players to generate a random encounter of a select type of enemy. In these cases, collect all of the non-boss enemy cards matching that type, shuffle them, then generate the encounter from those cards.
Encounter Cards: Sometimes encounters will be generated by encounter cards. When players are instructed to draw an encounter card, reveal and discard the top card from the encounter deck and generate the encounter from that card.
Gathering Enemies: When gathering enemy cards and figures for an encounter, use cards from the supply first, and then The Hunt box, if needed.
5 Enemy Limit: If generating an encounter would cause more than 5 enemy cards to be in play at the same time, after putting the 5th enemy card into play, do not put any more enemies into play.
There can only ever be up to 5 enemy cards in play at a time. Exception: If a boss enemy is to be put into play but there are already 5 enemy cards in play, replace the enemy card on the last slot of the threat track with the boss.
Encountering Roaches: Roaches are represented by tokens rather than figures, but are treated the same as figures. Roaches only have 1 enemy card that will activate all roaches in play. Each individual roach token has a life value of 1 and is removed from play once it is dealt damage. The roaches' enemy card is removed when the last roach is removed from play.
Discovery Deck
Throughout your campaign, you will discover new ways to interact with the world. Whenever you add a new card to a deck, add it to the bottom without shuffling. Whenever you are asked to retrieve a card (from any deck) that you have already retrieved, ignore that instruction.
Game Play
A player's turn consists of 5 steps that must be completed in order:
1. Draw
Draw until you have 5 action cards in your hand. Before drawing, if you have any action cards in your hand from a previous turn, you may discard any or all of them.
If there are not enough cards in the action deck to bring your hand to 5, shuffle the discard pile creating a new action deck. Note: If at any time you have more than 5 action cards in your hand, you must discard until you have no more than 5 cards in your hand.
2. Resolve Calamity
If you drew the card, immediately reveal it and discard it. If a has already been resolved on the current page of the Adventure Book, the card has no effect.
If a has not yet been resolved, roll the black die and add the result together with current value on the time  dial. If the total is equal to or higher than the value listed next to the entry on the current page, resolve the entry.
The Hunt: If the entry instructs you to encounter The Hunt, generate an encounter by shuffling together all enemy cards in The Hunt box and dealing them to the threat track until all of the cards are dealt or there are 5 enemies on the threat track.
Return any undealt cards to the Hunt Box. If there are now enemies in play, turn the situation to hostile. Note: Enemies from the Hunt never have loot.
3. Place Threat
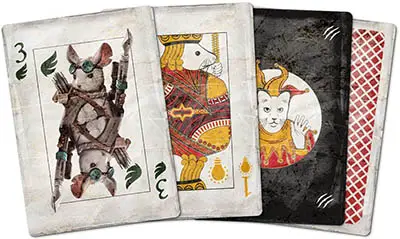
Place any threat (black) cards drawn onto the threat track in random order in the next slots not already containing threat cards. If a slot already contains an enemy card, slide the threat card under that enemy card leaving the threat card partially visible (see example on page 4).
4. Perform Actions
All of your remaining action cards can be used to perform actions. On your turn, you may perform as many actions as you like, as many times as you like, so long as you still have the appropriate cards available to initiate those actions.
5. Check Threat
If the situation is:
Safe: If there are 4 or more threat cards on the threat track, go to the entry on the current page of the Adventure Book.
Hostile: If the number of threat cards equals or exceeds the number of enemies on the threat track, resolve an enemy turn.
Skill Tests
Most actions require passing a skill test. There are two kinds of skill tests, regular and opposed.
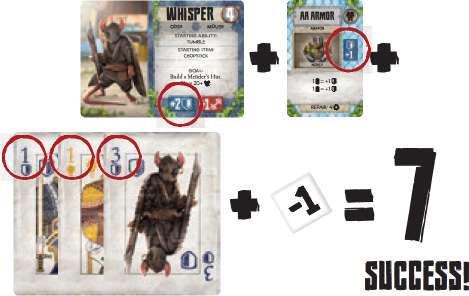
Resolving a Regular Skill Test: Each skill test will have an attribute symbol associated with it and a difficulty value. When resolving a skill test you must first play an action card from your hand that has a matching attribute symbol. (White cards can be used to initiate any type of skill test).
Then you may play additional action cards. These additional cards must match either the COLOR (not necessarily attribute) or the NUMBER value on the first action card you played into this skill test. Next, roll the white resolution die. Finally add together:
- The value of all of the cards you played
- Any bonus to that attribute granted by your character's card
- All bonuses to that action or attribute granted by any item cards equipped to your character
- The result rolled on the die
If your total is equal to or higher than the skill test's difficulty value you have succeeded at the test. Otherwise, you have failed at the test.
Example of a  skill test, difficulty:
Resolving An Opposed Skill Test: When resolving an opposed skill test, follow all of the rules for resolving a regular skill test, except when rolling the white die, also roll the black resolution die and add the result of the black die to the difficulty of the test.
Group Tasks
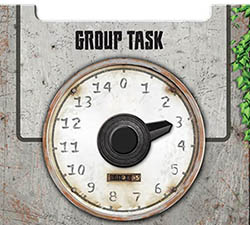
Group tasks are similar to skill tests, except they are based purely on cards played, they can take multiple turns to resolve and the whole party can help with the task. Group tasks are usually initiated by the Adventure Book.
Players can contribute action cards to a group task on their turn. The first card contributed must have a symbol matching the group task's associated attribute.
Slot that first card into the group task slot on the sideboard and increase the group task dial equal to its value.
All subsequent contributed cards must match the COLOR or NUMBER value of the first card. The value of those cards is added to the group task dial and they are discarded.
When the group task dial is equal to or higher than the task's difficulty, the party has succeeded at that task and reads the success instructions for that task in the Adventure Book. After resolving a group task, reset the group task dial to 0 and discard the card from the group task slot. There is no fail effect for group tasks.
Player Actions
Action: Move
To perform a move action, first play 1 or more action cards of any type in front of you. The total value of those action cards is the number of movement points available to your character. To move your character across a dashed white line, you must spend 1 of those movement points.
If all action cards played are of the same color, your character can cross a matching solid red, blue, or green line by spending 1 movement point. If not, you must spend 3 movement points to cross that line.
Solid white lines can be seen through but not crossed. Double solid white lines cannot be seen through or crossed. Figures cannot be moved diagonally.
Characters can move into and out of spaces containing enemies without restriction. Characters end their current movement when reading or entries.
After you have ended your movement for any reason, place your character anywhere within the destination space and discard the action cards you played in front of you for this movement.
Action: Communicate 
If the situation is safe, enemy figures on the board can be communicated with. To perform a communicate action, target an enemy sharing your character's space and resolve an opposed  skill test.
The difficulty of the test is equal to the communication value on that enemy's card. If you succeed at this opposed skill test, remove that enemy's figure and card from play and increase your dial by 1.
In addition, remove the bottom threat card from the threat track. If you fail this skill test, the situation becomes hostile.
Action: Recover 
A character suffering from 1 or more negative status effects may attempt to recover from one of those effects by performing a recover action and resolving the skill test listed on that status effect card. If you succeed at this skill test, discard that status effect.
Action: Scavenge 
To perform a scavenge action target a token sharing your character's space and resolve a O skill test. The difficulty of the test is the difficulty value listed on the targeted scavenge token. If you succeed at this skill test, reveal and discard the targeted token and gain the prize shown.
When discarding tokens (only), do not return them to the supply.
If the token shows
 , or symbols, gain an amount of , or on the campaign dashboard equal to the number of symbols shown.
If the token shows
 symbols, gain the number of tokens shown.
If the token shows a
 symbol, draw the top card of the item deck.
If the token shows a
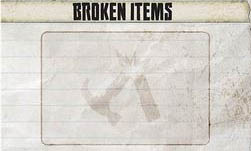
 symbol, draw the top card of the item deck and place it on the broken item pile on the sideboard.
Action: Activate Ability
You may activate one of your character's special abilities by playing enough white cards so that their combined value is equal to or higher than that ability's cost.
Note: If their combined value is higher than an ability's cost, any remaining value is lost.
Action: Encourage
To perform an encourage action, give an action card from your hand to a player that has 2 or fewer action cards in their hand.
Action: Equip/trade
To perform an Equip/Trade action discard any type of action card and move any number of items between your backpack and your equipment slots. You can also give items to and receive items from any players whose character is on the same space as your character. Items traded in this way must either be immediately equipped or stored in a character's backpack.
An item's bonus and effect are only active when it is equipped.
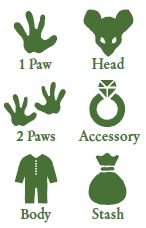
Equipment Slots: Each character has 5 equipment slots: Head, Body, Paw, Paw, Accessory.
A player can only equip items if they have slots available. Any item that cannot be equipped must be stored in that character's backpack. A character can store up to 2 unequipped items in their backpack.
If a player ever cannot equip an item or fit it in their backpack they must discard it. Items showing a Stash equipment slot are always added to the colony supply deck box when drawn.
Action: Melee Attack 
If the situation is hostile, you may perform a melee attack action by targeting an enemy sharing your character's space and resolving an opposed  skill test. The difficulty of the skill test is the targeted enemy's defense value. If you succeed at this opposed skill test, inflict 1 wound on the targeted enemy.
Action: Ranged Attack 
If the situation is hostile, you may perform a ranged attack by targeting an enemy up to 1 space away and within line of sight of your character and resolving an opposed  skill test. The difficulty of the skill test is the targeted enemy's defense value. If you succeed at this opposed skill test, inflict 1 wound on the targeted enemy.
Ranged Weapon: A character equipped with a ranged weapon may attack an enemy within a number of spaces equal to that weapon's range value, so long as they are in line of sight.

Defeated Enemy
If an enemy ever has a number of wounds equal to or higher than its life value, that enemy is defeated. Remove its figure from the board and its card from the threat track (moving any enemy cards below it on the track up to fill in the space).
If the encounter lists a loot prize, the player that defeats the last enemy remaining in that encounter gains that prize using the same rules as gaining a prize for successfully scavenging.
If the situation is hostile and the last enemy in play is defeated or otherwise removed from play, the situation becomes safe.
Defeating A Boss: Every boss's life value is equal to the number of characters in the party.
Enemy Turn
To resolve an enemy turn, starting with the enemy in the top slot of the threat track and continuing downward, activate each enemy 1 at a time until all enemies in play have been activated once. To activate an enemy do the following in order:
-
Determine Action
Check the value on the threat card under that enemy's card and match it to an action on the enemy's card.
That action will determine the enemy's speed, range and strength for the activation as well as any special rules that apply during the action.
-
Move

If the enemy is sharing a space with a character, do not move it.
Otherwise, move the enemy toward the nearest character (the character that would require the least amount of movement to reach) until it enters that character's space, or until it has moved a number of spaces equal to its speed, whichever comes first.
(If multiple characters are equally close, you decide which of those characters the enemy will move toward). Figures cannot be moved diagonally.
Note: It always costs only 1 point of movement for an enemy to move across a solid red, blue or green line.
-
Target
If there are no characters within the enemy's range and clear sight, it will not attack. Otherwise, it will target the closest character within range and clear sight. (If multiple characters are equally close, you decide which of those characters the enemy will target).
-
Attack
 / Defending
The enemy now attacks the targeted character. That character may then defend by resolving an opposed skill test of any attribute. The difficulty of the test is equal to the
 of the attack.
If the target character succeeds in this opposed skill test, the attack misses. Otherwise, the attack hits and inflicts 1 wound on that character.
Toxic Wounds: Some enemies or effects inflict toxic wounds
 . When your party nests (see below), toxic wounds do not heal in step 1, but do become normal wounds in step 2.
Note: Attacks from other sources, e.g. the Adventure Book, can be defended against in the same way as defending against an enemy attack.
-
Discard
After completing an enemy's activation, discard the threat card used to determine its action and activate the next enemy on the threat track until all of the enemies in play have been activated.
Once all enemies have been activated, if there are any threat cards remaining on the threat track, discard them and continue to the next player's turn.
Defeated Character
If a character ever has a number of wounds and/or toxic wounds equal to or higher than its life value, that character flees. Do the following in order:
- Remove its figure from play, placing it on its character card.
- Remove all tokens and all status effects from the character.
- +1.
Return a defeated character to play on its next turn if the situation is safe or when placing characters as part of a new page's setup instructions. When returning a defeated character to play, place a Badly Hurt status card on that character and place its figure on any space occupied by a fellow character.
If all characters are simultaneously defeated, the mission fails. See 'Ending a Mission' on the next page.
Items
When acquiring a (unbroken item) from the item deck: If it is a colony improvement, add it to the colony supply deck box. Otherwise, immediately do one of the following with that item:
Equip it to your character
Store it in your character's backpack
Trade it to another character in the same space (who must then immediately equip or store it)
Discard it to gain
equal to the item's repair cost.
When acquiring a (broken item) place it on the broken item pile on the sideboard. If an unbroken item ever breaks, place it on the broken item pile.
Batteries
Some items become more powerful or offer additional abilities when powered up by batteries. To gain these additional benefits, a player with battery tokens can place 1 or more batteries on 1 or more items as part of an equip action.
If a player moves a battery powered item to their pack, or trades it away, any battery tokens on it are discarded. Battery bonuses are in addition to existing bonuses.
Nest
At the end of any player's turn, as long as the situation is safe, the party can nest. While nesting resolve the following in order:
In turn order each character may choose once to reduce
by 1 to remove 1 normal wound  from their character.
Change all toxic wounds
to normal wounds .Discard all negative status effect cards.
Discard all
on any item cards.Players may collectively spend the required resources to fix broken items from the broken item pile. Players should agree as a team which items get fixed and which characters those items get assigned to.
- +1.
Status Effects
Characters can be affected by a variety of conditions. When a character "becomes" something it means to place the corresponding status card near that character's card. The status card's effect immediately applies to that affected character. A character cannot have 2 of the same status card at the same time.
To remove a status card, follow the instructions on the card under "removal". If a skill test is required to remove a status effect, only the character affected by that status can take the test, but the difficulty of the test is reduced by 1 for each other character sharing a space with the affected character.
Line of Sight
When determining if an attacker has clear sight to a target, draw an imaginary line from any portion of that attacker's base to any portion of the defender's base using their current placement. If that line would cross any double solid white lines, there is no clear sight and the ranged attack cannot be made.
Ambiguous Effects
Sometimes players will be instructed to collectively decide or do something for which there are multiple valid choices, such as deciding what cards to fix while nesting. In all cases such as these, if an agreement cannot be reached democratically the current bookkeeper makes the final decision.
Ending a Mission
Mission Success: When players have completed their main mission goal, the Adventure Book will instruct them on how to proceed.
Mission Failure: If all characters are simultaneously out of play from having been defeated, the players have failed the main mission. Go to the page and entry listed under the fail section of your main mission card.
Time: Going over a mission's allotted O does not result in a mission failure. Rather, the more time you spend on a mission, the more risk your colony is exposed to while you are gone. The Adventure Book will instruct players on resolving the effects of time spent.
The Campaign
Aftermath is played as a campaign. At the end of a mission, even if that mission was failed, the Adventure Book will guide players through a Colony Phase which includes repacking the game in a way that preserves the current campaign state.
Players may choose different characters at the start of each new game of the campaign, and player count may vary from game to game throughout the campaign.
To win the campaign players must complete the personal goal of at least 4 characters. Once a goal is completed, it stays completed regardless of future game state. Note: this will require players to pay attention to the personal goals of all of the characters (listed on their character card), even if all of the characters aren't being utilized in play.
Even after completing the personal goals of 4 characters players may continue playing the campaign if they still have main missions remaining that they'd like to complete.
If the or  dials on the campaign dashboard ever reach 0, the campaign has been lost. Upon losing a campaign, players must immediately go to page 100, entry 100-23 in the Adventure Book. Players must then reset the game and start a new campaign.
Infinite Lives Mode: Upon losing the campaign, players may choose to switch to infinite lives mode. In infinite lives mode, upon losing a campaign, instead of resetting the game, set the and dials to 5 and continue the current mission.
Resetting The Game
To reset Aftermath for a new campaign, return all cards with the symbol on the lower right corner to the discovery deck and put it in the discovery deck box.
Collect the character deck boxes and add to each their matching character card, character influence card, starting item and ability cards. Separate all other cards by card back and put them in separate baggies.
Expanding The Game
Plaid Hat Games intends to release expansions for Aftermath. We have 3 kinds of expansions in mind. All of the expansions can be added right into the game even if you are in the middle of a campaign.
Character Packs: will come with new playable characters to go adventuring with.
Enemy Packs: will come with new bosses and enemies that will immediately increase the variety of your encounters.
World Expansions: will come with a new Adventure Book and travel map that will allow players to explore whole new regions of the city. They will also include new missions, characters, bosses, enemies, items, and more!
Existing Upgrades: Players who own Mice and Mystics may want to replace their roach tokens with the roach figures from that game. Players who own Tail Feathers may want to replace their Dustfeather token with the Grizzard figure from that game.
Continue Reading