Components
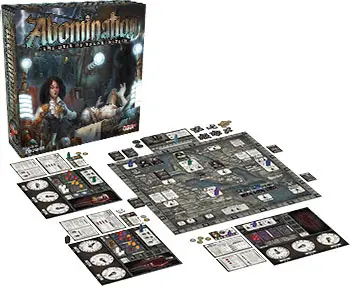
- 1 Paris Board
- 1 Event Board
- 4 Laboratory Boards
- 8 Shock Dice
- 144 Cards
- 1 Captain Meeple
- 1 First Player Creature Meeple
- 16 Scientist Meeples
- 12 Assistant Meeples
- 42 Francs
- 4 Ice Block Tokens
- 16 Leyden Jar Tokens
- 170 Material Cubes
- 30 Monster Body Part Tokens
- 4 Player Score Markers
- 6 Bonus Objective Markers
- 1 Bribe and Bump Track
- 4 Event Markers
- 12 Police Markers
- 4 Player Reference Cards
- 24 Alive Markers
- 12 Plastic Connector Sets
Object of the Game
Abomination brings to life the world of Mary Shelley's immortal Frankenstein. Set in Paris, the game takes place twenty years after the events of the novel. You are one of several esteemed scientists invited to dabble in the immoral world of monster building, to continue the dark work abandoned by Victor Frankenstein.
Through strategic worker placement and careful management of resources, you'll gather raw materials from the cemeteries and morgues around the city, conduct valuable research at the Academy of Science, hire less-than-reputable associates, and toil away in your lab-all in an effort to assemble a new form of life and infuse it with a "spark of being".
Do well, and the Creature may reward you during one of his surprise visits. Do poorly, and you may come to regret not putting forth more effort!
Once a player succeeds in bringing their creation to life, or after 12 rounds have elapsed, the game ends and the player with the most victory points fulfills Frankenstein's dark legacy, for good or ill...
Setup
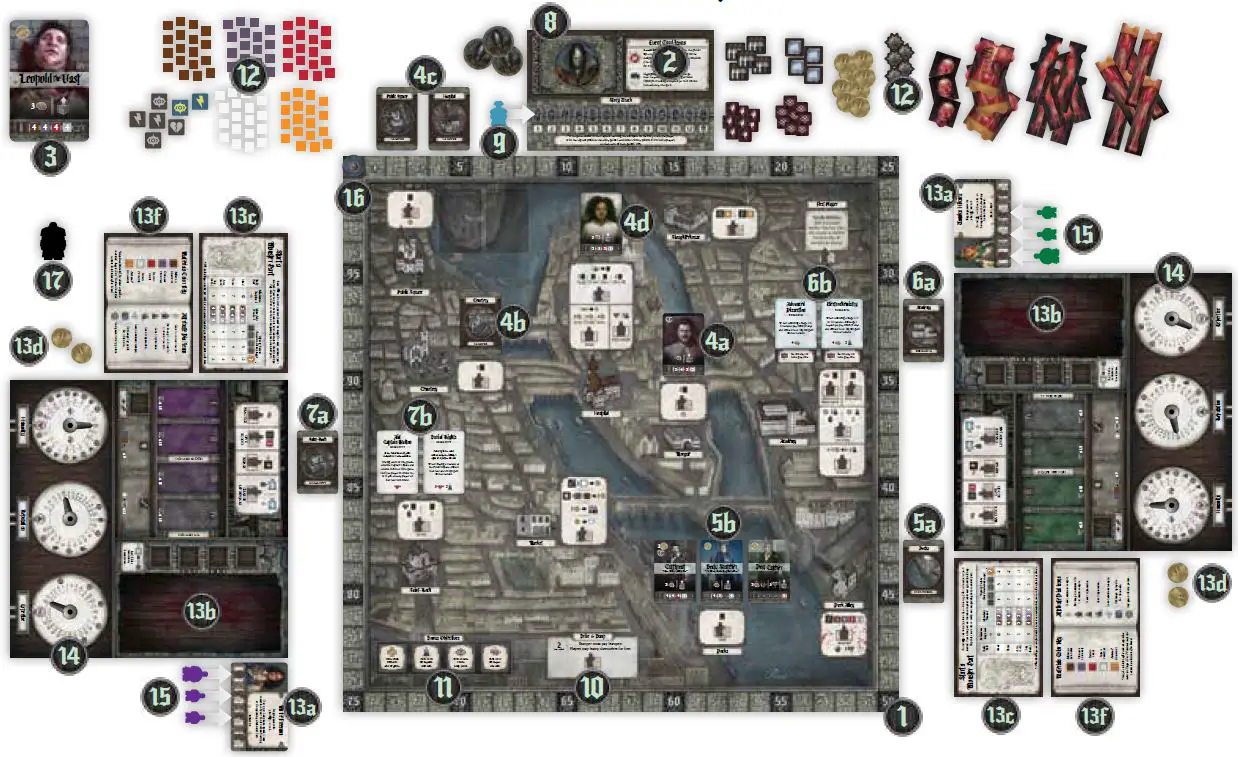
1 Place the Paris board in the center of the play area.
2 Place the event board above the Paris board.
3 Set the Leopold the Vast public square cadaver card to the side.
4 Sort and shuffle all the other cadaver cards by type creating 4 cadaver decks (Cemetery, Morgue, Hospital and Public Square). • 4a: Place the morgue deck face up on the Morgue location.
4b: Place the cemetery deck face down on the Cemetery location. 4c: Place all other decks face down off the board.
4d: Draw a number of cards from the hospital deck equal to the number of players and create a face up stack of those cards at the Hospital location.
5 Shuffle the scoundrel cards and create a scoundrel deck off the right side of the board near the Docks location (5a). Deal 3 scoundrel cards face up to the designated slots above the Docks (5b).
6 Shuffle the research cards and create a research deck off the right side of the board near the Academy location (6a). Deal 2 research cards face up to the designated slots above the Academy (6b).
7 Shuffle the humanity cards and create a humanity deck off the left side of the board near the Saint-Roch location (7a). Deal 2 humanity cards face up to the designated slots above Saint-Roch (7b).
8 Collect 6 random event cards and 4 random encounter cards and shuffle them together to form an event deck. Then, collect 2 additional random event cards and add them to the top of the event deck. Cover the event deck with the event cover card (shown here) and place on the event board. Place the Event markers nearby.
9 Set the Captain meeple on the first space of the story track.
10 Place the appropriate Bribe & Bump track on the Paris board, depending on your player count. (The default track printed on the board is for 4 players).
11 Randomly select 4 of the 6 possible bonus objective markers and place them face up on the Paris board. Return the remaining 2 to the box.
12 Sort the following components and create a supply of each within reach of all players:
- Leyden jars
- Ice blocks
- Damage Markers
- Alive Markers
- Francs
- Materials (sorted into their 5 colors)
- Shock dice
- Monster Part Tokens (sorted into heads, torsos, arms and legs)
- Police Markers
13 Give the following to each player:
-
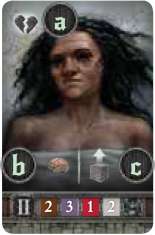
13a: 1 random character card
Note: For your first few 2-player games, we suggest not using Prisha Chatwal or Baptiste Rousseau.
-
13b: 1 laboratory board (with attribute dials assembled as shown on the back of this rulebook)
-
13c: 1 anatomy card
-
13d: Francs equal to the number of players (e.g. if playing with 4 players, each player gets 4 francs)
-
13e: 4 scientist meeples, 3 assistant meeples, and player score marker, all matching the laboratory board color.
-
13f: 1 player reference card
14 Each player sets the attribute dials on their laboratory to 0 for Humanity, and 1 for Reputation and Expertise.
15 Each player sets 1 scientist and 2 assistants on the designated slots on their character card. The remaining meeples are set aside for now.
16 Each player sets their score marker on the 0 space of the score track.
17 Randomly determine who will be First Player and give them the first player creature meeple.
Game Play
Abomination is played across multiple rounds. Each round is composed of 4 phases that must be resolved in order.
-
Event Phase
Draw and resolve 1 card from the event deck.
-
City Phase
Take turns placing your meeples in Paris or your lab.
-
Lab Phase
Work simultaneously in your labs to construct your monster.
-
Reset Phase
Reset board and prepare for the next round.
I. Event Phase
First Player (the player who has the creature meeple) draws the top card of the event deck and locates the side of the card that corresponds with the current round. If the card is an event card, First Player reads it aloud and puts it into play.
Some events have an immediate effect, and most change the rules in some way for the current round. You may place event markers at affected locations to remind players that there is a rules change.
If the card is an encounter card with a trigger of"Now", read it aloud to the indicated target player. If the card is an encounter with a location trigger, hold onto the card, keeping its location trigger secret.
When any player other than the card holder places a meeple at that location, announce there is an encounter and read the appropriate entry to that player before they pay any costs or resolve any effects.
Location encounters are held onto for the duration of the game, and get discarded only after being triggered. Note: If the card holder forgets to announce the encounter card during the trigger, the encounter card must be discarded without resolving it.
When First Player chooses the target of an encounter, they can choose any player, including themselves. If there is a targeu condition that more than one player meets, First Player chooses the target from among those players. When the target is First Player, choose any other player to read.
When an event or encounter card directs you to go to an entry, it is referring to the numbered entries starting on page 10 of this rulebook.
There are 2 additional event effects that are indicated by icons:

Execution: Draw 1 or 2 cards from the public square deck and place them face up on the designated slots at the Public Square location (1 card for 2 players, and 2 cards for 3 or 4 players).

Lightning Storm: All players charge their Leyden jars (flip to charged side). Upon purchasing a Leyden jar this round, immediately charge it.
2. City Phase
Starting with First Player and proceeding clockwise, players will take turns placing meeples until all players have placed all of their meeples or have been forced to pass.
On a player's turn they must remove 1 meeple from their character card and place it on a location space on the Paris board or on their laboratory board, then resolve that space's effect. If a player has no meeples remaining on their character card when it becomes their turn or if there are no valid spaces to play, that player passes their turn.
Placement Restrictions

Only a scientist meeple can be placed on this space.
A player must pay this many francs (returning them to the supply) to place a meeple on this space.
Bump Track
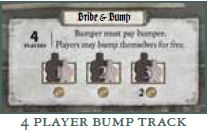
If another meeple is on a space, a player must bumpthat meeple before placing their own meeple on that space.
To bump a meeple, move it to the first available space of the bump track and pay the cost of that space by giving that many of your francs to the owner of the
bumped meeple. If the bump track is already full, the meeple cannot be bumped and you cannot place your meeple on the occupied space.
Note: You can bump your own meeples for 0 francs, but only if there is space on the bump track.
Location Space Effect
Locations use symbols to denote their effects. Each location effect is further described starting on page 8 of this rulebook.
3. Lab Phase
During the lab phase each player simultaneously resolves the following actions, in order:
- Build a Monster Part (as many times as they like or are able)
- Throw the Switch (up to one time) Preserve Materials (as many times as they like or are able)
Build a Monster Part
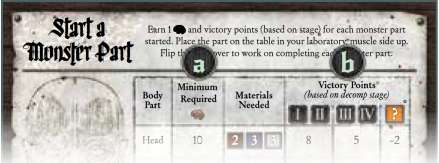
To build a monster part, first choose a part to build by consulting your anatomy card (you can create at most 1 head, 1 torso, 2 arms and 2 legs). To build a muscle monster part consult the 'Start a Monster Part' side of your anatomy card.
If you already have 1 or more muscle parts built and wish to add skin to one of them, consult the 'Complete a Monster Part' side of your anatomy card.
Once a part has been chosen, do the following in order:
-
Check that your expertise level meets or exceeds that part's expertise requirement
a. -
Discard the materials indicated by the part's material requirement. Take note of the decomposition stage of the most decayed material you are discarding. Animal (orange) material can be substituted for almost any other kind of material, but earns fewer victory points. Stage III or IV animal material cannot be substituted for blood.
-
Add any corresponding part token to your operating table (or, if adding skin to a previously built muscle part, flip that part token over to the skin-side on your operating table, retaining any damage).
-
Gain 1 Expertise.
-
Gain the number of victory points corresponding to the stage of decomposition of the used material that is most decayed, less 1 or 2 points (max) if any animal material was used, as indicated on the anatomy card
b.
Note: If a player builds a monster part and that part is later downgraded (flipped or discarded), they do not lose the expertise and victory points they had gained, and can gain expertise and points again for rebuilding that part.
Throw the Switch

If you have at least 1 completed monster part (skin-side up) on your operating table, you may throw the switch once this phase by doing the following in order:
-
Flip 1, 2 or 3 of your charged Leyden jars to their uncharged side.
-
Roll 2 gray shock dice for each Leyden I ar you just flipped. If you have research cards to play for their dice mitigation effect, you can use them now.
-
Resolve all
 results by placing that many markers, 1 at a time, onto 1 or more parts on your operating table.
If 2
markers are ever on a monster part, immediately discard those markers and downgrade the monster part one step: if it is a muscle part, discard it; if it is a non-alive skin/complete part, flip it to its muscle side; if it is an alive part, discard its  marker.
Note: When placing damage, you cannot place a second damage on a part unless all parts already have 1 damage.
-
Receive 1
 (max) when you roll 1 or more .
 -
If able, place an
marker on a skin-side up monster part on your operating table for each result.
Note: A monster part cannot have more than 1 marker on it.
Preserve Materiais
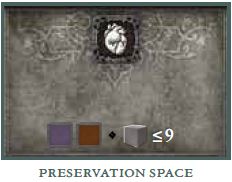
Move any number of organs (purple) and muscle (brown) materials from spaces on your decomposition track to your preservation space.
A player cannot have more than 9 materials on their preservation space at a time.
Note: You'll be able to sell preserved organs and muscle by placing at the Market in future rounds.
4. Reset Phase
Do the following in order:
-
Decompose: Each player without an ice block in their lab discards all materials on stage IV of their decomposition track and all blood material on stage II, then moves each remaining material in stage I through III one space to the right on their track.
Players with an ice block do not decompose materials but each solid ice block is flipped to the half-melted side and each half-melted ice block is returned to the supply.
-
Refresh the Board: Discard and then replenish all cards at the Hospital, Docks, Academy, and Saint-Roch. The Hospital is always replenished with a number of face up cards in a stack equal to
the number of players. Discard all cards at the Public Square; do not replenish them. Discard any event card in play, as well as any corresponding event markers.
-
Refresh Meeples: Collect all placed meeples and return them to your character card.
-
Advance the captain: Advance the Captain meeple 1 space along the story track. If he reaches the last space (skull), the game ends immediately.
Paying and Discarding Cards
There are no discard piles in this game. When cards are played or otherwise discarded, they go to the bottom of the deck they came from.
Cadaver Cards
After a player draws a Cadaver card, they resolve it by paying that card's cost a, if any, and then choosing one of the following options:
Increase their expertise by the value shown on the card
b, ORPlace the materials listed at the bottom of the card
conto the decomposition track (in the appropriate stage) and/or bone space in their laboratory.
Note: If a player draws a card and chooses not to resolve it, they don't need to pay its cost a. Either way, all drawn cards are returned to the bottom of their respective decks.
Gaining Materials
Some location and other game effects cause a player to gain various materials. Materials gained (except bone) will be identified as being in one of four stages of decomposition (stage I is the freshest and IV is the most decayed).
Players can have a maximum of 15 materials on each space of the decomposition track at a time. If a space has more than 15 materials, immediately discard the excess.
Whenever gaining materials, retrieve the appropriate number and type of materials from their supplies and place them on the appropriate space on your decomposition track or bone space (located on your laboratory board).
Note: Bone (white) materials never decompose and are always added to the bone space on the lab board, not the decomposition track. The bones space is limited to 12 materials which can later be sold at the Market if not used.
Note: In the unlikely event you run out of materials (or francs), please use substitutes.
Humanity and Research Cards
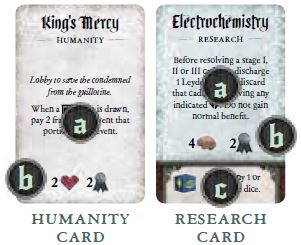
Humanity and research cards grant various effects to aid players' endeavors.
A player may possess up to 3 of each; if they want to draw a 4th humanity or research card (drawing is always optional), they must first discard one.
Most cards specify when they can be played, which is always optional. Cards offer a one-time effect a, and many grant an attribute or franc benefit listed as icons b, after which the card is discarded to the bottom of its deck.
Dice Mitigation
Alternatively, research cards can be played after rolling shock dice to gain the dice mitigation effect listed after the die icon c. If additional re-rolls are desired, additional research cards can be played for this purpose.
Increasing Attributes
Some location and other game effects cause a player's attribute levels to increase or decrease. When increasing an attribute turn your corresponding attribute dial that many spaces clockwise.
When decreasing an attribute turn that dial that many spaces counterclockwise. The primary way that your humanity changes is by receiving  or . signifies an increase in your humanity whereas signifies a loss in humanity due to your horrific actions.
Note: Some effects cause a player to lose an attribute as a cost. If they cannot lose an attribute (such as when their humanity is at -10 or if a game rule prevents them from losing that attribute), that player may still gain the benefit.
Note: If a player reaches -10 humanity ( ), that player can no longer gain or lose humanity when taking actions that would normally cause them to do so.
When moving a dial causes it to move onto or past one or more spaces with any of the following icons, resolve their effects:
-

Gain 1 assistant meeple. (Add it to your character card. If gained during the city phase, it can be placed that city phase).
-

Exchange 1 assistant for 1 scientist meeple. (If replacing an assistant meeple already at a location, this has no impact on the effects already resolved there).
-

Gain 1 reputation.
-

Lose 1 reputation.
-

Lose 1 assistant meeple from your character card or, if all have been played, from anywhere in play. (If all of your assistants have been upgraded to scientists, lose 1 scientist meeple instead).
-

When you roll dice, you may upgrade 1 gray die to a blue one. Once you reach 20 on the expertise dial, you may upgrade 2 gray dice to blue ones.
-

Do nothing at this time. At the end of the game you will earn victory points equal to the highest of these numbers that you have reached on your attribute dials.
Reversing Icon Effects
If a player moves past a space that they previously resolved the effect of, but this time heading in the opposite direction, then undo the effect of that space.
Example: Reversing Icon Effects
Player 2 takes a Murder action at the Dark Alley, receiving 3 U and forcing them to place a police marker on their character card. This drops their humanity attribute from 0 to -3, causing them to also lose 1 reputation.
Player 2's reputation is currently at 7, a level that had gained them a new assistant meeple on a previous turn. However, now their reputation drops to 6, reversing that benefit, causing them to lose the extra assistant meeple immediately (from their character card first, or else from game board or laboratory).
They can regain this meeple by boosting their reputation back to 7, which (among other ways) could be accomplished by increasing their humanity higher than -3, which would reverse the loss of reputation.
End of the Game
The game ends when either the Captain meeple reaches the last space of the story track or when one or more players have brought their monster to life (all 6 body parts alive) at the end of a lab phase.
At the end of the game each player gains additional victory points for the following:
-
Alive points for each monster part with an
marker. -
10 points for each bonus objective they have achieved.
-
Points equal to the highest victory point value reached on their reputation and expertise dials.
-
Points (gain or loss) equal to the highest or lowest victory point value reached on their humanity dial.
-
If the game ends with the Captain reaching the last space on the story track, the player with the highest positive humanity gains 5 additional victory points. If 2 or more players are tied, each of them gains 5 VPs.
After all players have scored all of their victory points, the player with the most victory points wins the game. If there is a tie, the tie breakers are as follows:
- The player with the most alive monster parts.
- The player with the most francs.
- Turn order position relative to First Player: 1. First Player, 2. Left of First Player, etc.
Bonus Objectives
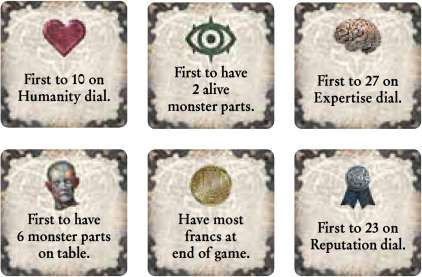
Bonus objectives are additional victory points you can earn in the game by meeting the conditions on the bonus objective markers in play. Some objectives are attainable during the game (first to reach 27 Expertise), while others are determined after the game is over (most francs).
Once you meet the condition, take the marker and place it in your play area. You will gain these points at the end of the game. Once claimed, no other player may obtain that objective.
Note: If two or more players meet the condition for the same bonus objective during the lab phase (in which actions are understood to be simultaneous), the tie breaker is decided by each player's turn order relative to First Player: 1. First Player, 2. Left of First Player, etc.
Game Tips
How to increase Expertise:
- Draw and resolve cadaver or scoundrel cards
- Place at Advanced Research at Academy
- Practice in your lab
- Start or Complete a Monster Part
- Draw and play certain research cards
How to Increase Reputation:
- Lecture at Academy
- Donate francs at Academy
- Volunteer at Hospital
- Draw and play certain research and humanity cards
- Increase humanity
How to increase Humanity:
- Place scientist at Saint-Roch
- Volunteer at Hospital
- Draw and play humanity cards
- Draw and resolve Dog Catcher scoundrel cards
How to earn Francs:
- Work at Hospital
- Sell materials at Market
- Lecture at Academy
- Draw and play certain research cards
- Collect bribes for being bumped
Continue Reading
