Game Components
- 100 Coins.
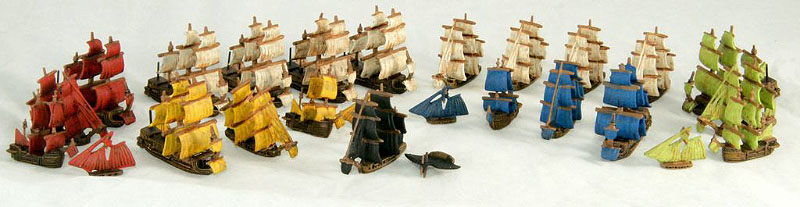
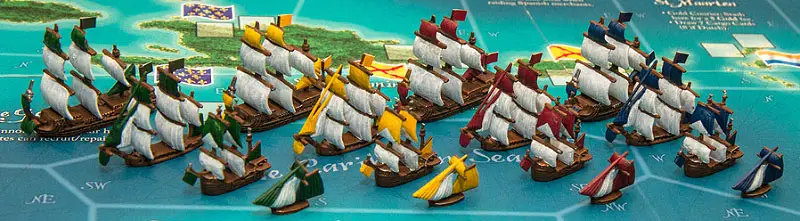
- 26 Plastic ships.
- 24 Demand Tokens.
- 17 Merchant Tokens.
- 16 Ship Modification Tokens.
- 12 Special Weapon Tokens.
- 20 Bounty Tokens.
- 254 Cards.
- 29 wooden cubes.
- 4 Naval Tokens.
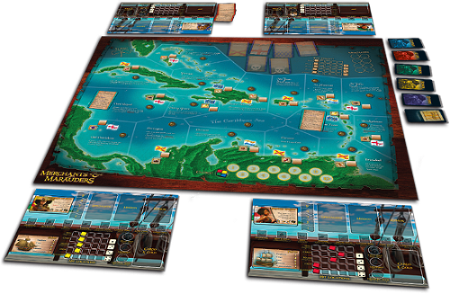
- 1 Game Board.
- 4 Player Boards.
- 10 custom dice.
- 4 stash containers.
- 2 Player Aid sheets.
- 1 rule book.
Object of the Game
The object of the game is to gain 10 Glory Points.
Whenever a point is gained, the player moves a cube in his or her color up the Glory track found on the Game Board.
Glory Points are awarded to players every time they perform various acts of glory and infamy:
- Defeating a Player or NPC. (Defined as surviving and winning Naval or Crew Combat).
- Selling 3 or more Cargo Cards in a port where the goods sold are 'in demand'.
- Plundering 12+ Gold in a Merchant Raid
- Completing a Mission
- Finding a Rumor to be true
- Buying a Galleon or Frigate (only once per Captain).
Once a player reaches 10 Glory Points (including the secret points for stashed Gold - see "Stash"), he declares so and the game ends after everyone has had their turn.
If several players reach 10 or more in the same turn, the player with the most points on the Glory track on the board (i.e. not counting points from their stash) wins the game.
If there is still a tie, the player with the largest amount of stash wins. If this does not resolve the tie, both players are declared winners.
Setup
The Player Board
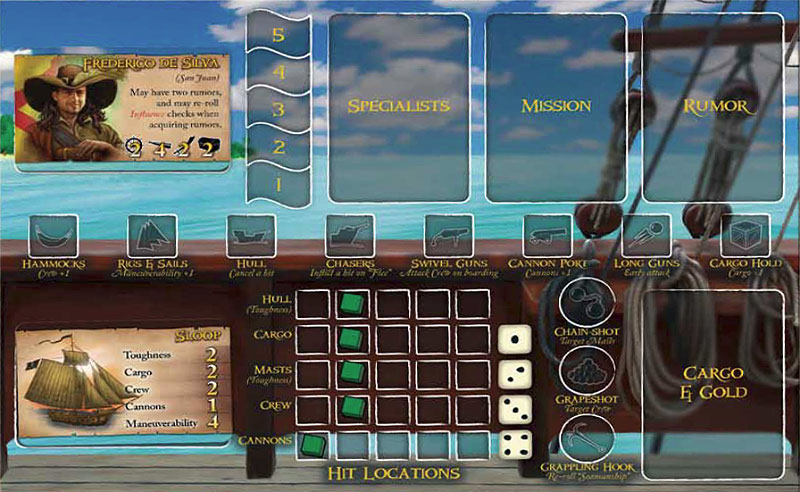
Each player gets a Player Board. The Player Board is used to keep track of Cards, Gold, Cargo, and the condition of your ship.
At the start of play, each player follows the following steps:
Select the color you wish to play and take the 6 cubes and miniatures of that color. Also take one of the stash containers which you will use for stashed Gold.
Randomly draw a Captain from the Captain Card deck - do not reveal which Captain you draw.
Secretly choose a ship for your Captain by placing it in your hand. You can choose between a Sloop and a Flute. Select the Sloop if you want a highly maneuverable ship suitable for piracy, or pick the Flute to get a vulnerable, but capable merchant vessel.
All players now simultaneously reveal their Captain and their chosen ship.
Take a Ship Card corresponding to your chosen ship. Place it and your Captain Card on your Player Board.
Place the ship miniature of your chosen ship in the home-port of your Captain on the Game Board.
Draw a Glory Card.
A Cube is placed on each "Hit Location" so that it matches the values on your ship card. "Hull" and "Masts" correspond to the "Toughness" value while the other locations match the names of the values on the card. So if you have a ship of toughness 2, you place a cube in the second space of that location. If you place the cubes for a Sloop correctly, all locations will have a cube in the second space, except for "Cannons" which has a cube in the first space.
Take 10 Gold. This is the Gold you have at the start of play
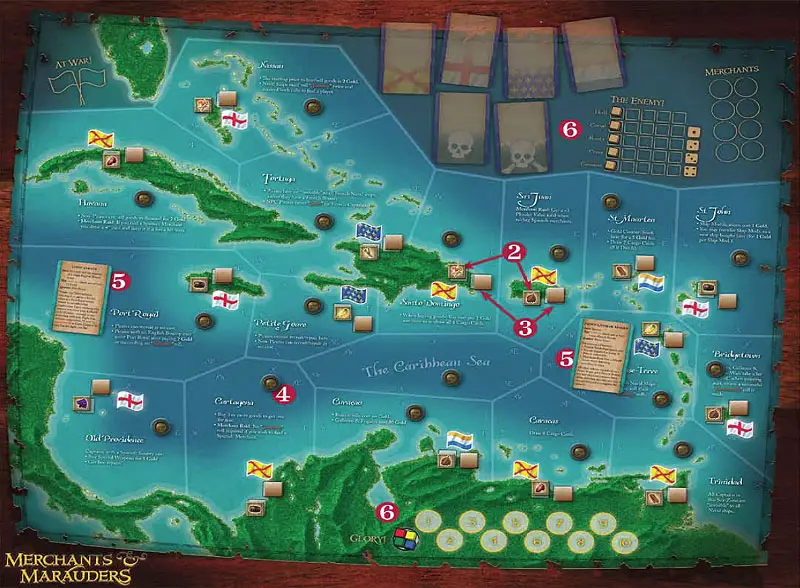
Game Board
The Game Board is divided into 17 Sea-Zones. 16 of these have a port associated with them, represented by a national icon from one of the 4 nations in the game (Dutch, English, French and Spanish).
Most Sea-Zones have a unique advantage or disadvantage which is written in each Sea-Zone. This Sea-Zone information can also be found on the Player Aids.
The borders of all Sea-Zones have a direction letter corresponding to a direction on a compass. These are used for NPC movement.
At the upper-left of the board you will find the "At War!" space, used to show which two nations are currently at war.
The top-center of the board is used for placing NPC Captains as they are drawn In the top-right corner is a table for tracking NPC damage ("The Enemy!") and spaces for placing defeated "Merchants" tokens. Lastly, at the bottom of the map, you will find the Glory Point track ranging from 0-10.
Setting up the game board
Shuffle all the decks (except the Ship Cards) and place them face-down near the Game Board. Shuffling the Event- and Cargo- decks thoroughly is very important!
Randomly place one Demand Token face up in each Sea-Zone. Place the tokens on one of the two square areas close to each port. The remaining 8 Demand Tokens are put in a pile face down (or in a cup) next to the Game Board for later use. Note that the 'Caribbean Sea' Sea-Zone does not get a Demand Token as there is no port there.
Randomly place a Ship Modification token facedown in the second square area of each Sea-Zone. No Ship Modification token is placed in the "Caribbean Sea" Sea-Zone.
Randomly place one Merchant Token (nationality side down) in each Sea-Zone including 'The Caribbean Sea'.
Draw two Mission Cards. Read them aloud and place each card on the Game Board in the Sea- Zone listed on the card.
Place a cube from each player on number zero of the Glory Point track and place 5 brown cubes somewhere in the "The Enemy" table, ready for use when a player vs. NPC battle occurs.
Game Play
Turn Sequence: 1) Draw Event Card, 2) Player Actions (in turn).
Once all players are finished, begin a new turn by drawing a new Event Card.
Draw Event Card
The start player draws an Event Card. If the card has any NPC icons at the top, these are resolved first. Then the text of the Event Card is read aloud. The effect of each Event Card is explained in detail on the card itself.
Some cards have an immediate effect, while others have an effect that takes place on each player's turn or at the end of the entire turn. Once the effects of the card have been carried out, put the card in a discard pile unless stated otherwise.
There are 34 Event Cards in the game. If there are no more Event Cards to draw, the game ends.
Actions
Next, the players perform their actions, starting with the first player and proceeding clockwise. Every time you have your turn you may perform three Actions, and have the following three actions to choose from:
- Move
- Scout
- Port
You may combine different actions, allowing you for instance to spend two actions to "move" twice, and then the third action to "scout" for a ship.
I. Move
Use the "move" action to move between adjacent Sea-Zones or to and from ports. Each separate move equals an action. Move your ship miniature to show your movement, and place it on a port if you move to port. Movement is the same, regardless of ship type.
Example: Frances Wright is in Havana and wants to go to Nassau. On her turn she moves from Havana out into the Havana Sea-Zone (1 action). Then from there to the Nassau Sea-Zone (1 action) and then lastly moves to the port of Nassau (1 action). Now all her three actions are spent. Any business in the port of Nassau must be done on her next turn.
II. Scout
Select the "scout" action to try find and attack a ship present in your Sea-Zone. Announce which of the following you "scout" for:
- A Player Captain in the same Sea-Zone (not in port)
- An NPC in the same Sea-Zone
- A Merchant in the same Sea-Zone (represented by a Merchant Token)
Roll your Captain's Scouting skill. If successful, you find the ship you scouted for after which a battle takes place. Battles against players and NPCs are elaborate affairs while the resolution of a Merchant Raid is faster and more abstracted.
You may not scout for the same target twice during the same turn. However, you may scout for another target in the same Sea-Zone, or move to another Sea-Zone and "scout" if you have enough actions.
Example: A Player starts his turn in the same Sea-Zone as both another player and a Merchant (represented by a Merchant Token). He takes a "scout" action and declares that he wishes to find the player Captain in the same Sea-Zone. He makes a Scouting roll and fails. He may now spend a new action to "scout" again, but may not "scout" for the same player again. Instead he "scouts" for the Merchant.
III. Port
When you are in a port you may (once per turn) take the "port" action to do any number of the following port activities:
- A. Sell Goods (must be your first port activity)
- B. Buy Goods
- C. Visit Shipyard
- D. Recruit
- E. Acquire a Rumor
- F. Claim a Mission
- G. Stash Gold (home-port only)
If you wish to "Sell Goods" then this must be your first activity. You may perform all the other activities in any order you wish. An activity can only be performed once, and must be completed before a new one can be made.
A. Sell Goods
Declare which of your goods (Cargo Cards) you wish to sell. All goods can be sold for the price of 3 Gold per card. However, the good in demand (the good displayed on the Demand Token next to the port) can be sold for 6 Gold. Sold Cargo Cards are placed face-up in the Cargo Card discard pile.
When you sell the "Good in Demand", you randomly replace the Demand Token with a new one from the reserve pool. After changing the Demand Token you cannot sell any more goods that turn.

B. Buy Goods
Draw the top 6 Cargo Cards and keep them to yourself. Discard any cards featuring the good in demand and draw new ones to replace them. The cards you have drawn are the goods available to you this turn (there are 8 different types of goods).
The base price per Cargo Card is 3 Gold. If you draw two of the same good, the price for that good drops from 3 to 2 Gold per card. If you draw 3 or more cards displaying the same good, you can get that good for just 1 Gold per Cargo Card.
Select which cards you wish to buy, pay their cost, and put them face down on your Player Board. If you buy any goods at a reduced price verify your reduced price to a player of your choice.
The person you showed your cards to may not disclose what they are in any way.
Put the cards you don't buy in the discard pile face up. Likewise, if you discard old Cargo to make room for newly bought Cargo, you also discard them face-up.
When the Cargo deck runs out, shuffle it thoroughly and place it face down.
Note:
- If you "buy goods" in the same port two turns in a row, you only draw 3 Cargo Cards.
- While in port there is no limit to how many Cargo Cards you may posses. However, once you leave port you must discard any cards in excess of your ship's current "Cargo" value.
C. Visit Shipyard
At the shipyard you can buy Repairs, Ship Modifications, and Special Weapons for your ship. It is also at the shipyard you can buy a new ship and sell your old one.
| Buy | Sell | |
|---|---|---|
| Sloop | 10 | 5 |
| Flute | 10 | 5 |
| Frigate | 35 | 10 |
| Galleon | 35 | 10 |
| Repairs (per point of damage) | 2 | - |
| Ship Modification | 3 | *1 |
| Special Weapons (per Token) | 3 | 1 |
| *Cannot be sold separately, but add a value of +1 Gold when selling your ship. | ||
Buy/Sell Ships:
When buying a new ship, you must sell your old one. Modify the above sales price by:
- +1 Gold per Ship Modification.
- - 1 Gold per point of damage (disregarding damage to "Crew").
If you sell a ship with Ship Modifications, these now re-enter the game. When you buy a new ship you bring the "Crew" from your old ship.
You can never be "ship-less" - you must buy a new ship when selling your old one. If that isn't possible, then you can't sell your ship.
Note that the Man-o-War cannot be bought nor sold. It can only be obtained by a hostile takeover and must be abandoned when acquiring a new ship.
Buy Special Weapons:
Special Weapons can be bought in any port for the price of 3 Gold per token. You can only have one token of each Special Weapon, but all three if you wish.
Repair
You can repair damage to your ship for a price of 2 Gold per point of damage. This includes damage to all locations except for Crew which must be recruited.
Buy Ship Modification:
The only Ship Modification that can be bought in a given port is the one represented by its "Ship Modification" token. Face-down tokens are revealed in a given port right after the "port" action is taken.
When you buy a Ship Modification you take the token and place it on your Player Board on the area corresponding to the modification you bought. The port now no longer sells any Ship Modifications. You cannot buy more than one of each of the same type of Ship Modification. Generally, you cannot transfer Ship Modifications from ship to ship - only in St. John as you can see in the St. John info text on the board.
Note that most of the combat related ship modifications do not have an effect during Merchant Raids. They are mainly used for the elaborate Player vs. Player or NPC battles.
 | Extra Hammocks: Adds +1 to the ship's "Crew" value (the extra crew must be 'recruited'). Your ship's "Crew" can never exceed 5. |
 | Advanced Rigs & Sails: Adds +1 to the ship's Maneuverability value. |
 | Reinforced Hull: Flip this token to absorb 1 point of damage done to any hit-location (after hit-locations have been determined). "Repair" the token for 3 Gold in any port to refresh its ability. |
 | Extended Cargo Hold: Adds +1 to the ship's Cargo value. Move your "Cargo" hitlocation cube up one step. A ship's "Cargo" can never exceed 5. |
 | Chasers: Flip this token to inflict a hit after you or an opponent declares the "Flee" action. Flip it face up after combat has ended. |
 | Extra Cannon Port: Adds +1 to the ship's "Cannons" value. Move the "Cannons" hit-location cube up one step. "Cannons" can never exceed 5. |
 | Swivel Guns: Just prior to Crew Combat (at sea), roll 2 dice. Inflict one hit to enemy "Crew" on one or more successes. It does not matter who initiated the boarding. |
 | Long Guns: Prior to the first round of Naval combat you roll a die for each of your "Cannons". Inflict a hit for each success. Chain- and Grape- shots cannot be used. |
When a player ship with Ship Modifications is sunk, sold or discarded, the player owning the ship must immediately distribute the Ship Modification tokens. They are placed randomly, and face down in any port of his or her choosing, currently without Ship Modification tokens.
D. Recruit
On a successful Leadership roll you can fill up your "Crew". If the roll fails, "Crew" may be recruited for 2 Gold each. Your "Crew" can never exceed the "Crew" value of your ship.
E. Acquire a Rumor
Pay 2 Gold and roll your Influence skill to try catch a rumor. If successful, draw a single Rumor Card. Read it to yourself and place it on your Player Board face-down. You may only have one Rumor Card at a time. You may acquire a new Rumor, but must choose which one to keep. Shuffle rejected rumors back into the deck.
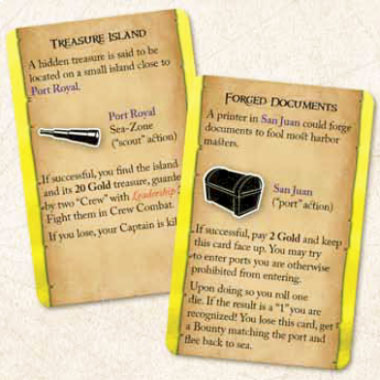
Rumors typically require you to go to a specific port or Sea-Zone and roll either Influence or Scouting during a "port" or "scout" action (indicated with a skill icon). When taking the required action, present the rumor and roll the skill required. If you fail the roll, the rumor was false and the card is discarded. If successful you obtain what was promised by the rumor.
Then discard the card unless stated otherwise (Like the Forged Documents rumor below).
Glory Point! When a rumor is found to be true and its effect has been resolved, you get a Glory Point and therefore also a Glory Card.
F. Claim A Mission
The mission deck is full of different missions offered by various personalities in the game, such as Governors, nobles, merchants and pirates.
At the top of every Mission Card you will see listed:
Earn: The amount of Gold or other benefits you can earn.
Req: Requirements to claim the mission.
Location: The port where you can claim the mission.
If you attempt to take a mission, but fail (for instance, failing an Influence roll), then unless stated otherwise the mission stays in play. A new attempt to take the mission (or another mission in the same port) can be made next turn during a new "port" action.
When you have claimed a mission, put it face-up on your Player Board. Then draw a new mission from the Missions Deck and place the new mission at the location listed on the card. That way there are always two available missions throughout the game. You can only have one mission at a time, but can discard a mission upon claiming a new one.
Glory Point! Completing a mission earns you a Glory Point, and therefore a Glory Card.
G. Stash Gold
When in your home-port you may stash all or part of the Gold you have on your ship by placing it in your stash container. When stashing, you are hiding your Gold in a safe location where other players can't touch it. Every 10 Gold you stash secretly counts as 1 Glory Point. Remember: only half of the winner's points may come from stash!
You must declare to the other players when you stash Gold, but you don't have to tell them how much you are stashing. Likewise, the total amount of Gold you have stashed through the game is secret as well.
The only time you are required to let the other players see how much Gold you have stashed is when you declare that you have 10 Glory Points. When you are in your home port you may freely spend Gold from your stash or move it onto your ship.
Tip: Stash or spend your Gold when you can to avoid sailing around with too much Gold onboard. If you get sunk you would lose all that Gold, or even worse; another player can take your Gold if he boards and defeats you. This means in one swift blow he would gain a Glory Point and potentially a few more when he stashes all your hard earned Gold. If you start feeling the pressure and you are far from your home-port, perhaps upgrading to a larger ship might be worth considering.
Retirement
If you grow tired of your Captain, or end up broke and with a heavily damaged ship, retiring may be a sensible option.
To retire you must start your turn in a port and retire before performing any actions. Then, on your next turn, you go through the same steps as when dying, after which your new Captain starts his adventures.
Continue Reading

