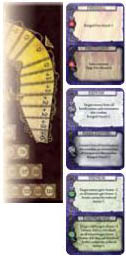
Keep
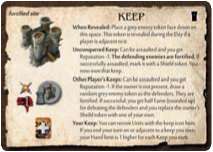
Find and read the Keep Description card. When a keep is revealed, place a gray enemy token face down on its space.
If a player moves to a space adjacent to the keep during a Day Round, reveal that token. It remains face up, even at Night. If the token is not revealed before Night comes, it remains face down all Night unless someone assaults the keep.
The gray token represents the garrison of the keep. Unlike rampaging enemies, the garrison just sits behind the walls of the keep. It does not limit movement to adjacent spaces, and you cannot attack them from an adjacent space. To fight them, you have to move onto the space and assault the keep.
Assault
When you enter a space with a fortified site (a keep, mage tower, or city) during movement, you must assault the site (in this case, the keep). Your movement immediately ends, and you have to fight the defenders. This means that you cannot pass through unconquered fortified sites without interrupting your movement.
Contrary to defeating rampaging enemies, assaulting a fortified site is not something that is perceived positively by the locals - each assault causes you to get Reputation -1.
Then, a combat is fought. If you defeat the enemy, not only do you get Fame for defeating them, but you also conquer the keep and become the new owner. Put one of your Shield tokens there to mark that you were the player that conquered this keep. Only you can benefit from this keep.
If you fail to defeat the enemy, your assault failed. You return to the space from where you moved to the keep. You can try another assault next turn (but you get another Reputation -1).
Fortified Enemies
Enemies in a keep are fortified, as if they had the "fortified" symbol on their token. Ranged Attacks cannot target these enemies during the Ranged and Siege Attacks phase. To defeat them, you either have to use Siege Attacks only, or you have to wait until the Attack phase (in the Attack phase, any Attacks can be used against them, including Ranged Attacks).
If the enemy defending a keep also has the Fortified  ability on its token, it is fortified twice - even Siege attacks cannot be used against it during the Ranged and Siege Attacks phase.
Assault And Rampaging Enemies
Assaulting is part of movement. If the move that results in an assault fulfills the conditions of provoking rampaging enemies (i.e. when both the space you are assaulting from and site you are assaulting are adjacent to that monster), the provoked enemies will join the battle, and you have to battle both them and the garrisoned enemies.
Provoked enemies do not gain the benefits of being fortified from the site you are assaulting and you are not required to defeat the rampaging enemies in order to conquer the keep.
It is recommended that you challenge and defeat any rampaging enemies first and postpone your assault to a later turn, or to move in a way that does not provoke them. If you dare, you can try to fight both - see the Revealing Ruins section of this chapter for how to fight multiple enemies at once.
Owning A Keep
If you conquer a keep, put your Shield token on it. Your keeps give you two benefits:
First, you can recruit Units with the keep
 icon here. This is done through interaction, like at a village. You can't recruit a Unit on the same turn that you conquer a keep, since assaulting the keep uses your action for the turn.
Second, your keeps provide supplies to you. If you end your turn in or adjacent to a keep that you own, your Hand limit is temporarily increased by 1 for each keep you own. This allows you to draw more cards at the end of your turn.
For example, if you own three keeps anywhere on the map, your Hand limit is 3 higher than what is printed on your level token (if you end your turn in or adjacent to one of your keeps).
Assaulting An Enemy Keep
Players can assault keeps that have already been conquered. If the keep owner is in his keep, it would be considered to be attack to that player (see Player vs. Player Attack later).
If the owner of the keep is not there, draw a random gray enemy token when assaulting the keep. This is the garrison and you fight them the same way as when assaulting a neutral keep (they are fortified).
If you defeat them, you only get half of the Fame for these enemies (round up), but the keep is now yours - remove the other player's Shield token and replace it with your own. If you do not succeed, discard the enemy token and a new random gray enemy will be drawn to defend the keep the next time it is assaulted. Return to the space you were attacking from.
Every attempt to assault a keep of another player (whether its owner is present or not) still causes you to get Reputation -1.
Mage Tower
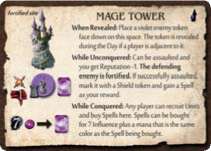
Find and read the Mage Tower Description card. Neutral mage towers behave the same way as neutral keeps, except there is a violet enemy token garrisoned instead of a gray one. As with the keep, this token will be revealed when someone gets close during the Day, but will stay hidden at Night unless a player assaults it.
The rules for assaulting a mage tower are the same as for assaulting a keep, including the fact that defenders are fortified and you get Reputation -1. Note the mage tower you just revealed is in a desert - during the Day, you need Move 5 to assault it.
Spell Offer
When you reveal the first mage tower, you should also prepare the Spell offer - flip over the top three cards of the Spell deck and put them in a column underneath it.
Note: In subsequent games, the Spell offer \ is revealed at the start of the game, but k during the first game, it is better to do it this way so that players will have less cards to examine during setup and you will avoid answering unnecessary questions such as "what are these for and how do I get them?".
Conquered Mage Towers
When you conquer a mage tower, put your Shield token on it. Contrary to keeps, this does not mean the tower is yours; it just reminds everyone that you broke the resistance of their garrison. As a reward for conquering a mage tower, you gain one Spell from the Spell offer at the end of your turn.
Once conquered, the mages are willing to cooperate with anyone - any player can interact in a conquered tower, regardless of who conquered it.
Recruiting
It is possible to recruit Units with the mage tower  icon here, following the usual Unit recruitment rules.
Buying Spells
In addition, you can buy Spells here. You can buy any Spell in the Spell offer. You have to pay 7 Influence points, and also one mana of the same color as the spell you want to buy. It is not easy to buy spells!
Remember, you can use only one mana from the Source, so you either have to generate 7 Influence points without using mana, or you have to find a way of using more mana on your turn. Take the chosen Spell and put it on top of your Deed deck. This means the Spell comes to your hand soon (probably at the end of you turn) and you can use it later this Round.
Then reveal another card from the top of the Spells deck, so there are three Spells in the Spell offer. The newly revealed Spell always goes to the topmost position of the offer column - before adding it, you should shift the other spells down, to fill the gap of the one you took.
Gaining a Spell as a Reward
As with any other reward for combat, you pick your Spell at the end of your turn. This is to speed up the play of the game - you can take your time to read the Spells in the offer and make your decision while other players take their turns.
A Spell gained as a reward go to the top of your Deed deck, the same as if you bought it through interaction (except you pay no Influence or mana for it). Once you choose, replenish the offer, and shift the remaining cards down as needed.
You claim your rewards before drawing new cards, so the new Spell will likely be drawn right away.
Casting Spells
Spells are very powerful cards. Even their basic effect requires mana to use. To cast its stronger effect, you need two mana - one of the Spell color, and one black. That means the stronger effect of a Spell can only be cast at Night, since black mana cannot be used during the Day.
Even then it is not easy, since if you use a black mana die from the Source, you will have to provide the other mana from your own reserves.
Even the most powerful Spell cards, however, can be played sideways as Move 1, Influence 1, or Attack or Block 1.
Violet Enemies
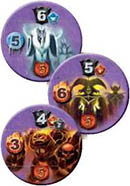
To assault a mage tower, you have to defeat a violet enemy. Violet enemies are mostly groups of mages and golems. Mages often use Fire or Ice Attacks, and both mages and golems are resistant to some elements.
When a mage tower is revealed for the first time, show a few violet tokens to the players and explain how they work. Then shuffle them and place one face down as the garrison for that mage tower.
Colors of Attack
All enemies you have encountered so far have used physical Attacks (the attack number was on a gray fist icon). Now, you will face Fire and Ice Attacks.
 This icon means you are facing a Fire Attack.
It works like a regular attack, except that:
The only type of Block that is fully efficient against a Fire Attack is an Ice Block. If you use normal Blocks (including cards played sideways), or Fire Blocks, they are inefficient and their total value is halved (rounded down).
If assigning damage from a Fire Attack to a Unit, it works the same way, except that a Unit with Physical resistance gets no benefit. Against a Fire Attack, only Units with Fire resistance
 are resistant (Fire resistance against Fire Attacks works just like Physical resistance versus physical Attacks).

Ice Attacks work just like Fire Attacks, except that only Fire Blocks are fully efficient against them (the others are halved), and only Ice Resistance  applies when assigning damage to a Unit.
Remember: The best way to counter an elemental attack is to play Blocks of the opposite element, or (if you do not block it) to have Units resistant to the same element.
Example:
Imagine we are facing an Ice Attack of 5. To block it we can play a total of Fire Block 5, or any combination of Block 10 (regular or Ice). We can also combine Fire and non-Fire Blocks - for example, if we play Fire Block 3, and then Block 4 (including cards played sideways). The non-Fire Block gets halved to 2, but this is still just enough.
If we do not block it and we want to assign the damage to a Unit, the best way is to use a Unit with Ice resistance. If it has at least Armor 3, it will absorb al the damage (3 damage will be soaked up by the resistance and then the rest will Wound the Unit) - and if it has Armor 5 or more, it will be not even be Wounded by the attack!
Enemy Resistances
You have already encountered Physical resistance on an enemy. Now we encounter enemies that are resistant to Fire, Ice, or even multiple types of Attack.

All resistances work the same way - the total value of all Attacks the Unit is resistant to get halved, rounded down. For example, to defeat the Ice Golems shown here, Fire Attack of 4 would be enough by itself.
But if you use physical and/or Ice Attacks, you would need an Attack total of at least 8 to defeat it.
Resistance To Special Effects
Ice and Fire resistances on enemy tokens have an additional effect - they are also immune to special combat effects of that color. Whenever a red card (or a Unit ability paid for with red mana) says that something happens to an enemy, enemies with Fire resistance cannot be chosen as targets for this effect. Whenever a red card (or red text on a Unit) applies an effect to "all enemies", enemies with Fire resistance are not affected by it.
The same applies for blue cards (or Unit abilities paid for with blue mana) and Ice resistant enemies. This applies to special combat effects only, not for Attacks.
Note the difference:
- Attack 4 is physical Attack, even if it is on a red card, and it works fully against enemies resistant to Fire.
- Fire Attack 4 is a Fire Attack, and its efficiency is halved when used against enemies resistant to Fire.
- "Destroy target enemy" or " all enemies get Armor -1" are special effects, and if they are on a red Action card, or a red Spell card, they do not affect enemies resistant to Fire at all.
Monastery

Find and read the Monastery Description card. Any player can recruit Units with the monastery icon t and get healed here. In this respect, a monastery is kind of like an improved village.
Training
When a monastery is revealed, you immediately draw one card from the Advanced Action deck and put it in the Unit offer (not the Advanced Action offer). This is the monk's knowledge and it can be learned at any monastery.
You can learn one of these Advanced Actions through interaction - the cost is 6 Influence points. If you buy it, put it on top of your Deed deck (you will probably draw it at the end of your turn). You can buy multiple Advanced Actions this way in a single turn, provided there are multiple available (in case there are a few monasteries on the board) and you can generate enough influence to pay for them.
Advanced Actions in the Unit offer do not get replenished until the start of the next Round.
If any Advanced Actions are left in the Unit offer at the end of the Round, they are discarded to the bottom of the Advanced Actions deck, and a new Advanced Action is added to the Unit offer for each monastery on the map (excluding any that have been burned down).
Burning The Monastery
While in a monastery, you may decide to try to burn it down as your Action for the turn (if you haven't already taken your action for the turn - and especially not after interacting in the monastery!). To do so, announce your attempt. You immediately get Reputation -3.
There is always someone willing to defend the monastery - draw a random violet enemy token, and fight it. Your Units will not help you in this combat, as they feel what you are doing is very wrong - you can neither activate them and use their abilities, nor assign damage to them.
If you win the combat, you gain an Artifact at the end of your turn (see later), and the monastery is burned to ashes. Mark the space with one of your Shield tokens. From now on, it has no function, as if it is an empty space.
(You do not remove the Advanced Action added to Unit offer by this monastery, as it still can be learned elsewhere, but you do not add a new Advanced Action for this monastery at the start of the next Round).
If you fail, nothing happens, and only the position of your Reputation token (and perhaps few Wounds in your hand) reminds you of what you attempted to do.
Gaining Artifacts
Gaining an Artifact always happens at the end of your turn, so you do not slow down the game.
Draw two cards from the Artifacts deck, and look at them. Choose one of them and put it on top of your Deed deck. Return the other Artifact card to the bottom of Artifacts deck.
If you would ever gain more than one Artifact during your turn, draw that many cards from the Artifact deck, plus one. Put the ones you wish to gain on top of your deck in any order, and return the remaining one to the bottom of the Artifact deck.
Using Artifacts
Newly gained Artifacts are put on top of your deck, so you will have them in your hand very soon. There are several ways that Artifacts can be used:
The upper part of the Artifact describes its basic effect. Play this just like you would any other card. At the end of your turn, you discard it with the other cards played during the turn.
Or, you may decide to invoke the ultimate ability of the Artifact by playing the lower effect. Doing so destroys the Artifact, and it is thrown away after use.
Even a mighty Artifact may be played sideways as Move 1, Influence 1, or Attack or Block 1, and then normally discarded at the end of the turn.
Banners

Banners are special types of Artifacts. Their ultimate ability works the same - you can throw it away for the described effect.
The upper part works differently. It does nothing by itself, but you can assign the Banner to any Unit. The Unit then gets the bonuses or effects indicated on the banner. Some banner abilities can only be used once each Round - flip them face down when they are used. Flip them face up at the start of the next Round.
When a Banner is assigned to a Unit, it remains assigned to it until the end of the Round. At the end of the Round, you may decide either to keep the Banner with the Unit for the next Round, or you can shuffle it back into your Deed deck. If you disband the Unit or if it gets destroyed, put the Artifact in your discard pile. You can use it again if you draw it (most likely in a later Round).
Each Unit can hold only one Banner. If you want to assign a Banner to a Unit that already has one, discard the Banner it is holding and replace it with the one you wish to assign.
Note: while it is assigned to a Unit, you cannot use Artifact's ultimate ability.
Monster Den
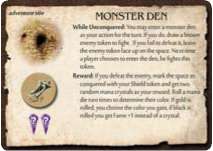
Find and read the Monster Den Description card. This is the first adventure site we have encountered. Unlike rampaging enemies or fortified sites (keeps or mage towers), players may completely ignore an adventure site, even when on that space.
As long as you do not announce that you are entering the monster den, you can treat the space as if it were empty. You may announce that you are entering the monster den as your action for the turn (if you have not already taken another action - like fighting a rampaging enemy). If you do, draw a brown enemy token and fight it.
If you win, mark the space with a Shield token to remember it was you who accomplished this adventure. The monster den is conquered and has no other meaning for the rest of the game. As a reward, you get two random crystals (as with any reward, you claim it at the end of your turn).
Roll a spare mana die (not one that is active in the Source) twice, to see what you get. If you roll gold, you may choose which basic color to take (even at Night). If you roll black, you get Fame +1 instead of the crystal for that roll.
If you do not defeat the enemy, you remain in the space. Return the undefeated enemy token face up. It should not be confused with active enemies (rampaging monsters or garrisoned Units that have been revealed), but if you prefer, you could return it face down. If you do, then anyone can look at the token at any time.
Remember: A monster den, as well as any other adventure sites we will mention later, share a common rule: you may ignore them, i.e. you may move through their space or end your turn on that space without fight, even if there is an undefeated enemy token on that space, if you wish.
Also note: You gain Reputation when defeating rampaging enemies. You lose Reputation when assaulting fortified sites. And you neither gain nor lose Reputation when entering an adventure site - locals do not care about it.
Dungeon
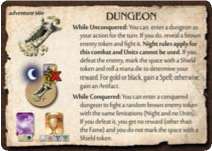
Find and read the Dungeon Description card. No enemy tokens are placed here (for now). This is another adventure site, so like the monster den, you can ignore a dungeon even if you are on its space. You may enter it as your action for the turn.
When entering a dungeon, draw a random brown enemy token to fight. However, there are two conditions for this combat:
You must fight it alone, since any Units you control refuse to enter the dungeon with you - they are waiting upstairs. You can't use their abilities or assign damage to them for this combat.
In a dungeon, Night rules apply, even if it is a Day Round. This means that you cannot use gold mana, but you can use black mana to cast the stronger effect of Spells. (Read the Night rules to everyone now if you revealed this tile before the end of the first Day).
If you defeat the enemy, mark the dungeon with a Shield token to remember it was you who accomplished this adventure. At the end of your turn, claim your reward. Roll a mana die. If gold or black is rolled, gain a Spell; if any other color is rolled, gain an Artifact. (See Gaining Spells in the Revealing a Mage Tower section and Gaining Artifacts in the Revealing a Monastery section - both these sections you should know already).
If you fail, nothing happens. Discard the enemy token. Next time someone enters the dungeon, a new enemy will be drawn for that player to fight.
Conquered Dungeons
Even if a dungeon is marked with a Shield token (it was conquered, explored and looted by a player), it can be explored again (by the same or a different player). If you do, you fight a random brown enemy under the same combat conditions, but you do not mark the dungeon and you gain no reward; just the Fame for defeating the monster, as always.
Ruins

Find and read the Ruin Description card. Ruins are another adventure site where you may move into the space and choose to ignore the site or enter it. But beware, Ruins can contain... well... anything; including the most challenging adventures that can be found in the land.
When revealed, place a yellow ruins token there. If it is Day, place the token face up - if it is Night, place it face down. A face down token does not get revealed until the start of a Day Round, or until someone moves into the space.
Ruins contain two different types of adventure for you to complete:
-
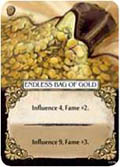
Ancient Altar

You encounter an ancient altar of some forgotten god. In this case, the token depicts three mana of a particular color. You may activate the altar by paying three mana of that color.
If you do, gain 7 Fame immediately, discard the ruins token and mark the space with a Shield token to remember it was you who accomplished this adventure. If you cannot or do not want to pay the three mana, nothing happens.
-
Enemies With Treasure

There may be a secret and well-guarded treasure I hidden in the ruins. In this case, the ruins token depict two enemy tokens and a reward.
When entering such a ruin, you have to draw the depicted enemies and fight them. If you fail to defeat both enemies, nothing happens. The undefeated enemies remain on the space (you may keep them face up, but keep the ruins token at least partially visible, so they do not get confused with rampaging enemies or garrisons). Defeated enemies are not replaced.
Whoever defeats the last enemy removes the ruins token and marks the space with a Shield token. At the end of his turn, he claims the depicted reward.
Note: Orcs and Draconum enemies encountered in ruins are not worth reputation when defeated.
Rewards
The rewards may include:
Artifact card: A real treasure! You already know how to gain an Artifact (see the Revealing a Monastery section).
Spell card: A magic tome was hidden there. You gain a Spell the same way you did when conquering a mage tower (see the Revealing a Mage Tower section).
Advanced Action: The defeated enemies guarded some secret knowledge here. Take one Advanced Action from the Advanced Action offer (not one of the ones in the Unit offer from a monastery) and replenish the offer (shifting the cards down and adding the new one to the top).
Set of four crystals: A magic treasure! You gain one crystal of each basic color to your Inventory.
Unit: You rescued prisoners and they will gladly join you. You may recruit any one Unit from the offer, without paying its cost and regardless of where it can be usually recruited. You still have to have a free Command token available, or disband one of your existing Units to make room.
Note: While you usually claim your rewards at the end of the turn before you resolve a Level up, you may switch the order here. If the Fame for defeating enemies caused you to gain a new level and thus a new Command token, you can use this new Command token to recruit the Unit.
Fighting Multiple Enemies
Ruins are most likely your first opportunity to fight two enemies at once (another would be a situation when rampaging enemies get provoked by an assault - see the Assault section in Revealing a Keep above for more on this). In later scenarios, you can even fight three or more enemies at once.
Attacking
During the Ranged and Siege Attacks phase, and in the Attack phase, you have more options:
-
You can play one big attack to eliminate multiple enemies at once. To do so, your Attack has to be equal to or greater than the total Armor of all chosen enemies. This may be advantageous, especially if you have powerful cards that generate more Attack than is required to eliminate any one enemy (since any extra attack spent against an enemy is lost). Essentially you are treating multiple enemies as if they were one enemy with much more Armor.
But beware - if any of the chosen enemies has Physical, Fire or Ice resistance, all your Attacks of the corresponding type will be halved, even if the other enemies in the group you are attacking do not have that resistance.
If you group a fortified and an unfortified enemy together as the target of a single large attack, you will be limited to only using Siege attacks against that group.
-
You can play multiple attacks in a phase. This way, you can fight enemies individually, or in small groups, or one enemy individually and the remainder as a group, etc. This may be advantageous especially when:
Some of the enemies have resistances and some do not. Instead of mixing all your attacks together (which would reduce all resisted attacks by half), you can eliminate a resistant enemy by playing only attacks that it is not resistant to.
Some of the enemies are fortified and some are not. Thus, during the Ranged and Siege Attack phase, you can only use Siege Attacks to attack fortified enemies, but you can use both Ranged and Siege Attacks to attack the non-fortified enemies.
Blocking
In the Block phase, you have a chance to block any enemies you have not defeated. You can block none, one, or more enemies in any order, but you cannot group multiple enemies together to block them with one powerful block. If you want to block more than one enemy, you have to resolve blocks against each individually.
Assigning Damage
Now, you have to assign the damage from all enemies that were not defeated or blocked. You can do it in any order, but you have to assign the damage from all unblocked enemies. As with any attack, you can choose to assign damage to your Units or your Hero.
But remember: No Unit can be assigned damage twice in one combat, even if it survived the first assignment of damage without being Wounded because it had a resistance.
On the other hand, you could, for example:
Activate a Unit with a Ranged attack or a Block ability in the first two phases of combat to help deal with one enemy, and then assign damage from an unblocked enemy to that same Unit during the Assigning damage phase.
Assign damage to a Ready Unit, and if it survives combat Unwounded because it has resistances, activate it in the Attack phase.
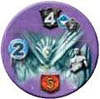
In ruins, you may encounter red and white enemy tokens. These represent the most dangerous enemies you will find in the game. Some of them have Cold Fire Attack  Only Cold Fire blocks are efficient against these attacks, and no unit is resistant to this type of attack, unless it has both Ice and Fire resistance.
Tiles 9 - 11
On these tiles you should encounter nothing new, just combinations of the things you have already seen.These tiles contain lots of opportunities to gain some extra Fame as the game is coming to an end!
Core Tiles
If you reveal the tile with a city, each player (including you) will play one more turn, and then the game ends. You may put the corresponding city figure on its space, to mark it, but ignore its dial for now. Treat that space as inaccessible.
If you revealed a non-city Core tile, the game continues. Core tiles contain the same elements as Countryside ones, with a few exceptions. However, these are very similar to those you have already seen, except they have stronger enemy combinations and greater rewards - the spawning grounds is an adventure site
similar to a monster den, the tomb is an adventure site similar to a dungeon, and Draconum are rampaging enemies similar to Orc Marauders. Note that descriptions of similar sites are on the opposite sides of each Site Description card.
Continue Reading