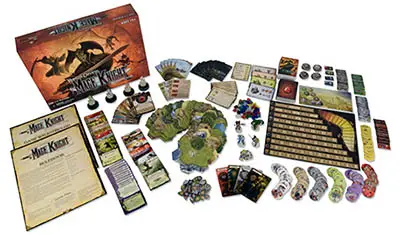
Components
- 168 Deed Cards
- 40 Unit Cards
- 12 Tactic Cards
- 4 Hero Cards
- 4 Skill Description Cards
- 7 Site Description Cards
- 1 Scoring Card
- 4 City Cards
- 128 Hero Tokens
- 60 Enemy Tokens
- 12 Ruin Tokens
- 20 Map Tiles
- 2 Game Mats
- 4 Hero Figures
- 4 City Figures
- 54 Mana Crystals
- 7 Mana Dice
- 2 Rulebooks
Overview
In the game, each player controls a Hero known as a Mage Knight. He has his game figure, several types of tokens, and a Deed deck consisting of 16 Action cards. There are a few revealed Map tiles creating the starting area - the magic portal and the surrounding area.
Scenarios
Each game of Mage Knight is played according to one of the scenarios. Do not imagine them as scripts with a strict course of action - scenarios simply set the basic parameters and goals of the game.
Each play through is unique, with a randomly built map, different cards to gain, and different enemies to defeat. You can try different scenarios, or you can just play the one that fits your gaming preferences best.
Regardless of your preferences, the first scenario you should play is "The First Reconnaissance".This scenario is meant to introduce players to the game in the most entertaining way - by playing it. It is shorter, so it will not take too long even if you are playing slowly to start, and it shows the game concepts and rules in the most natural order.
"The First Reconnaissance" is your first assignment as a Mage Knight. You have been ordered to travel to an unknown part of the Atlantean kingdom, map it, and locate its capital. For now, that is al the Council of the Void asks of you. Any treasure, knowledge or Fame you gather during this quest is yours to keep.
Rounds And Turns
The game is played in Rounds. Each Round represents either one Day or one Night. The first Round of a scenario is usually Day, which is then followed by a Night Round, then a Day Round, etc.
The first scenario is limited to three Rounds, i.e. Day, Night and then Day. You should fulfill its goal (to find the City) before the end of the third Round.
At the start of each Round, each player shuffles his Deed deck and draws five cards (this number may increase later in the game). Then, they choose their Tactic for this Round. Tactics determine the order of play during the Round, and might give some other advantages. Then, in the order determined by the Tactics, the players take their turns.
During their turns, players play some or all of the cards they have in their hands, to perform different activities - to move around the map and explore it (revealing additional Map tiles and adding them to the board), to interact with the local inhabitants, or to combat enemies and assault Atlantean fortifications. At the end of his turn, a player draws new cards from his deck until he has a total of 5 cards in hand. When players are experienced, they should think about how to use their cards and plan their turns in advance, so they are prepared when their turn comes - the game will then flow a lot quicker.
When a player runs out of cards in his Deed deck, he may decide to skip his turn and announce the "end of Round" instead. Each other player plays one more turn, and then the Round ends and the next Round begins.
Improving Heroes
During the game, a Hero will improve in several ways:
A Player can find powerful Artifacts, study new Spells and learn other useful Advanced Actions - these are represented by new Deed cards that are added to the player's Deed deck. Usually, these cards can be used in the same Round they are gained. They can also be used in subsequent Rounds since they will remain in his deck.
At inhabited places, a player can recruit local Units such as villagers, soldiers, golems, or even mages. For many of them, Mage Knights are Heroes that can save the land from instability and danger, and it takes just a bit of persuasion to get them to join a Hero and accompany him on the way to glory. Units give additional options to a player, especially in combat.
For different deeds (mainly for fighting enemies), Heroes win Fame. When a Hero collects enough Fame points, he progresses to the next Fame level. When doing so, he can learn new useful Skills and Advanced Actions, his characteristics improve, and he can command multiple Units.
End Of The Scenario
The first scenario ends when a player reveals a Map tile with a city on it and each player has had one more turn (including the player who revealed the City).
Extra Fame is awarded at the end of game for different achievements, and then, whoever collected the most Fame is the winner.
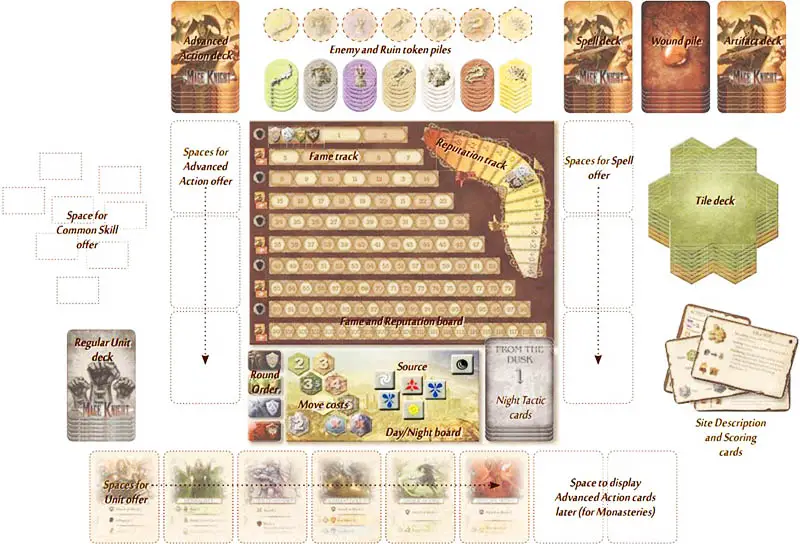
Setup
The large picture below shows how the components should be prepared for your first game. In the "Players" section is another picture showing how each player should prepare his playing area.
First Round
The Day Tactic cards are displayed. In this phase, each player will take one of these cards. (Do not do it now - we will return to Tactics once more rules have been explained). For now, all that is important is that these Tactics determine the order of play for this Round.
Each Tactic card has a large number on it that indicates the player order this Round - the lowest number going first.
After Tactics are chosen, the Round Order tokens near the Day/ Night board are reordered, so the Round Order token of the player with the lowest number on his Tactic card will be in the topmost position, the player with highest number in the lowest position.
Taking Turns
Once the turn order is determined, players begin taking turns, starting with the player whose Round Order token is in the top position, until someone ends the Round.
During his turn, a player plays some cards from his hand and performs their effects. If he has any Units recruited, he may also activate them to perform their effect. Later, when he has gained some Skills, he may also use them if they are available.
Action cards can be strengthened by spending mana of the indicated color. During each turn, a player may use one mana die from the Source as mana of the color shown. He may also convert his crystals (stored in his Inventory) into mana, or gain mana as the effect of other cards.
When a player finishes his turn, the first thing he should do is return any mana dice he used to the Source. When doing so, he rolls them and puts them back in the Source with their new color showing. Any die that is showing black is placed in the darker area in the top right - this mana die is depleted.
At this point, the next player may start to play his turn.
When finishing a turn, the player does the following:
- Discard all cards he played face up to his discard pile.
- Return all used or unused mana tokens to the bank. He keeps only the crystals stored in his Inventory.
- Draws cards from his Deed deck, up to his Hand limit. This limit is 5 cards at the start of the game (as stated on your Level token), but it can increase as the player gets more Fame during the game, and can be temporarily increased under some circumstances.
Before drawing new cards, a player may discard any number of non-Wound cards from hand. Wound cards can never be discarded unless some rule or card explicitly permits it.
Next Player
The next player starts taking his turn in exactly the same way. Once he has finished and after he has rerolled any mana dice, he informs the next player that they can start playing while he is finishing his turn and drawing cards. Once all players have taken their turn this way, it is then the first players turn again, etc.
Ending The Round
If a player has no cards in his Deed deck at the start of his turn, he may either play with whatever cards he has in his hand, or he may announce the End of the Round. If he does, then his turn immediately ends. Each other player then plays one last turn and then the round is over.
If a player has no cards in his Deed deck and no cards in his hand at the start of his turn, he must announce the End of the Round (unless another player announced it sooner - in that case, he just skips his turn).
One Turn
On your turn, you can either play a Regular turn or you can Rest. You won't need to Rest in the first several turns of the game, so we start with a Regular turn.
On your first turn, place your figure on the Magic Portal space of the map. From then on, your figure can start to move and act on the map.
Each Regular turn has two parts. First, you may move your figure one or more spaces on the map. Then, depending on where you end up, you may perform one Action (in most cases, either combat or interacting with locals), or do nothing.
On your turn, it is possible to:
- Move to another space, and then fight or interact there.
- Stay where you are, and fight or interact there.
- Move to another space and do nothing there.
- Do nothing.
Read here about using actions cards.
Read here the movement rules to move a unit.
Interaction in a Village
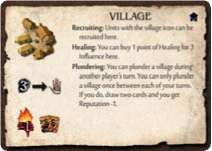
At the start of the first game, there are two villages on the initial portion of the map. Villages are inhabited sites, and you can use influence to interact with the locals there. Check the Village Description card to see what you can do here.
Influence Points
You play cards to provide Influence points the same way as you do with Move points. Remember, you can play any non-Wound card sideways as Influence 1.
As with Move points, you total the Influence provided by all cards you play. However, this total is further modified, depending on your Reputation.
Reputation
When interacting with locals, check where your Shield token is on the Reputation track. If there is a '0' on your space, nothing happens. If there is a positive number, you increase your total Influence by this number. If there is a negative number, your total Influence gets lowered by that amount.
Beware: If your Shield token is on the space of the Reputation track marked with a red "X", the locals refuse to talk to you, and you can't interact at all until you improve your Reputation.
Spending Influence
With Influence, you can buy one or more things that are offered at the space you occupy (at a village, you can recruit a village Unit and buy points of Healing). You can buy things of the same or different types. If you buy Healing points, you can combine it with other healing effects (see later Healing).
As with movement, you can alternate playing Influence and spending it. The bonus or penalty from your Reputation, however, counts only once each turn, no matter how many things you buy.
Recruiting Units
Players can only recruit the Units that are in the Unit offer.
Take a look at these Units. In the middle-left of each Unit card, there are one or more icons that show where that Unit can be recruited. In a village, only Units marked with a village icon  can be recruited (see the Site Description cards - all inhabited sites have an icon in the upper right corner of the Description card). If there is no Unit with that icon in the offer, no Units can be recruited in the village.
The cost for recruiting a Unit is in its upper left corner - that is how many Influence points you have to pay. If you do, you recruit the Unit and put it in your Units area.
Important - Unlike other offers, the Unit offer is not immediately replenished when you recruit a Unit. As players recruit Units, there will be less cards available in the Unit offer. The Unit offer only gets replenished to its full amount at the start of each Round.
When recruiting your first Unit, take the Command token you have available from the start of the game and put it above the Unit you just recruited. This uses up your Command limit - you can't have any more Units until you progress to level 3, when you get another Command token.
You may still recruit however, even if you have no free Command token - but before taking a new Unit, you have to disband (remove from the game) the old Unit. This way, the Command token is available again and it can be assigned to the new Unit.
Plundering A Village
When you end your turn on a village, you may decide to plunder it before your next turn. Doing so gives you -1 Reputation, but you immediately draw two cards from your Deed deck, which strengthens your next turn. Plundering does not affect the village - you may still recruit Units or buy Healing here, and if you stay here, you may plunder it again after your next turn. However, your Reputation drops every time you do.
Plundering is not an action, and you actually do it after your turn has ended, during another player's turn. Just announce you are doing it, decrease your Reputation and draw two cards, and then start planning your turn with those cards in hand. Note: you can only plunder a village once between each of your turns.
Units
Units you recruit are stored in your Units area, and each Unit has a Command token (reverse side of a Level token) above it.
Read here for more detailed information about units.
Combat
You may encounter combat on many occasions in the game. But for now, the only enemies on the revealed part of the map are two groups of Orc Marauders (the green tokens).
Enemy Tokens
Let's take a look at an enemy token:
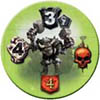
The number at the top is the Armor of the enemy. It basically means, "You need this much attack to defeat this enemy".
The number to the left is its Attack. This number is how much Block you will need to counter the attack, or how much damage you will take if you do not block. It is on a fist icon, because the attack is physical. Later, you will encounter enemies with Ice and Fire attacks, which have different attack icons.
On the right, there may be an icon showing any special abilities of the enemy.
Some enemies may have a special defensive ability, such as resistances. These icons are next to the Armor icon of the enemy.
The number at the bottom is the amount of Fame you gain when you defeat this enemy.
Challenging with Rampaging Enemies
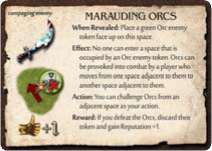
To initiate combat, you have to be on a space adjacent to the enemy token. You announce you want to challenge the enemy, and the combat begins.
This counts as your action this turn and you can only do one action on your turn.
For example, if you end your movement in a village next to an enemy, you have to decide whether you want to interact with the villagers, or challenge the enemy (or do nothing).
Another way that combat can happen is to provoke the enemy by moving around it - the enemy will attack you and combat starts immediately. This also counts as your action for the turn. See the Movement section above for more on this.
Combat Outcome
If you manage to defeat the rampaging enemy, the token is discarded to the appropriate discard pile, and its space is now safe. Whether provoked or challenged, you gain +1 Reputation for defeating any Orc Marauders, as the locals appreciate that you rid them of that menace. Move your Shield token up on the Reputation track (unless you are already on the last +5 space).
Read here more about the combat details.
Healing
We just saw how easy it is to take Wounds. It is not so easy to get rid of them.
Wound Cards
As described earlier, Wound cards in your hand are completely useless and cannot be discarded under normal circumstances. They clog up your hand, counting against your Hand limit.
Even if you manage to discard them (see Resting), they still remain in your deck, so you will eventually draw them again during the next Round.
There are other ways for Wounds to get into your deck, such as poisonous attacks. Also, if you have any Wounds in your hand at the end of the Round, they get shuffled together with your other cards.
A deck stuffed with Wound cards is slow and ineffective. That's a good reason to get rid of any Wound cards in your hand as soon as possible - through Healing.
Wounded Units
A Wounded Unit cannot be activated or assigned damage again. It is completely useless until it is Healed (or replaced by a fresh, healthy one).
Getting Healing Points
Fortunately, some cards and Unit abilities provide Healing points (Heal X means you get X Healing points).
You can play these effects at any point during your turn, except during combat (it is not possible to heal a Unit wounded during the Assign Damage phase in order to use it in the Attack phase of the same combat). You play them as you would any other cards - they may be stacked together or powered by mana to provide stronger effects. Other cards may not be played sideways for extra Healing points.
Healing points may also be combined with healing bought in a village - see the Interaction in a village section.
As a result, you will have an amount of Healing points: for example, you play a card that provides Heal 1, activate a Unit that provides
Heal 2, and buy 3 heals for 9 Influence points in the village - you have 6 total Healing points. Now, you can spend them.
Spending Healing Points
For one Healing point, you can get rid of one Wound card from your hand. Return it to the Wound pile. You can only heal Wound cards you have in your hand (not ones in your discard pile or Deed deck).
You can also heal Wounded Units. To do this, you must spend Healing points equal to the level of the Unit (the roman numeral in the upper-right corner of the Unit card). Remove a Wound card from it and return it to the Wound pile. If a Unit has two Wound cards on it (because it was damaged by a poisonous attack), you have to Heal it twice to completely Heal the Unit.
It is up to you how you spend Healing points; you can heal several Wounds from your hand, heal one or more Units, or divide the Healing however you choose.
Resting
You can decide to Rest instead of taking a regular turn, especially when you have some Wound cards in your hand and no way to heal them.
When Resting, you can't move, and you can't take any actions (such as interactions or combat). You are allowed to play Special and Healing cards and effects and may also use a space which provides a benefit at the end of the turn (such as Crystal Mines or Magical Glades).
In addition, you have to discard one non-Wound card, and any amount of Wound cards. Beware, this is not the same as healing, the cards go to your discard pile; old Wounds show up again later.
Exhaustion
A Hero is exhausted when he has nothing but Wound cards in his hand at the start of his turn. In such a case, he reveals his hand, and all he can do with his cards this turn is discard one Wound.
He does not lose his turn however, and may use healing and special abilities of his Units, but as with regular Resting, he cannot move or take an action. If he is on a space that provides a benefit at the end of the turn, he can still use it.
Reverting
The game offers many options for how to play your turn. Players should be allowed to change their minds and take back cards or actions.
If you insist on holding a player to his moves, and not allowing any take-backs, the game can be much slower as players will have to devote much more time to planning out their turns. It is much easier for a player to try and combine the cards and mana on the table in front of him, play their turn, change their mind, and do it again a different way.
However, there are some things you cannot take back. Whenever you reveal any new information (for example, exploring the map, drawing a card, or revealing a hidden enemy token), you cannot undo that action, or go back and change any actions prior to that event. The same applies for any action that involves a random element (such as a die roll).
you reveal any new information (for example, exploring the map, drawing a card, or revealing a hidden enemy token), you cannot undo that action, or go back and change any actions prior to that event. The same applies for any action that involves a random element (such as a die roll).
Example
You play a Move card powered by a mana die from the Source to reveal a map tile. You see there is a village on the new tile right next to you and you would like to take back the spent mana and instead play more Move cards from hand, so that you can use a different mana die to help you recruit a Unit from the village.
However, you cannot undo that previous action now, since you revealed new information.
On the other hand, imagine you used mana to move toward an Orc Marauders, challenge them to a flight, and then realize you need that mana for combat. You can change the combination of cards and abilities you used to move to the space, or even to decide to do something entirely different, since you have not revealed any new information.
Level Ups
With enough fame, a hero can advance to a next level. The maximum level is 10.
Read here all detailed information about level up.
End of the Round
If a player runs out of cards in his Deed deck and he does not want to play anything in his hand (or his hand is empty), he can announce the "end of the Round" at the beginning of his turn. If he does, he does not play his turn. Each other player then takes one last turn for the Round, and then the Round is over.
Preparing a New Round
To prepare a new Round, do the following:
-
Flip the Day/Night board over to the other side - the time of day changes.
-
Reroll all mana dice to form the new Source. If you are starting a Day Round, set any black dice to the depleted side of the Source. If you are starting a Night Round, set any gold dice to the depleted side of the Source. (This is important since by starting with a Day Round, new players get used to a gold mana die being a good thing. You have to put it to the "bad side" of the Source to remind them it is not good during Night Rounds).
Again, at least half of the dice should be of basic colors. Reroll black and gold dice as needed until this condition is met.
-
Take all Unit cards from the Unit offer that were not recruited and put them on the bottom of the Regular Unit deck. If there are also any Advanced Action cards in the Unit offer (see Revealing a Monastery above) put them at the bottom of the Advanced Action deck.
-
Reveal new cards for the Unit offer. The amount of Units is equal to the number of the players, plus 2. If there are any monasteries on the board (that were not burned) reveal that many Advanced Action cards and add them to the Unit offer. (See Revealing a Monastery above).
-
For the Advanced Action offer, remove the card that is in the lowest position of the offer and return it to the bottom of the Advanced Action deck. Shift the other cards down, and place a new card from the top of the deck in the topmost position of the offer.
-
The Spell offer is refreshed in the same way as the Advanced Action offer above.
-
Each player shuffles all his Deed cards (the ones he had in his hand, discard pile and Deed deck when the previous Round ended), and forms a new Deed deck. If he has any banner Artifacts assigned to his Units, he may (but does not have to) remove any of them from their Units and shuffle them in to his Deed deck. Then he draws cards from that deck up to his Hand limit (indicated on his Level token), and possibly more if he is close to a keep he owns (see Revealing a Keep above).
-
Every Unit in the player's Unit area that was spent (i.e. it has its Command token on it) becomes Ready. Put its Command token above the card again. Note that even Wounded Units get Readied if they were spent, but they do not get healed.
-
Any Skills that were flipped face down are flipped up again. If any Unit has been assigned a banner Artifact that is face down, flip it face up aswell.
-
All players return their Tactic cards. Now, the cards corresponding with the new Round are displayed - there is a different set of Tactic cards for Night.
Choosing Tactics
Players have to choose their Tactics for the next Round.
The player whose token is last on the Fame track gets first choice of Tactics. Then the one who is second to last gets to pick, etc. The player with most Fame chooses last.
In the case of a tie, the player who was playing later in the previous Round (i.e. his Round Order token was lower in the order) gets priority for picking.
After all players have chosen a Tactic, rearrange the Round Order tokens next to the Day/Night board to reflect the new turn order.
End of the Game
The first scenario is almost over when the city tile is revealed. Each player (including the one who revealed the city) plays one more turn, and then the game is finished. During this time, Player vs. Player combat is not allowed.
Once the game is concluded, it is time to assign some extra rewards. Players will score extra Fame for different achievements - continue to move their Shields on the Fame track, but ignore any Level ups now. Each category also awards special titles for even more Fame.
Before determining achievements, players should take all their cards (from their hand, discard pile and Deed deck) and sort them by types, to see what cards they ended the game with.
Final Scoring
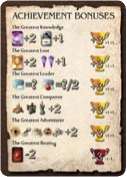
Final scoring is summarized on the Achievement Scoring card, which is available for any player to examine over the course of the game. The other side of this card is not used in "The First Reconnaissance" scenario.
-
The Greatest Knowledge
Each player scores 2 Fame for each Spell, and 1 Fame for each Advanced Action in his deck. The player who scores the most Fame this way gets 3 extra Fame for achieving the Greatest Knowledge. If two or more players are tied, each gets 1 Fame (except if the tie is between players who scored no Fame in this category).
-
The Greatest Loot
Each player scores 2 Fame for each Artifact in his deck or on his Units, and 1 Fame for every two crystals in his Inventory. Again, the player who scored the most Fame this way gets 3 extra Fame for achieving the Greatest Loot (1 if tied).
-
The Greatest Leader
Each player scores Fame equal to the total level of all his Units. Wounded Units are counted only as half, rounded down (thus a Wounded level 1 Unit is worth no Fame). The player who scored the most Fame this way gets 3 extra Fame for being the Greatest Leader (1 if tied).
The Greatest Conqueror
Each player scores 2 Fame for each Shield token he has on a keep, mage tower or monastery. The player who scored the most Fame this way gets 3 extra Fame for being the Greatest Conqueror (1 if tied).
-
The Greatest Adventurer
Each player scores 2 Fame for each Shield token he has on an adventure site. The player who scored the most Fame this way gets 3 extra Fame for being the Greatest Adventurer (1 if tied).
-
The Greatest Beating
Each player loses 2 Fame for each Wound card in his deck (not on his Units). The player who lost the most Fame this way loses an additional 3 Fame for receiving the Greatest Beating (-1 if tied, except if the tie is between players that have no Wounds).
Whoever has most fame now is the winner the first scenario. congratulations!
Continue Reading