In Terraforming Mars, you control a corporation, and you buy and play cards describing different projects.
The projects often directly or indirectly contribute to the terraforming process, but can also consist of business enterprises of different kinds. In order to win, you have to accumulate a good terraform rating (TR) and many victory points (VPs).
Your TR is increased each time you raise a global parameter (temperature, oxygen or ocean). Your TR determines your basic income, as well as your basic score. As the terraforming process proceeds, more projects become feasible. Additional VPs are awarded for anything enhancing mankind's grip on the solar system. This can be anything, from founding cities to building infrastructure, or protecting the environment.
Time is measured in generations, and each generation starts with a Turn Order phase, followed by a Research phase, in which players access new cards. In the Action phase, players take turns doing 1 or 2 actions, going around the table until everyone has passed. Then, in the Production phase, all players produce resources according to their production parameters on the player boards, and gain income from their TR.
The central game board has tracks for temperature, oxygen level, terraform rating, and generations. There is a surface map where you add ocean tiles, greenery tiles, and city tiles as the game progresses. There is also a list of standard projects available to all players, as well as milestones and awards that players can compete for.
The game ends when there is enough oxygen to breathe (14 %), oceans enough to allow Earth-like weather, and the temperature is well above freezing (+8 °C). It will then be possible, if not comfortable, to live on the surface of Mars!
Global Parameters

Temperature, oxygen, and ocean are called global parameters. Whenever you raise one of them, your terraform rating also increases by that much, giving you a higher income and score.
When a global parameter has reached its goal, it can't be raised any further, and so does not increase your TR. You may still play cards and actions that increase the parameter - just ignore that part of the effect.
When all three global parameters have reached their goal, the game ends after that generation (after the production phase).
Each area or tile on the game board represents 1% of the Martian surface, so 9 Ocean tiles represents 9% ocean coverage, which should be enough to enable stable hydrological cycles, air moisture, and weather patterns. Water is also important, as it moderates temperature swings. At very low temperatures, oceans are actually glaciers for most of the year.
Although the temperature on Mars can already reach 20 ˚C on 'hot' summer days, this is not enough. To enable liquid oceans, the mean temperature has to be positive, at least at the equator.
The most important parameter for terraforming is the oxygen level. Without a breathable atmosphere, Mars is not liveable, not terraformed. Earth's oxygen content is 21% of the atmosphere, 0.21 atm. At higher altitudes, this decreases as the atmosphere becomes thinner. At 3000 m the oxygen level is 0.14 atm and there are a few major cities at this altitude, mostly in the Andes and in China. The most notable examples are the Bolivian cities El Alto (4150 m) and La Paz (3640 m), each with nearly a million inhabitants.
Earth's atmosphere also contains 78% nitrogen, the main component responsible for air pressure. Air pressure is also important, if not as crucial as oxygen level. Another aspect of terraforming is Mars' very weak magnetic field. These aspects are not represented by a global parameter, but usually result in a higher TR for the player, as indicated on the specific cards.
Game Board
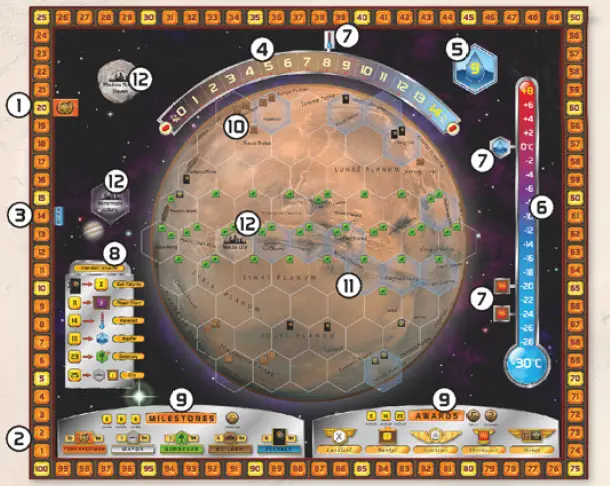
1 Terraform rating (TR) track: All players start at 20. This is your basic income and VPs. You increase it every time you terraform.
2 Generation track: The generation marker measures time (rounds) and starts at 1, moving up on the TR track.
3 Solo games start with a TR of 14, and end after generation 14.
4 Oxygen: This global parameter starts at 0%. This percentage compares to Earth's 21% oxygen.
5 Ocean tiles: This global parameter starts with 9 tiles in a stack here, to be placed on the board during the game.
6 Temperature: This global parameter (mean temperature at the equator) starts at -30 °C.
7 Bonus steps: If you raise the parameter to this point, you also get the attached bonus.
8 Standard Projects: May be used by any player regardless of what cards you have.
9 Milestones / Awards: Can be a good source of extra VPs.
10 Placement bonuses: When placing a tile on an area with a placement bonus, you get the printed resources or cards.
11 Ocean-reserved areas: Blue areas are reserved for ocean tiles; ocean tiles may only be placed here and no other tile may be placed here.
12 Special reserved areas: 3 areas are reserved for specific cities. No other tiles may be placed there.
The Bonus Steps
As the atmosphere thickens, greenhouse effects will raise the temperature, as indicated by the bonus at 8% oxygen.
As the temperature rises, carbon dioxide will thaw out, adding a greenhouse warming effect as indicated by the heat production bonuses. Then, at 0 °C, ice-bound water in the soil will begin to melt, adding water to the surface.
The Map
The game board has an accurate map of the Tharsis region of Mars, including Valles Marineris and 3 of the 4 great volcanos. Only the region around Olympus Mons is missing.
The areas reserved for Ocean tiles are low in elevation so water will naturally flow there. The plant bonuses around the equator simulate that the higher average temperature will make it easier for life to thrive there. Mountain ridges have steel and titanium bonuses, while other interesting sites may have a card draw bonus, like the Viking site where the first man-made lander touched down.
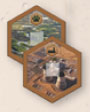
Tiles
The game board has a map where tiles may be placed. When placing a tile, you must first check to see if there are any placement restrictions. There are areas reserved for the ocean and specific cities, where no other tiles may be placed. Furthermore, each tile may have specific restrictions printed on the respective card or in the summaries below.
When you place the tile, you receive the placement bonus printed on that area (if any). You also get a bonus for placing tiles next to ocean tiles (see below).
Ocean Tile

Ocean tiles may only be placed on areas reserved for the ocean (see map). Placing an ocean tile increases your TR 1 step. Ocean tiles are not owned by any player. Each ocean tile on the board provides a 2 M€ placement bonus for any player later placing a tile, even another ocean, next to it.
Example: If you place a city tile adjacent to 2 different ocean tiles you get 4 M€ as placement bonus
Greenery Tile

If possible, greenery tiles must be placed next to another tile that you own. If you have no available area next to your tiles, or if you have no tile at all, you may place the greenery tile on any available area. Place a player marker on it to mark your ownership. When placing a greenery tile, you increase the oxygen level, if possible, and also your TR. If you can't raise the oxygen level you don't get the increase in TR either. Greenery tiles are worth 1 VP at the end of the game, and also provide 1 VP to any adjacent city (see below).
City Tile

May not be placed next to another city (exception: Noctis city must always be placed on its reserved area). Add a player marker.
Each city tile is worth 1 VP for each adjacent greenery tile (regardless of owner) at the end of the game. (Note: the card Capital places the unique Capital city tile, which counts and scores like a normal city tile, but additionally gives you VPs for adjacent ocean tiles, as stated on the card).
Special Tiles
Some cards allow you to place special tiles. Any function or placement restriction is described on the card. Place the tile, and place a player marker on it.
Markers
Resource cubes: Resources are collected on the player board or on specific cards. There are many types of resources, but they are all marked by these cubes:

- Bronze = 1
- Silver = 5
- Gold= 10
Player markers: Each player uses his own color to mark TR, ownership of tiles, production, and to indicate the used blue card actions.

Temperature, oxygen, and generation markers: Start at the beginning of the respective track. First player marker: Shifts clockwise each generation.
First player marker: Shifts clockwise each generation.

Player Boards
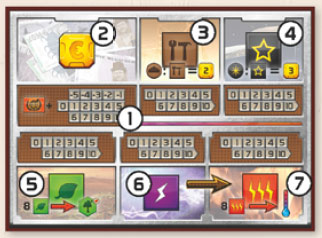
The player board keeps track of your current resources and production. Resource cubes are placed in their respective boxes, and player markers are used on the production tracks.
In the game, resource icons refer to resource cubes, while resource icons inside brown boxes refer to the production of that resource (see the project card below).
1 Production tracks: If you gain production of a resource, mark the new production level with your player marker.
Production is not limited to 10. Example: If you play a card that increases your heat production 3 steps from 19 to 22 you mark this by having 2 player markers on '10' and 1 marker on '2' on the production track above the heat box. Impressive!
During the production phase, you add resource cubes equal to your production.
2 MegaCredits (M€): Are used to pay for cards and other things. Note: Your M€ income is the sum of your M€ production and your TR. M€ production is the only production that can be negative, but it may never be lowered below -5.
3 Steel: Is only used to pay for cards with a building tag and is worth 2 M€/cube. You may pay with both M€ and steel, but you get no refund for 'overpaying' with steel.
4 Titanium: Is only used to pay for cards with a space tag and is worth 3 M€/cube, similar to steel.
5 Plants: May be converted into greenery tiles by using the depicted action.
6 Energy: Is used by many cards. All leftover energy is converted into heat at the beginning of the production phase.
7 Heat: Maybe spent to raise temperature 1 step by using the depicted action.
Cards
Each player starts the game with a corporation card. During the game, players buy and play many project cards to get benefits of different kinds. The cards are divided into active cards (blue frame, see example), automated cards (green) and event cards (red).
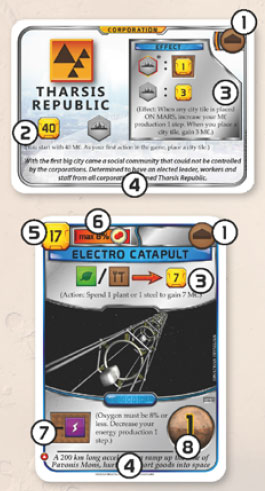
1 Tag: Places the card in certain categories, which can affect or be affected by other cards, or by the player board (e.g. you can pay with steel when playing a building tag).
2 Starting conditions: This tells you how much money you start with, as well as other starting resources and production. Some corporations also have a fixed first action described here (see example card).
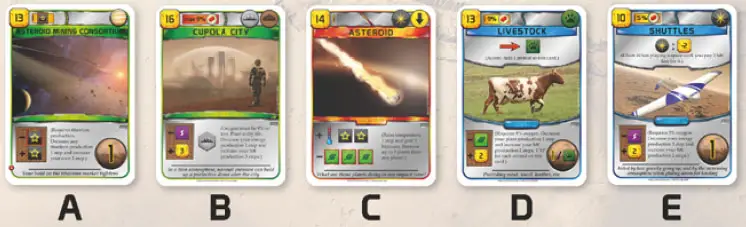
3 Effect/action: Boxes marked by a blue ribbon show an ongoing effect or action that may be used during the game. Actions may be used only once per generation, while effects are always active.
4 Flavor text: Gives you some background information and feeling for the card.
5 Cost: This is what you pay to play the card from your hand. (To get cards into your hand, you must first buy them during the research phase).
6 Requirement: Any requirement must be met in order to play the card. Some cards require a global parameter to have reached a certain level, while others can only be played while the parameter is still low (see example card). Some cards require that you have certain tags or production. (Note: In order to play the card you must also be able to perform the effects of the card). Note also that the requirement only needs to be fulfilled when playing the card, not when you use it later.
7 Immediate effects: Most cards affect your (or your opponent's) resources or production. You may also get tiles to place, or other effects.
8 VPs: Some cards give you victory points at the end of the game.
If you are uncertain of how a card works, read the text in parenthesis.
Setup
This describes the setup for the standard game for 2-5 players. See additional rules for other game variants.
Game board: Place the game board centrally on the table. Place the 9 ocean tiles in their reserved space. Place the temperature and oxygen markers in their starting positions. Also, place the generation marker on '1' on the TR track.
Resource cubes and remaining tiles: they are placed so that everyone can reach them.
Project deck: Make sure you have no Corporate Era cards in the project deck or among the corporation cards. These are marked with a red and white icon in the lower left edge. Shuffle the project cards and place the project deck next to the board. Leave space for a discard pile beside it.
Players: The player who most recently won a game of Terraforming Mars is given the first player marker. Players choose their colors and take the corresponding player markers and a player board.
You start with 1 production of each resource on the player board, so place player markers on the tracks (only in a standard game). Each player also places one marker at the starting position (20) of the TR track.
Corporation cards: Players new to Terraforming Mars each get a Beginner Corporation card (colorless card back) and follow its instruction to get 42 MegaCredits and draw 10 project cards to form their starting hand. Then they can examine their cards while experienced players continue this setup without them. Shuffle the 10 standard corporation cards (excluding the 2 Corporate Era corporations) and deal 2 to each remaining player.
Project cards: Deal 10 cards to each remaining player. These are cards that players may buy for their starting hands (3 M€ each). Now the players examine their options for their starting hand and corporation.
Starting conditions: Players choose which of the corporations they want to play, and which of the 10 project cards they want to keep for their starting hand. The cards not kept are discarded (put discarded corporations back in the box) - cards are always discarded face down! In player order, players then reveal their chosen corporation, get their starting resources and production (if any), and then pay 3 M€ for each project card they keep. Be aware that your resources for the following few generations will be quite limited until you get your economy going.
Start the game: The first generation starts without a player order phase and without a research phase (since you just performed those phases during setup), so the first player just starts the action phase.

Generations
Because of the long time spans needed for the projects, this game is played in a series of generations. Each generation the players go through 4 phases.
I. Player Order Phase
The first player marker shifts 1 step clockwise and the generation marker is moved up 1 step. This phase is skipped in the first generation (see setup).
II. Research Phase
Each player draws 4 cards and decides which of them he wants to buy to his hand. Each card costs 3 M€ to buy to the hand, and you may buy 0-4 cards. The rest of the 4 drawn cards are discarded face down on the discard pile.
There is no hand limit.
This phase is also skipped the first generation (see setup).
Example: In the second generation, the players have their first normal research phase. They put down their hand cards and draw 4 cards each to buy from. Stanley decides to buy 3 of his cards, so he pays 9 M€ and discards the remaining card, adding the 3 new cards to his hand.
III. Action Phase
Players take 1 or 2 actions each turn, or pass. Play proceeds clockwise around the table until all players have passed. The actions may be combined in any way the player chooses. The available actions are:
A) Play a card from your hand.
B) Use a standard project.
C) Claim a milestone.
D) Fund an award.
E) Use the action on a blue card.
F) Convert 8 plants into a greenery tile (which gives an oxygen increase) as described on the player board.
G) Convert 8 heat into a temperature increase as described on the player board.
You can choose to take 1 or 2 actions on your turn. If you take no action at all (pass), you are out of the round and may not take any anymore actions this generation. When everyone has passed, the action phase ends.
IV. Production Phase
All players perform this phase simultaneously.
First, all energy is converted into heat (move all resource cubes from the energy box to the heat box). Secondly, all players receive new resources:
Players get M€ according to their terraform rating plus any M€ production (which may be negative!), then the players also get any other resources they have production of according to the player board. Place all generated resources in their corresponding boxes.
Finally, remove player markers from used action cards, to mark that they may be used again next generation.
Now you are ready to start the next generation.
Example: Kim gains 21 M€ from her TR and M€ production. She also produces 3 titanium resources (because she played Asteroid Mining earlier), and 1 each of the other resources, adding them on her player board.

Actions
There are 7 different actions that players may choose from on their turn. Players may do 1 or 2 actions on their turn, in any combination (for example 2 of the same action). By choosing 2 actions, a player can surprise the others, by doing more than they expected and beat them to some goal or bonus.
Choosing only 1 action can be useful too - it can be used for waiting out your opponents or just to do a no-brainer while thinking about your more important decisions.
A. Play a card from your hand
When playing a card, there are 3 steps to consider:
- Check the requirements.
- Pay for the card and get any immediate effects.
- Place the card appropriately.
-
Check The Requirements
In order to play a card you must meet its requirements and be able to perform the effects stated on the card, with the following exceptions: You may play a card that...
- raises global parameters that have already reached their goal (for example when there are no more ocean tiles, or when the temperature is at +8 °C).
- adds resources that you can't collect (for example adding microbe resources without having any microbe project to place them on).
- removes resources for any player (red-bordered resource icons, see example on card C below) if you can't or do not wish to.
Even if these effects can't be performed, you may still play the card, performing all other effects as usual.
Example: Kim can play Asteroid card C even if the temperature has reached its goal, but then she gets no TR. She may also choose not to remove any plants at all, or just do it partly (maybe only Kim herself has plants, or maybe Stanley or Robinson have less than 3 plants to remove). All plants must be taken from the same player, though.
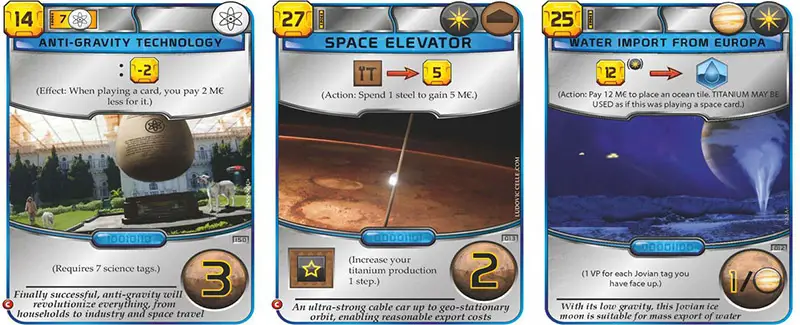
Cards A, B, D and E below each have a requirement listed next to the card's cost. To play card A, you need to have titanium production. To play card B, the oxygen level needs to be 9% or lower, and you also need to have energy production since the card requires you to decrease your energy production.
To play card D, the oxygen level must be 9% or higher. You also need to have plant production, since the card requires you to decrease your plant production.
Card E requires 5% oxygen and energy production.
The cost required to play the card is stated in the upper left corner. Some blue cards already in play may give you a discount (for example, E gives a discount when playing a space card). You may also use steel and titanium to help pay for building and space cards respectively.
-
Paying And Performing Immediate Effects.
First you must pay the card's cost.
Then the lower panel of the card shows you any immediate effects. These effects (and other effects triggered by the card you just played) are performed in any order you choose.
Any production (see brown boxes on cards A, B, D & E) must be performed. Resources or production with a red frame means that you can affect any player you choose (even yourself). Resources or production without red frames always affect yourself and must be performed.
So card A essentially steals a titanium production from an opponent, while in B, D and E you must decrease your own energy or plant production in order to increase your M€ production.
Cards may also feature tiles and tags with a red border. A 'red' tile means any player's tile, and a 'red' tag means any player's tag.
Any resources C are gained immediatley. Again, a red border means you can choose the resources of any one player, so playing card C is usually not very nice. Red-bordered resources are optional, so card C does not remove your own plants, even if you are the only player that has any plant resources. Non-standard resources (that are not collected on your player board) are instead collected on specific cards D. By default, those resources are usually placed on the same card that generates them. Livestock (Card D), for example, gains 1 animal (resource cube) on it when you use its action (actions can be used once per generation).
Any tiles B placed by the card follow the rules for tiles. A tile must be placed if possible, but being unable to do so does not prevent you from playing the card.
If a card has a *, then it is an exception to the normal rules, and you must read the explanation in parenthesis to see details of how the card works.
If you ever become uncertain of a card's function, read the explanation text.
VP icons (see cards A, D, E) are ignored for now, they will be counted in the final scoring. Card D may be worth several VPs if its action (top panel) has had time to work a few times to add more animal resources to the card.
-
Place The Card (see Illustration Below).
Events (red cards, C) are collected in a personal pile face down after being played. Their tags only apply while being played (for example using the discount on card E when playing a space event).
Automated cards (green, A, B) are placed face up in a stack on the table with only the top row visible. They have no further effect, but since they represent the current extent of your operations, their tags still apply.
Active cards (blue, D, E) have ongoing effects that may trigger at any time, or actions that you can use (just like the corporations). Since you need to keep track of these cards, they are placed with the top panel visible.

Many cards represent ideas for terraforming. They may affect the global parameters or give you a higher TR in other ways. They may represent photosynthesising organisms releasing oxygen, or heat sources that gradually raise the temperature.
There are also other cards that are interlinked with the terraforming process, either requiring some terraforming to have been done, or specializing in early conditions.
Each card has a flavor text that may help you get a feeling for what the card does 'in reality'.
B. Use A Standard Project
The 6 standard projects printed on the game board are always available to the players. Each of them may be used several times during the same generation.
Sell patents: You may discard a number of cards from hand to gain the same number of M€.
Power plant: For 11 M€ you get to increase your energy production 1 step.
Asteroid: For 14 M€ you get to increase temperature 1 step (and your TR).
Aquifer: For 18 M€ you get to place an ocean tile (you also get 1 TR and collect any placement bonus for the tile).
Greenery: For 23 M€ you get to place a greenery tile, which increases oxygen level (and your TR) 1 step, and collect any placement bonus for the tile. Put a player marker on the tile.
City: For 25 M€ you get to place a city tile (collect any placement bonus for the tile, and place a player marker on it). You also get to increase your M€ production 1 step.
Example: Robinson's first action on his turn is to use the standard project City to gain his 3rd city tile, continuing to get extra bonuses from his corporation Tharsis Republic.
C. Claim A Milestone
If you meet the criteria of a milestone, you may claim it by paying 8 M€ and placing your player marker on it. A milestone may only be claimed by one player, and only 3 of the 5 milestones may be claimed in total, so there is a race for these! Each claimed milestone is worth 5 VPs at the end of the game.
These are the milestones and what you need to claim them (besides paying 8 M€):
Terraformer: Having a terraform rating of at least 35.
Mayor: Owning at least 3 city tiles.
Gardener: Owning at least 3 greenery tiles.
Builder: Having at least 8 building tags in play.
Planner: Having at least 16 cards in your hand when you claim this milestone.
Example: Robinson's second action (after building his 3rd city), is to claim the mayor, which he now qualifies for. He pays 8 M€ and places one of his markers on the Mayor milestone. This is worth 5 VPs! Only 2 more milestones may be claimed now, and no one else may claim Mayor.
D. Fund An Award
There is no requirement that must be met to fund an award. The first player to fund an award pays 8 M€ and places a player marker on it. The next player to fund an award pays 14 M€, the last pays 20 M€. Only three awards may be funded. Each award can only be funded once.
In the final scoring, each award is checked, and 5 VPs are awarded to the player who wins that category - it does not matter who funded the award! The second place gets 2 VPs (except in a 2-player game where second place does not give any VPs). Ties are friendly: more than one player may get the first or second place bonus (see example).
If more than one player gets 1st place bonus, no 2nd place is awarded.
These are the awards and what they are awarded for:
Landlord: Owning the most tiles in play.
Banker: Having the highest M€ production.
Scientist: Having the most science tags in play.
Thermalist: Having the most heat resource cubes.
Miner: Having the most steel and titanium resource cubes.
Example: Stanley pays 8 M€ to fund the award for thermalist, since he thinks his GHG Factories will give him all the heat he needs to win that award.
When the game ends, though, Kim also produces heat and has 12 in her resource box, compared to Stanley's 12 and Robinson's 5. Stanley and Kim both get 5 VPs for first place, while Robinson gets nothing.
E. Use The Action On A Blue Card
Many blue cards and corporations have actions, as indicated by a red arrow. Each such action card may be used once each generation. When you use an action on a blue card, you must first pay any cost stated to the left of the arrow. You get whatever the arrow points to, and place a player marker on the card to indicate that it has been used this generation. The player markers will be removed during the production phase.
Example: Towards the end of the game, Stanley has Livestock (card D) in play. He can choose its action on his turn, adding a resource cube (an 'animal') to that card, and placing a player marker on it.
Blue cards may also have effects that are always active, like Shuttles (Card E): When you play a space card, it costs 2 M€ less. These effects are not actions (no red arrow), so you can always use them.
F. Convert Plants Into Greenery
8 plant resources may be turned into a greenery tile, which increases oxygen level 1 step (and therefore also your TR 1 step).
Note that the greenery tile must be placed next to another of your tiles (if possible) and may generate placement bonuses.
Example: Robinson removes 8 plant resources from his plant box on the player board, increasing oxygen level 1 step, and raising his terraform rating 1 step as well. Then he takes a greenery tile and places it between 2 of his city tiles, and takes the placement bonus, which happens to be 2 plants, as printed on the chosen area.
Not only did this yield 1 TR plus placement bonus, but the greenery will be worth 1 VP in itself as well as 1 VP to each adjacent city in the end game scoring.
G. Convert Heat Into Temperature
8 heat resources may be spent to increase temperature 1 step (and therefore also your TR 1 step).

End of the Game
When all three global parameters (ocean, temperature, and oxygen) have reached their goals, the game ends at the end of that generation. After the production phase, players have one extra chance to convert plants into greenery tiles (in player order; this may also trigger other effects such as placement bonuses).
Then the final scoring takes place. To avoid confusion, we recommend that one player is chosen to handle the scoring, and that all other players check that scoring is done correctly.
Final Scoring
TR: Your TR at the end of the game is your basic score. Move your marker onward from this point as you add VPs from the rest of the scoring.
Awards: Gives the leading player in that category 5 VPs and the runner-up 2 VPs (except in a 2-player game). Ties are friendly: Players at the same level get the same VPs for 1st or 2nd place. Add your points to the TR-track.
Milestones: Each claimed Milestone is worth 5 VPs.
Game board: Players get VPs from the map on the game board. Each greenery tile is worth 1 VP and each city tile is worth 1 VP for each greenery adjacent to it (regardless of who owns the greenery tiles). Count these in player order to avoid confusion.
Cards: First count all VPs on cards that collect resources.
Then gather all of your remaining cards (including all your played events!) and count your VPs. If you have Jovian cards, these may have to be counted separately.
The player with the highest total score is the winner! Any ties are won by having the most M€.
Suggestions
If you don't understand the symbols - read the explanation in parenthesis on the card.
Sometimes there are many effects to keep track of, so please help each other. When several effects are triggered at the same time, the active player chooses the order, even for other players' triggered effects.
Continue Reading


