This section describes all other rules needed to play the learning scenario.
Commands
Commands enhance a ship's power, giving it additional capability. The effect of each command depends on whether a player spends a command dial or a command token. Each command effect is described below.
Navigate 
When a ship is determining course for movement, it may spend its  command dial to increase or decrease its speed by one. This is the main way that a ship changes its speed. Also, it may adjust one joint by one click more than the speed chart normally allows. The minimum speed for all ships is "0", and the maximum speed is indicated on the speed chart.
A ship with a command token may spend the token when determining course for movement to increase or decrease its speed by one.
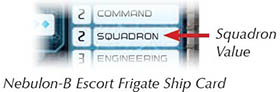
Squadron 
After this icon is revealed on a command dial, the ship may spend its  command dial to activate a number of friendly squadrons up to its squadron value. It can only activate squadrons that are at close-medium range of it.
Each squadron activated in this way can attack and move in either order. The ship chooses and activates squadrons one at a time.

A ship with a command token may spend the token after revealing its command dial to activate one squadron following the rules above.
Repair 
After this icon is revealed on a command dial, the ship may spend its command dial to gain engineering points equal to its engineering value. It may spend these points on the following effects in any combination and number.
1 point: Move one shield from one of the ship's hull zones to another of its hull zones (without exceeding the hull zone's maximum shield value).
2 points: Recover one shield in any of the ship's hull zones.
3 points: Discard any one of the ship's faceup or facedown damage cards.
A ship with a  command token may spend the token after revealing its command dial. The ship gains engineering points equal to half of its engineering value, rounded up, to spend on the effects listed above.
Concentrate Fire 
After a ship rolls dice during an attack, it may spend its  command dial to roll one additional attack die. That die must be of a color that it already rolled.
A ship with a command token may spend the token after it rolls dice during an attack to reroll one attack die.
Command Tokens

When a player reveals a ship's command dial, he can spend the dial to place the matching command token next to that ship.
The maximum number of command tokens that a ship can have is equal to its command value, and a ship cannot have more than one copy of each type of command token.
Attacking
The rules below describe how a ship attacks an enemy ship. Squadrons use most of the same rules as ships when attacking and defending; the few exceptions are described in the "Squadron Attacks" and "Squadron Defense" sections.
To perform an attack, the player first chooses one of his ship's hull zones to attack from. Then he declares the defending hull zone on the ship he wants to attack. The defending hull zone must be within firing arc and attack range.
After declaring the defending hull zone, the attacker determines his attack dice. These dice are printed in the attacking hull zone.
Then the attacker rolls his attack dice. For each accuracy ( ) icon rolled, he can choose one of the defender's defense tokens; the chosen token cannot be spent during this attack. Then the defender can spend defense tokens, which allow him to negate damage in various ways.
Finally, the defender suffers damage equal to the number of hit ( ) and critical (
 ) icons remaining.
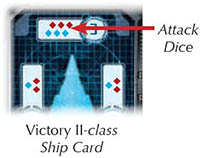
Attack Dice
There are three different colors of attack dice: red, blue, and black. Each ship's hull zone lists different combinations of attack dice.
The colors of the attack dice serve two purposes:
- When attacking a ship from a distance, some dice colors cannot be rolled for that attack.
- Each color has a different distribution of icons.
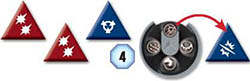
There are three icons that appear on these dice:
Accuracy: For each G icon rolled, the attacker chooses one of the defender's defense tokens. The chosen token cannot be used during this attack.
Hit: For each F icon rolled, the defender suffers one damage.
Critical: For each E icon rolled, if the attacker and defender are both ships, the defender suffers one damage and the first damage card dealt is dealt faceup.
Targeting
The defending hull zone must be inside the attacking hull zone's firing arc.
In addition, the defending hull zone must be at attack range. The attacker uses the range side of the range ruler to determine the range to the chosen hull zone. Each range band on the ruler depicts which colors of attack dice he can roll.

For example, at long range a ship can roll only its red attack dice. If the attacking hull zone does not have any red dice, then it cannot perform this attack.
Squadron Attacks
Squadrons do not have hull zones and therefore do not need to declare an attacking hull zone.
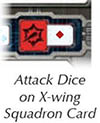
The attack dice that a squadron uses when attacking ships are printed on its squadron card.
When a squadron performs an attack, it can target one enemy ship at distance 1 using the distance side of the range ruler. Squadrons can use a 1l the colors of dice at distance 1, but they ignore icons when attacking.

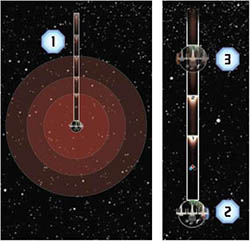
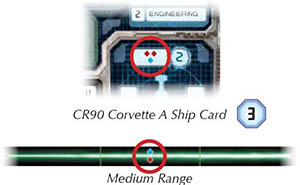
Measuring Firing Arc and Range
1The X-wing is at close range, but outside the left firing arc of the Victory II-class.
2The front hull zone of the CR90 Corvette A is at close range and inside the left firing arc of the Victory II-class.
3The left hull zone of the CR90 Corvette A is at medium range and inside the left firing arc of the Victory II-class.
Defense Tokens
Each ship has a number of defense tokens that can be used when defending against an attack to mitigate the damage it suffers.
After attack dice are rolled and the attacker spends his accuracy () icons, the defender can spend one or more of his defense tokens as described below:
 Redirect: The defender chooses one of his hull zones adjacent to the defending hull zone. When the defender suffers damage, it may suffer any amount of damage on the chosen zone's remaining shields before it must suffer the remaining damage on the defending hull zone.
 Evade: If the attack occurs at long range, the defender chooses and cancels one attack die. At medium range, he chooses one attack die to be rerolled. At close range and distance 1, the token has no effect.
 Brace: After the damage is totaled, the defender reduces the total to half, rounded up.
 Scatter: The defender cancels all attack dice
When the defender spends a readied defense token, he flips it over to its exhausted side. When he spends an exhausted defense token, he discards the token, returning it to the supply. All exhausted defense tokens are readied during the Status Phase.

The defender cannot spend any single defense token more than once per attack, and he cannot spend more than one defense token of each type per attack. If the defender's speed is "0", he cannot spend any defense tokens.
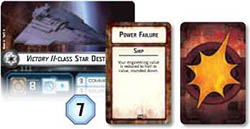
Ship Damage
Whenever a ship suffers damage, it suffers each point of damage separately. To suffer a point of damage, the player reduces the shields in his defending hull zone by one by rotating the shield dial to the next lowest number.
If he does not have any shields remaining, he instead draws one card from the damage deck and places it facedown near his ship card.
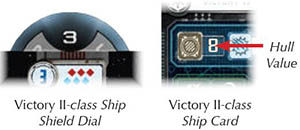
If a ship ever has a number of damage cards equal to its hull value, it is destroyed; remove the model from the play area along with any tokens and other associated components.
Critical Effect
Before the defender determines the total damage amount from an attack, the attacker can resolve a critical effect. If the attacker has rolled at least one critical () icon, the first damage card that the defender receives is dealt faceup.
Faceup damage cards count as damage against the ship's hull and also inflict the effect described on the card. They remain faceup until an effect flips them facedown or discards them.
Squadron Defense
Attacking a squadron follows all the same rules for attacking a ship with the exceptions described below.
Squadrons do not have hull zones; therefore, the attacker does not need to declare a defending hull zone.
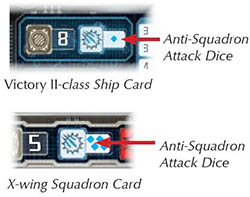
When attacking a squadron, the attacker uses the Anti-Squadron section of his card to determine his attack dice, which is the same for all hull zones.
Squadron Damage

When a squadron suffers damage, the player reduces its remaining hull points by the damage amount. He rotates the squadron's disk so that the pointer on the squadron base points to the remaining hull points.
If a squadron ever has zero or fewer hull points, it is destroyed; remove the model from the play area along with any tokens and other associated components.
Squadrons suffer damage equal to the number of hit () icons only; they ignore critical () icons.
Attacking Squadrons with a Ship
When a ship attacks a squadron, it can perform one attack against each squadron inside the firing arc and at attack range of the attacking hull zone. Each attack is resolved separately.
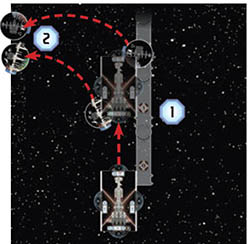
Attack Example
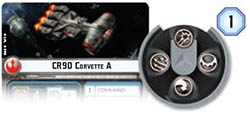
1 The Rebel player activates his CR90 Corvette A, reveals a () command, and then decides to attack the Victory II-class Star Destroyer.

2 The Rebel player declares that the CR90 will attack from its front hull zone and will target the Victory II-class' rear hull zone. The Rebel player measures firing arc and range, confirming that the rear hull zone of the Victory II-class is within his front hull zone's arc and that the attack is at medium range.
3 The CR90 has 2 red dice and 1 blue die in its front hull zone. The attack is at medium range, so the Rebel player gathers all 3 dice.
4 The Rebel player rolls the dice, resulting in 4 and 1 . He spends the command to roll an additional blue die, resulting in 1 .

5 The Rebel player decides to spend his G icon to prevent the Victory II-class from spending its redirect token. The Imperial player decides to spend only his brace defense token. The total damage of 5 ( + + + + ) is reduced to 3 (half of 5, rounded up).

6 The Victory II-class suffers the first point of damage, reducing its rear hull zone's shields to 0.
7 The Victory II-class suffers the remaining 2 points of damage on the ship's hull. The Imperial player draws a faceup damage card for the first point of damage because the Rebel player rolled at least () icon.
He immediately resolves the effect on that card. Then he draws a facedown damage card for the second point of damage. He places both cards next to the Victory II-class' ship card.
Overlapping
Squadrons cannot be placed so that they overlap other ships or squadrons. If a ship would overlap another ship or squadron, players use the following rules depending on the type of plastic model that the ship overlapped.
Overlapping Squadrons
If the moving ship's final position overlaps one or more squadrons, the moving ship finishes its movement normally and the players move any overlapped squadrons out of the way.
Then, the player who is not moving the ship places all of the overlapped squadrons, regardless of who owns them, next to the ship so that their bases are touching the ship's base.
Overlapping Ships
If the moving ship's final position would overlap another ship, it cannot finish its movement normally. Instead, its speed is temporarily reduced by one and it attempts to move at this speed. This process continues until the moving ship can finish a movement or until its speed is temporarily reduced to "0", in which case it remains in its current position.
After moving, the moving ship and the closest ship that it overlapped both receive one facedown damage card.
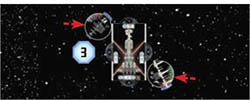
Overlapping Squadrons
1The Rebel player's CR90 attempts to complete a 2-speed movement, but there is a TIE fighter squadron and an X-wing squadron under the ship's final position.
2The Imperial player removes those squadrons so the CR90 can be placed.
3The Imperial player places the TIE fighter and X-wing squadrons as he chooses so that they are touching the CR90.
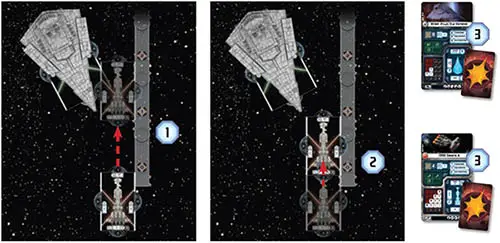
Overlapping Ships
1The Rebel player's CR90 Corvette A attempts to complete a 2-speed movement, but there is a Victory Il-class at the ship's final position. The CR90 must temporarily reduce its speed by 1.
2The CR90 completes a 1-speed movement.
3Then the CR90 and the Victory Il-class both receive 1 facedown damage card.
Size Class
Each ship belongs to a size class as described below:
- CR90 Corvette: Small
- Nebulon-B: Small
- Victory-class Star Destroyer: Medium
Size class has no inherent effect, but some card effects may refer to it. Expansion packs with large ships may be released in the future.
Squadron Keyword
Each squadron benefits from one or more keywords. The rules for each keyword are printed on its squadron card. As an additional reference, each squadron disk depicts an icon that corresponds to each of its keywords. Unique squadrons, such as Luke Skywalker, have unique special abilities described on their squadron cards
Continue Reading


