America In The 19th Century: You Are A Rancher And Repeatedly Herd Your Cattle From Texas To Kansas City, Where You Send Them Oby Train. Is Earns You Money And Victory Points. Needless To Say: Each Time You Arrive In Kansas City, You Want To Have Your Most Valuable Cattle In Tow.
Is Will Not Only Require That You Keep Your Herd In Good Shape, But Also That You Eectively Utilize The Various Buildings Along The Trail. Success Will Require That You Hire Capable Sta : Cowboys To Improve Your Herd, Cra Smen To Build Your Very Own Buildings And Engineers To Manage The Important Railroad Line.
If You Cleverly Manage Your Herd And Navigate The Opportunities And Pitfalls Of This Great Western Trail, You Surely Will Gain The Most Victory Points And Win The Game.
Components
- 1 game board
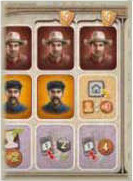
- 54 worker tiles
- 18 hazard tiles
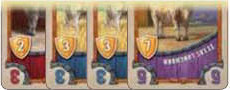
- 22 teepee tiles
- 4 player boards
- 4 player count tiles
- 4 cattlemen
- 56 player discs 14 per player
- 4 engines
- 4 certicate markers
- 92 cattle cards
- 24 objective cards
- 4 starting objective cards
- 47 building tiles
- 5 station master tiles +55 coins
- 1 job market token
- 1 scoring note pad
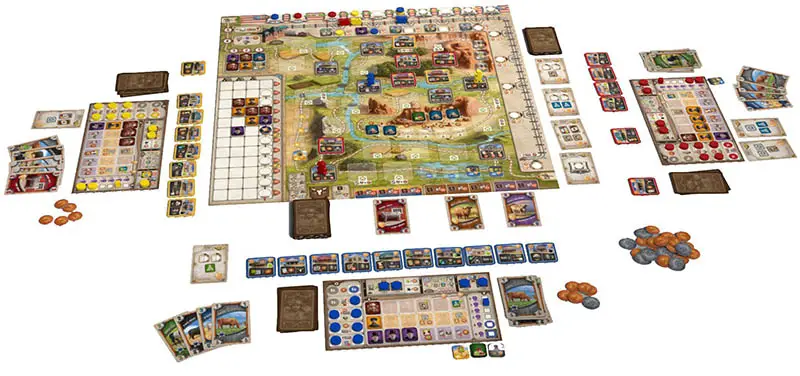
Setup
Place the game board in the middle of the table.
Shuffle the 5 station master tiles and place one at random face up onto each of the 5 station master spaces.
Take the 7 neutral building tiles and place one face up onto each of the 7 neutral spaces on the game board: If this is your first game, place each tile onto the space marked with its matching letter (A to G). In subsequent games, shuffle the tiles and distribute them at random.
Place the job market token onto the top dashed round space in the job market.
Take the 54 worker tiles, the 22 teepee tiles and the 18 hazard tiles and turn them face down. Sort them into piles according to the numbers on their back (1, 2 and 3). Then shuffle each of these piles separately and place them as three face-down piles by the upper left of the game board (next to Kansas City). These piles are called the Kansas City supply
From the Kansas City supply, start revealing tiles with a  on their back and place them one after the other onto the game board. Where a revealed tile is placed depends on its type:
- If it is a teepee tile (green or blue), place it in the Indian trade section onto the empty space with the lowest money value above it (starting at -3).
- If it is a hazard tile, place it in its corresponding hazard section (flood, drought or rockfall) onto the empty space with the lowest number (1 to 4). If there is no empty space left, flip the tile face down and return it to the Kansas City supply.
Keep revealing tiles with a until you have placed a total of 7 tiles onto the game board.

Start revealing tiles with a  on their back (which include only worker tiles). Put these worker tiles one after the other in the job market as follows:
Start in the top row and place the first revealed tile onto the space directly beneath the player count sign of your actual player count. Place the next tile onto the space to the right of that tile and continue like this rightwards.
After you have placed a tile onto the rightmost space of the top row, continue along the second row, where you place the next tile yet again onto the space in line with your player count sign.
Then continue like this rightwards until you place a tile onto the space to the left of the job market token. This is the last tile. So depending on your player count, there now are between 3 and 7 worker tiles in the job market.
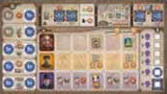
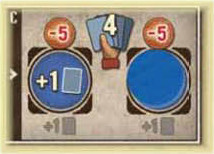
Now fill the 6 foresight spaces in Kansas City with tiles from the Kansas City supply:
- Draw 2 tiles with a on their back and place them face up onto the two foresight spaces marked 1.
- Draw 2 tiles with a on their back and place them face up onto the two foresight spaces marked 2.
- Draw 2 tiles with a
 on their back and place them face up onto the two foresight spaces marked 3
Shuffle the 36 market cattle cards and place them as a face-down market cattle stack beneath the lower left of the game board.
Depending on your player count, draw a number of cattle cards from this stack:
- In a 2-player game: Draw 7 cards.
- In a 3-player game: Draw 10 cards.
- In a 4-player game: Draw 13 cards.
Sort the drawn cards by color and place them face up beneath the game board in the cattle market, forming an overlapping row in which the left side of each card is visible. For clarity, the cards of this row should be arranged in the following order from left to right: yellow, red, blue, brown, purple (not all colors may be present though).
Shuffle the 24 objective cards and place them as a face-down stack to the right of the game board. Then reveal 4 cards from this stack and display them face up in a column below the stack. This display is called the general objective display.

Place the coins within reach of all players as a general supply. This supply is called the bank.
Each player chooses a player color. She receives the player board of that color (identifiable by the 14 round colored spaces) and places it in front of her. If you are playing with 3 or 4 players, each player also receives the player count tile of her color. She turns it to the side of the appropriate player count and uses it to cover up Phase A of her player board.

Then each player receives the 10 private building tiles of her color. These building tiles are double sided and each is marked with a number (between 1 and 10) and with the letter 'a' on one side and the letter 'b' on the other.
In your first couple of games, each player turns her private building tiles to their a-side and displays them in an ascending order above her player board.
If you know the game a little better, you may try the following: Choose a player who determines the side of each of her building tiles at random (for example by tossing them in the air) and then displays them in ascending order above her player board. Afterwards all other players copy her display by turning their tiles to the same sides.
Thus, for the remainder of the game, the side of each building tile is identical for all players. No one may deliberately flip a building tile to its other side.
Then each player receives the following items of her color:
- 14 player discs - which she places onto her player board to cover up each of the colored disc spaces. (Only the 2 gray spaces in the upper left remain empty).
- 1 engine - which she places onto the starting space (the red building) of the railroad track on the game board.
- 1 certificate marker - which she places onto the top space of her certificate track (next to the 0).
- 1 cattleman - which she places next to her player board for now.
Then each player receives the 14 player cattle cards that are marked with a star of her color. These 14 cards make up her herd deck. She shuffles her herd deck and places it as her face-down personal draw stack to the left of her player board. Then she draws 4 cards from this personal draw stack and adds them to her hand.

Shuffle the 4 starting objective cards and deal each player one random card, which she places face up below her player board. This is the first card of her personal objective area. Return any spare starting objective cards to the box.
Finally, determine a starting player. This player receives 6 dollars from the bank as starting capital, which she places in front of her. The next player in clockwise direction receives 7 dollars, the third player (if any) receives 8 dollars and the fourth player (if any) receives 9 dollars as starting capital.
Object of the Game
On your turn, you move your cattleman along a trail that winds and forks from the lower right corner of the game board to Kansas City in the upper le. Along your path, you perform actions that provide you with various ways to earn victory points, for example: Placing private building tiles, buying cattle from the cattle market, upgrading train stations and removing hazards.
Each time your cattleman reaches Kansas City, you must send cattle off by train to another city, which may also be worth victory points. afterwards, your cattleman continues its movement again in the lower right corner of the game board and throughout the game your cattleman will reach Kansas City about 5 to 7 times.

All victory points are awarded at the end of the game. Then you add up the victory point symbols on the various components in front of you as well as the ones marked with your color on the game board. The player with the most victory points wins the game.
What Is Your Herd Deck?

Your herd deck represents your herd, which you lead along the trail. Each cattle card of that herd represents one animal of a specific cattle type, clearly denoted by the card's color and breeding value.
Each player starts with an identical herd deck of rather low breeding values.
However, during the game, you can improve your deck by adding market cattle cards with higher breeding values as well as objective cards to it.
Your herd deck is made up of the following parts:
- Your face-down personal draw stack to the left of your player board.
- Your hand cards that you draw from that draw stack according to your hand limit (you start with a hand limit of 4 cards).
- Your face-up personal discard pile, onto which you place any cards that you discard from your hand as well as any cards you acquire during the game.
Important: When you must draw a card from your personal draw stack but have no cards left in that stack, then (and only then) pick up your personal discard pile, shuffle it thoroughly and place it as your new face-down personal draw stack to the left of your player board. Then continue to draw cards from it as usual.
What Is The Purpose Of The Cattle Cards?
On the locations of the trail, there are several actions that require specific cattle cards to be discarded from your hand in order to gain rewards.
Also, each time you reach Kansas City, you want to have many different types of cattle with high breeding values in your hand: The more varied and valuable they are, the more money and victory points are in store for you. (For details see pages 8 and 9).
Game Play
Beginning with the starting player (the one with a starting capital of only 6 Dollars), players consecutively take turns in a clockwise direction.
On your turn, you must carry out all of the following phases in this order:
- Phase
AMove Your Cattleman To Another Location Along The Trail - Phase
BUse The Action(s) Of Your Reached Location - Phase
CDraw Up To Your Hand Limit
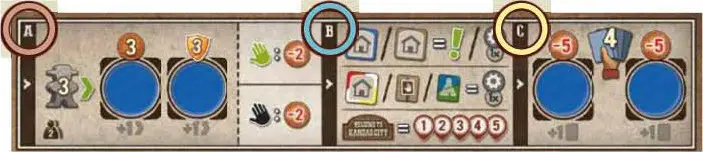
Then it is the next player's turn.
I. Phase A: Move your cattleman
What Is Considered A Location?
The main location of the trail is Kansas City. Furthermore, any tile that is placed on a space of the trail is considered a location (building tiles, hazard tiles and teepee tiles). Spaces without any tile are considered an unimpeded part of the trail and are NOT locations! On your very first turn of the game, place your cattleman onto any neutral building tile and continue directly with phase B. You may start on the same building tile as other players.
In this phase, you must move your cattleman from its current location along the trail to another location.
For this, bear the following rules in mind:
- The movement of your cattleman is measured in steps: Each location along your path takes 1 step (remember, empty spaces along the trail are not considered locations).
- You must move your cattleman at least 1 step and are not allowed to move it more steps than the current step limit your player board indicates. (Depending on your player count, you start with a step limit of 3 or 4, which later in the game can be increased).
- You must always move your cattleman forward along the intended direction of the trail (as indicated by the arrows).
- If the trail forks, choose one of the available paths to continue along.
- The location on which your cattleman ends its movement (either because you want it to or because your step limit is exhausted), is the location you use in phase B.
- You are not allowed to pass over Kansas City. So when your cattleman reaches Kansas City, it must end its movement there.
- The cattlemen of the other players do not interfere in any way with your own cattleman. Several cattleman can be on the same location.
Attention: Several locations show a green or black hand (or both). If your cattleman moves to or passes over such a location, you must immediately pay a fee:
If it is a hazard or teepee tile, you must pay the fee to the bank.
If it is a private building tile of another player, you must pay the fee to that player.
The fee depends on the player count and the color of the hand(s):
In a 2-player game:

- each green hand costs 2 Dollars
- each black hand costs 2 Dollars
In a 3-player game:

- each green hand costs 2 Dollars
- each black hand costs 1 Dollar
In a 4-player game:

- each green hand costs 1 Dollar
- each black hand costs 2 Dollars
Very important: If you cannot pay for some or all of the hands along your path, you are still allowed to move. This means that if your cattleman moves to or passes over a location whose fee you cannot pay, pay as much as you can and continue as usual.
You never have to pay fees retroactively, even if you receive money while still at a location whose fee you could not pay before. This only applies to fees levied by hands. All other costs and requirements in the game must always be paid/met in full.
II. Phase B): Use actions of your reached location
After moving your cattleman, use the location on which it ended its movement.
However, your options on the location differ depending on whether it is:
- A neutral building tile or a private building tile of your own color
- A private building tile of another player, a hazard tile or a teepee tile
- Kansas City
a) On a neutral building tile or a private building tile of your own color
You have two options:
-
Use The Local Action(s)
Most building tiles show two different local actions on their bottom half. These actions are separated from one another by full-length dividers. (Only a few building tiles show just one or more than two local actions).
- You may now perform each of that tile's local actions once.
- You may perform these local actions in any order.
- You do not have to perform all of the available local actions. But if an action shows a cost or requirement, you have to pay/meet it completely in order to gain that action's reward.
- A few tiles show two actions (separated by a white slash) within the same local action.
- You are only allowed to perform one of those actions.
- Some spaces of the trail have risk actions attached. If a building tile is placed on such a space, the risk action becomes part of that tile's local actions and thus can be performed by its owner each time she reaches that location.
-
Use One Single Auxiliary Action
- If you do not perform any of the local actions of the reached tile, then and only then may you perform one single auxiliary action instead.
- Your auxiliary actions can be found on the left side of your player board in the auxiliary action section.
- At the beginning of the game, only 2 of them are available. Each of the other auxiliary actions becomes available after you have cleared at least one of its two disc spaces (again, you will learn soon enough how to do that).
B) A Private Building Tile Of Another Player
On a building tile of another player, a hazard tile or a teepee tile, you have only one option: Perform one single auxiliary action (see above).
Note: This means, of course, that you usually will try to reach a neutral building tile or a building tile of your own color, because only there can you perform local actions.
C) Kansas City
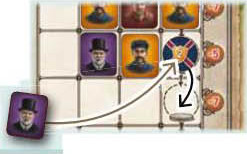
When you reach Kansas City, you must carry out all of the 5 Kansas City subphases in succession.
To make sure that you do not forget any subphase, move your cattleman along the numbered spots and perform the corresponding subphase before moving on to the next spot.
The 5 Kansas City subphases are:
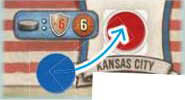
- Foresight 1: Choose one of the 2 tiles in the foresight spaces below spot 1 and move it to its corresponding section.
- Foresight 2: Choose one of the 2 tiles in the foresight spaces below spot 2 and move it to its corresponding section.
- Foresight 3: Choose one of the 2 tiles in the foresight spaces below spot 3 and move it to its corresponding section.
- Income: Reveal your entire hand, calculate your income and gain that amount from the bank. Then discard your hand to your personal discard pile.
- Delivery: Move one of your player discs from your player board onto a city crest and pay any transport costs arising.
Each of the 3 tiles that you choose in subphases , and must immediately be moved to its corresponding section:
If it is a teepee tile (green or blue), place it in the Indian trade section onto the empty space with the lowest money value above it. If no empty space is left there, take the teepee tile out of the game by returning it to the box.
If it is a hazard tile, place it in the corresponding hazard section (flood, drought or rockfall) onto the empty space with the lowest number (1 to 4). If no empty space is left there, take the hazard tile out of the game by returning it to the box.
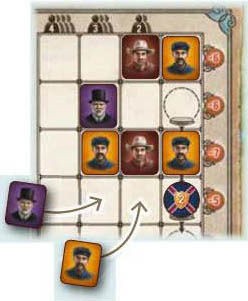
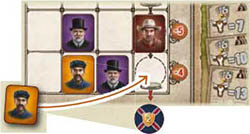
If it is a worker tile, place it onto the next free space of the job market. To determine that next free space, apply the following rules:
-
The tile must always be placed in the row where the job market token is located.
-
The spaces of that row must always be filled from left to right.
-
If you are playing with fewer than 4 players, also consider the following:
In a 3-player game, each row only comprises 3 spaces (starting beneath the 3-player count sign) and the entire left column is left empty.
In a 2-player game, each row only comprises 2 spaces (starting beneath the 2-player count sign) and both left columns are left empty.
-
The last space to be filled in each row is always the one with the job market token.
And as you place a worker tile onto that space, move the job market token along the arrow to the dashed round space of the next row.
Usually, when the job market token is moved to the next row, nothing in particular happens.
However, the job market token triggers a special situation when it is moved along a colored arrow:
If the job market token is moved along a yellow arrow, you must immediately fill up the cattle market. When this happens, draw from the market cattle stack as many cards as it takes to bring the cards in the cattle market up to their initial number:

- In a 2-player game: Fill the cattle market up to its total of 7 cards.
- In a 3-player game: Fill the cattle market up to its total of 10 cards.
- In a 4-player game: Fill the cattle market up to its total of 13 cards.
As in the setup, sort all cattle cards by color and place them face up in an overlapping row in which the left side of each card is visible. For clarity, the cards of this row should be arranged in the usual order from left to right: yellow, red, blue, brown, purple.
If you must fill up the cattle market but the number of cattle cards in the market is already equal to (or higher than) the total for your player count, don't add any cards to it.
If the market cattle stack is empty, no more cards are added to the cattle market.

If the job market token is moved from the bottom row along the red arrow, the game end is triggered
Income:
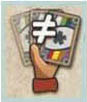
Reveal your entire hand to the other players and calculate its total breeding value:
To do this, sum the breeding values of each different type of cattle that you have in hand. This means each type is counted only once, no matter how many cards of that type you have.
(Ignore any victory points on your cattle cards and any objective cards for now).

Then, if possible and if you like, you can increase that total breeding value by adding certificates to it. There are 2 types of certificate in the game: Temporary certificates and permanent certificates.
Temporary certificates are those on your certificate track: The number next to the current position of your certificate marker tells you how many temporary certificates you have available. Of those, you can use as many now as you want by moving your certificate marker backwards accordingly.
Permanent certificates are those on the upper half of any station master tiles in front of you: Each of those increases your total breeding value automatically by 1 for the rest of the game.

Once your total breeding value is set (including any certificates), take that many Dollars from the bank. Place this amount a little set off from the rest of your money so that you are able to track that total breeding value in subphase 5.

Then discard all cards from your hand to your personal discard pile.
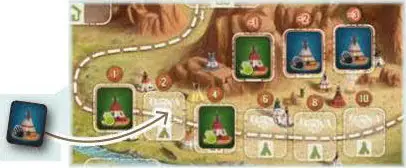
Delivery:

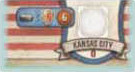
The cattle for which you just received your income must now be delivered to a city along the railroad. The crest of each city shows a city value that corresponds to that cattle's total breeding value: The higher the total breeding value, the farther up the railroad you can deliver.
To do this, decide on a city whose city value is equal to or lower than your cattle's total breeding value. Bear in mind, however, that you are not allowed to choose any city to which you have delivered before (that already has one of your discs on its city space). The only exceptions to this rule are:
- the local town, Kansas City and
- the terminal town, San Francisco.
You may deliver to either of these cities even if you already have one or more of your discs there.
Once you have decided on a city, place one of your player discs onto its city space (if other discs are already there, put it on top of those). Take that player disc from any of the disc spaces of your player board but keep in mind that there are 2 types of disc space: Those with white corners and those with dark corners.
By clearing a disc space of its disc this way, you unlock its ability. Note, that some of the disc spaces with dark corners have additional requirements or give rewards for clearing them.
By placing your disc onto a city space, you may gain or lose victory points at the end of the game and may trigger delivery actions which you must perform immediately.
Attention: The action in any of the green arrows is not triggered until both adjacent crests have one of your discs on them. The same is true for victory points in green arrows: Only if both adjacent crests have one of your discs on them, have you unlocked the victory points between them.
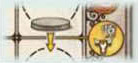
Finally, check whether you need to pay any transport costs for your delivery. This depends on the position of your engine on the railroad track: If the nose of your engine is beneath or farther up the railroad track than the city crest onto which you just placed your disc, you have no transport costs.
If your engine is farther down the track than that city crest, you must pay transport costs as follows: Pay 1 Dollar to the bank for each cross that is located between the nose of your engine and the city value of that crest.
Note: Since you gain your income beforehand, you are always able to pay any transport costs arising.
After finishing the Delivery subphase, carry out these 2 final steps:
1) Move your cattleman to the start of the trail, by placing it onto the horseman space in the lower right corner of the game board. The next time it is your turn, the movement of your cattleman starts from there.
2) Refill each of the 3 empty foresight spaces in Kansas City with tiles drawn from the Kansas City supply.
Make sure that on each space you place a face-up tile whose number on the back matches the number of that space.
III. Phase C: Draw up to your hand limit
Each player starts with a hand limit of 4 and can increase it up to 6. If you have fewer cards in your hand now than the current hand limit your player board indicates, bring their number up to that limit by drawing as many cards from your personal draw stack as you lack. (If necessary, shuffle your personal discard pile and use it to replace your run-out draw stack as described at the bottom of page 5).
Note: If you just went through the subphases of Kansas City, you must replenish your entire hand, of course.
Then it is the next player's turn.
Example: Mary has a hand limit of 5 cards (because she already cleared one of the relevant disc spaces on her player board). In phase B she discarded 2 cards from her hand in order to perform a local action. As that left her with 3 cards in her hand, she must now draw 2 cards to bring her hand back up to 5. As she has 2 cards left in her personal draw stack, she draws these 2 cards. Note, that even though her personal draw stack is empty now, she does not yet create a new one from her personal discard pile. She will do that right before she has to draw the next card.
The Actions
Read here the detailed information of the actions.
The Objective Cards

During the game, you can gain objective cards via certain actions. They are then usually put onto your personal discard pile and thus enter your hand at some point later.
During your own turn, if you happen to have one or more objective cards in your hand, you can play any of them, either:
- before performing phase A or
- before or after performing any one action in phase B.
This means that you are neither allowed to play objective cards in the middle of an action nor after you have started to carry out phase C.
When you play an objective card, place it face up in your personal objective area (beneath your player board). Then perform the immediate action depicted in the upper left corner of the card or forfeit it.
The following immediate actions can be found on objective cards:
Move your cattleman up to 3 steps forward along the trail, ignoring any green and black hands. However, you are not allowed to use the location on which you stop. So if you move your cattleman before phase A, you then start the usual movement of phase A from that location. If you move your cattleman after using a location in phase B, you directly carry out phase C once your cattleman reaches the new location. You are not allowed to move to Kansas City via this immediate action.
Draw up to 3 cards from your personal draw stack. Then discard as many cards as you drew.
Move your engine up to 2 or 3 spaces forward.
Gain 2 Dollars.
Perform one single or one double auxiliary action.
Each objective card depicts a combination of tasks to be fulfilled at the end of the game. If all of the tasks of an objective card are fulfilled by then, you gain the victory points printed on it.

If its tasks are not fulfilled completely, you lose the negative victory point value printed on it. (Only your starting objective card has no negative victory point value).
Important: Each single fulfilled task can only count towards one objective card. So if several objective cards show the same tasks, each of these tasks must be fulfilled individually.
The following tasks can be found on objective cards:
- Have 1 building tile on the game board.
- Have 1 green teepee tile in front of you.
- Have 1 blue teepee tile in front of you.
- Have 1 hazard tile in front of you (of any kind).
- Have 1 of your discs on a train station.
- Have 1 cattle card with a breeding value of 3 in your deck.
- Have 1 "West Highland" cattle card in your deck.
- Have 1 "Texas Longhorn" cattle card in your deck.
- Have 1 of your discs on the city space of San Francisco.
Note: You are not compelled to play your objective cards. If you want, you can keep some or all of them in your deck by the usual means (for example, by discarding them via this icon ![]() ). For each objective card that is still in your deck at the end of the game, you may then decide if you want to score it or not. For the cards placed in your personal objective area, you do not have that choice. Those must be scored.
). For each objective card that is still in your deck at the end of the game, you may then decide if you want to score it or not. For the cards placed in your personal objective area, you do not have that choice. Those must be scored.
End of the Game
The game end is triggered when a player places a worker tile onto the last space of the job market while carrying out subphase 2 or 3 in Kansas City.
As this makes the job market token move along the red arrow out of the job market, the active player immediately takes the job market token and places it in front of her.
If this happens during subphase 2, she then carries out subphase 3 but may not choose another worker tile (as there is no space left in the job market). If there are only worker tiles left, she skips phase 3 entirely. Afterwards, she carries out subphases 4 and 5 as usual and also refills any empty foresight spaces at the end of her turn. This was her last turn.
Then, each of the other players has one final turn, in which she moves her cattleman as usual and uses the reached location. Players that move to Kansas City during their final turn also carry out the 5 subphases as usual.
However, they may not choose any worker tiles from the foresight spaces when performing subphases 2 and 3 (skipping those entirely if there are only worker tiles left). Still, at the end of their turn, they must refill any empty foresight spaces.
After the last player has finished her final turn, the game ends. Now, attend to the final scoring.
The Final Scoring
Take the scoring note pad and go through its 11 categories.
In each category, write down the victory points for each player as follows:
-

The player gains 1 victory point for every 5 Dollars that she own
-

The player gains the sum of the victory points printed on each of her private building tiles which is placed on the game board.
-

The player gains the sum of the victory points that she has unlocked with her discs on the city crests. Any negative victory points must be subtracted of course. (Thus even negative sums are possible).
-
The player gains the sum of the victory points printed right next to each train station that has her disc on it.
-
The player gains the sum of the victory points printed on each of the collected hazard tiles in front of her.


-
From her deck (personal draw stack, hand cards and personal discard pile), the player seeks out all cattle cards that have victory points on them. Then she gains the sum of those victory points.
-

The player must seek out all objective cards that she still has in her deck. For each of those, she must decide whether she wants to remove it from the game or add it to her personal objective area now (without using its immediate action). Afterwards, she checks each objective card in her personal objective area to see if she has fulfilled each of its tasks individually. For all cards that are entirely fulfilled, she sums the positive victory points printed on them.
For all cards that she has not fulfilled completely, she subtracts the negative points printed on them. Then she gains the result as her victory points (this can also be a negative result).
-

The player gains the sum of victory points generated by the individual tasks of the station master tiles that she has in front of her. (These individual tasks are totally independent of the tasks on objective cards).
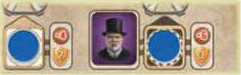
The individual tasks of the station master tiles
 Gain 1 victory point for each worker in your worker section (including the ones printed on the player board).
 Gain 3 victory points for every 2 objective cards in your objective area (whether you fulfilled them or not).
 Gain 3 victory points for every 2 hazard tiles in front of you (of any kind).
 Gain 3 victory points for each pair consisting of 1 green teepee tile and 1 blue teepee tile in front of you.
 Gain 3 victory points for every 2 certificates you have (no matter if they are permanent or temporary).
-
The player gains 4 victory points for each worker that is placed on the fifth or sixth space of any row in her worker section.
-

The player gains 3 victory points if she managed to clear this disc space during the game
-

The player gains 2 victory points if she has the job market token in front of her.
Whoever has the most victory points in total wins the game. In the case of a tie, the victory is shared.
General Notes And Special Cases
Money is considered unlimited. If the bank should run out, use something else as a substitute.
If the objective stack should run out, the vacant spaces in the general objective display are not refilled anymore. If the general objective display is empty, no new objective cards can be gained.
You are allowed to look through the cards of your personal discard pile at any time. You are not allowed to look at the cards of your personal draw stack.
As you can remove cards from the game via an auxiliary action, you are able to slim your deck down. There is no limit to how small your deck can become. If you should reach the point when you don't have enough cards in your deck to replenish your hand to its limit, you simply have to get by on fewer cards (which is not advisable).
If you must place a disc onto a city space during delivery or onto a train station while upgrading it, some special cases can occur: If you are supposed to place a disc onto a space with white corners but only happen to have discs on disc spaces with dark corners left, you are allowed to place a disc from a disc space with dark corners onto a space with white corners. If you are supposed to place a disc but are unable to (because you have none left or cannot pay for them), remove one of your discs from a train station of your choice and place that one instead.
Continue Reading