
Game Components
- Rulebook
- 1 Game Board
- 138 Colored Plastic Units consisting of:
- 60 Footmen (10 per House)
- 30 Knights (5 per House)
- 36 Ships (6 per House)
- 12 Siege Engines (2 per House)
- 81 Large Cards consisting
- 24 Small Tides of Battle Cards
- 2 Reference Sheets
- 6 House-specific Player Screens
- 266 Cardboard Tokens consisting
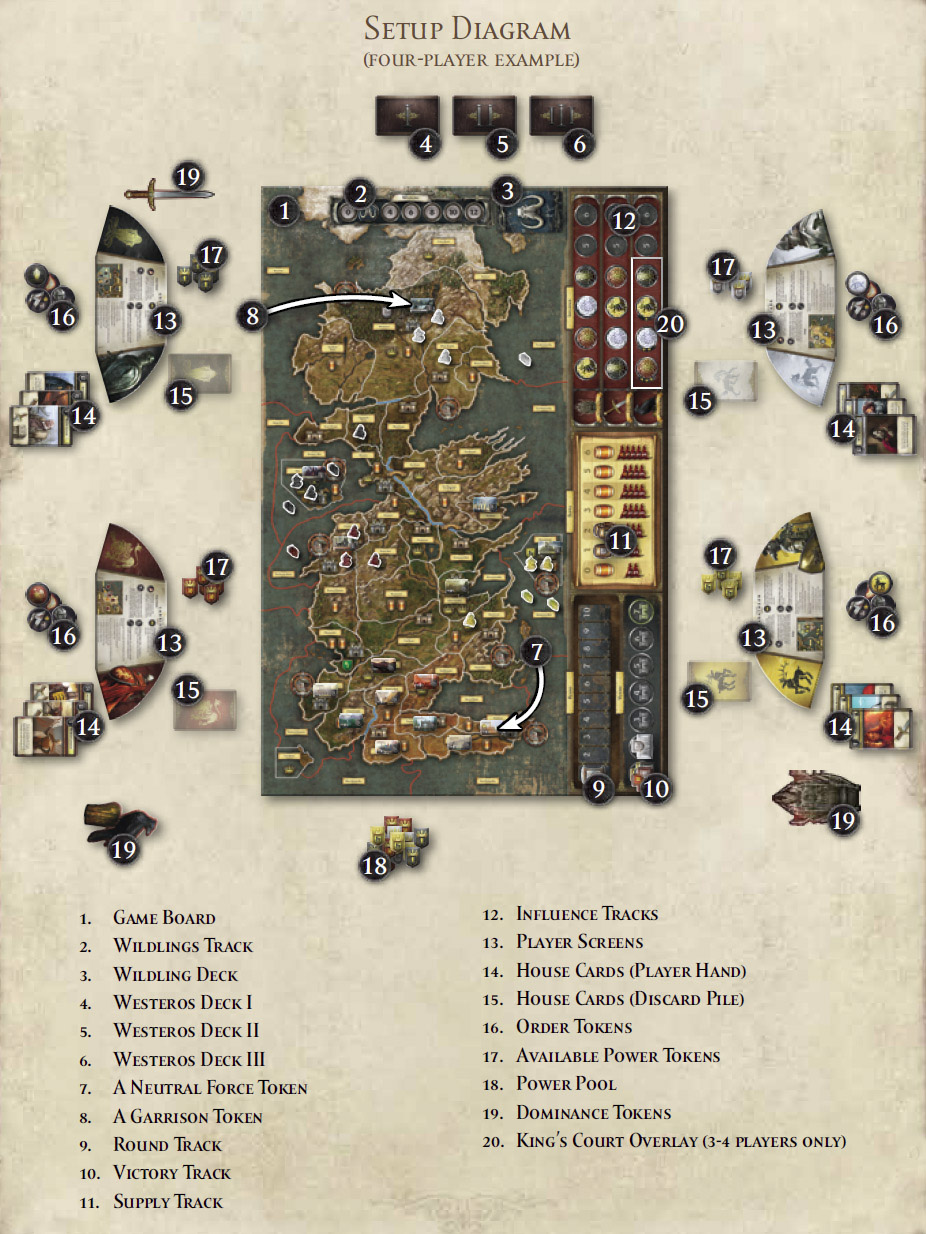
Setup
Before playing the game, perform the following steps in order:
Prepare the Game Board: Unfold the game board and place it in the center of the play area.
Prepare the Wildling Deck and Wildling Threat Token: Shuffle the Wildling cards to form a deck. Place this deck on the space provided at the top of the game board. Then place the Wildling Threat token on the "2" position of the Wildlings track.
Prepare the Westeros Decks: Separate the Westeros cards into decks according to their roman numeral (I, II, or III). Shuffle each deck and place them separately facedown next to the game board.
Place the Neutral Force Tokens: First collect the Neutral Force tokens marked with the correct range of players. Then place those tokens on the areas of the game board matching the name on each token.
All Neutral Force tokens are double-sided. One side is used exclusively when playing with three players. The reverse side is used if the current number of players fall within the indicated player range. After placing all necessary Neutral Force tokens, return any unused tokens to the box.
When playing with four, five, or six players, not every Neutral Force token is used.
Place Game Round Marker: Place the Game Round marker on the "1" position of the Round track.
Determine Player Houses: Each player now selects which House he wishes to control during the game (Stark, Lannister, Greyjoy, Tyrell, Baratheon, or Martell). Alternatively, players may randomly determine which House each player will control. When playing a game with fewer than six players, some Houses are not eligible to be played.
Gather House Materials: Each player gathers all materials belonging to his House. These are: 1 player screen, 7 House cards, 15 Order tokens, 1 Supply token, 3 Influence tokens, 1 Victory Point token, 1 Garrison token, and all plastic units of his color (do not take any House-specific Power tokens yet).
Place Influence, Victory and Supply Tokens: Each player places his Victory, Supply, and Influence tokens on the game board tracks as instructed by his player screen. Unlike the Influence tracks, more than one House may share the same position on the Victory and Supply tracks.
If playing with fewer than six players, slide every Influence token to the left (towards the "1" position) on each Influence track to fill any leftward empty position (in other words, the highest numbered positions on each track remains empty and unused in games with fewer than six players). The Setup Diagram on page 5 illustrates how Influence tokens have been shifted left in a four-player game.
The Houses occupying each "1" (i.e., left-most) position on each Influence track now claim the pictured Dominance token for that track (the Iron Throne, the Valyrian Steel Blade, or the Messenger Raven token).
Place Units: Each player then places all of his starting units on the game board according to the instructions on his player screen.
Place Garrison Tokens: Each player places his Garrison token on his home area (matching the area name on the token).
Gather Power Tokens: Place all Power tokens (for all Houses) in a central pile. This pile of Power tokens is referred to as the "Power Pool". Each player then takes five Power tokens matching his House from the Power Pool.
The game is now ready to begin.
Game Play
A Game of Thrones: The Board Game is played over 10 game rounds, each consisting of the following three phases:
The Westeros Phase (skipped game round 1)
The top card of each Westeros deck is drawn, after which each card is resolved in order (I, II, then III). Westeros cards represent important game procedures and events.
The Planning Phase
Each player simultaneously assigns facedown Order tokens to each area containing one or more of his units.
The Action Phase
The Order tokens assigned during the Planning Phase are now resolved. The majority of player activity in A Game of Thrones: The Board Game takes place during this phase.
After each Action Phase, a new game round begins, starting with another Westeros Phase.
Object of the Game

If at any time during the game a player controls seven areas containing a Castle or Stronghold, the game is over and that player is the winner. Otherwise, the game lasts until the end of the 10th game round, at which point the player who controls the most areas containing a Castle or Stronghold wins the game.

I. The Westeros Phase
During this phase, players draw and resolve three Westeros cards, one from each Westeros deck.
Note: Skip this phase during the first game round, proceed instead directly to the Planning Phase.
The Westeros Phase consists of the following steps:
Advance Game Round Marker: Advance the Game Round marker one position on the Game Round track.
If the Game Round marker was on the 10th space at the start of the Westeros Phase, it's not possible to advance the Game Round marker. Instead, the game is over and a winner is determined.
Draw Westeros Cards Reveal the top card of all three Westeros decks.
Advance Wildlings Track: Count the number of Wildling icons on the three revealed Westeros cards (if any) and move the Wildling Threat token forward that many spaces on the Wildlings track. If, during this step, the Wildling Threat token reaches position "12", a Wildling Attack is immediately resolved (ignore any surplus Wildling icons).
Resolve Westeros Cards: Now, in order of deck number (starting with numeral I), resolve each revealed Westeros Card.
To resolve a Westeros card, simply read the card's text and implement its effects. Many cards are self-explanatory, but some require a detailed understanding of their specified effect.
The resolution effects of those important Westeros cards are found on the following pages.
The Westeros Cards
There are three decks of Westeros cards, each marked with a roman numeral. When revealing and later resolving Westeros cards during the Westeros Phase, always start with deck I, followed by deck II, and then deck III.
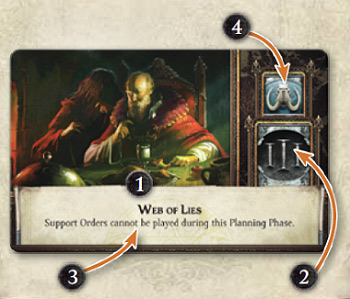
- Event Title and Artwork.
- Deck Number: The number in the right-hand box indicates which Westeros deck this card belongs to (also indicated on the card back).
- Text Effect: Describes how this card affects gameplay.
- Wildling Icon: Some cards show a Wildling icon in the upper right corner. During the Advance Wildlings Track step, the Wildling Threat token is advanced one space for each of these icons present on the drawn Westeros cards.
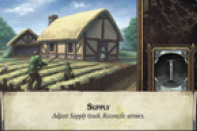
Westeros Card: Supply
Armies require enormous amounts of supplies to function efficiently: food, water, steel, horses, clothing, etc. Without adequate provisions, an army will quickly deteriorate.
When resolving the "Supply" Westeros card, each House, in turn order, counts the number of Supply icons printed in areas it controls, and then moves its Supply token on the Supply track to reflect that level of supply.
Each column on the Supply track has a resulting set of flags. These flags illustrate the number of different armies, and the maximum number of units in each such army, that a House may field on the game board.
For example, a House with a supply of "3" may field four armies: one army with a maximum of three units, and three smaller armies each with a maximum of two units.
Reminder: An army is defined as two or more friendly units in the same land or sea area. A single unit is not considered an army, and has no supply consideration.
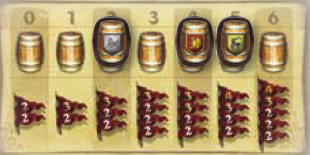
In the illustration above, Stark (with actual supply of two) is able to field up to three armies, being two armies each containing two units, and one army containing up to three units. Both Lannister and Baratheon have more supply, and therefore can field proportionally more (and larger) armies.
After a player adjusts supply, he must ensure the actual number (and size) of his armies on the game board do not exceed his supply limits. If his armies do exceed new supply limits, he must immediately remove units from the game board until his army number (and size) conforms to that allowed by his position on the Supply track.
A player is allowed to have fewer and/or smaller armies than the limit provided by his position on the Supply track.
Though a Knight or a Siege Engine unit are stronger than Footmen or Ship units, they only count as one unit for the purpose of supply.
Though a player may gain or lose Supply icons on the game board throughout one or more Action Phases, his armies are reconciled only when the Supply track is adjusted (via a "Supply" Westeros card, or other game effects).
player is never allowed to take any action in the game that would cause him to exceed his actual supply limit as dictated by his position on the Supply track (such as mustering, marching or retreating).

Westeros Card: Mustering
The "Mustering" Westeros card represents the efforts of the great Houses in calling their bannermen to action, in training and outfitting warriors, assembling warships, and constructing massive engines of war.
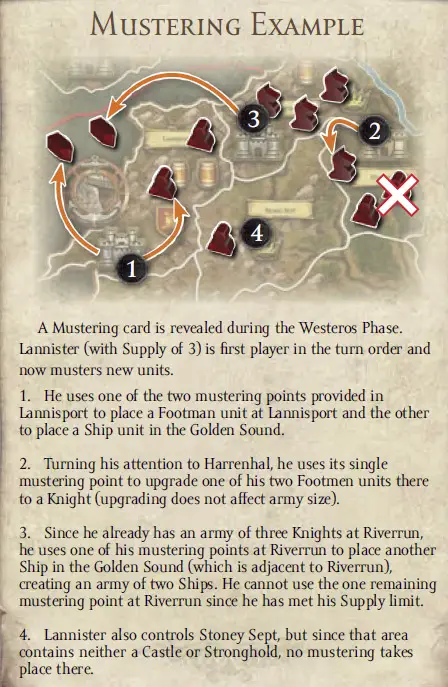
When resolving the "Mustering" Westeros card, each player, in turn order, may recruit new units into each area he controls that contains a Castle or Stronghold. Each Castle or Stronghold provides mustering points which may be spent to recruit new units in its area:
 Strongholds each provide 2 points of mustering.
 Castles each provide 1 point of mustering.
The mustering cost of each unit type is as follows:
 Footman: Costs 1 point of mustering.
 Knight: Costs 2 points of mustering (or 1 point if upgraded from a Footman).
 Ship: Costs 1 point of mustering.
 Siege Engine: Costs 2 points of mustering (or 1 point if upgraded from a Footman).
A mustered unit is taken from its player's unused units, and placed directly into the area of the Castle or Stronghold that provided the mustering point(s) to muster it.
A Footman unit located in a mustering area (i.e., an area containing a Castle or Stronghold) may be upgraded to (i.e., replaced with) a Knight or Siege Engine unit for a cost of 1 mustering point.
A player may never muster a unit that would create or expand an army beyond his actual supply limit. In other words, if mustering a new unit would cause a player to have more (or larger) armies than allowed by his position on the Supply track, that unit cannot be mustered.
If an area containing a Castle or Stronghold is unable to muster or upgrade a unit (or its owner decides not to muster or upgrade in this area) its mustering points are lost (i.e., they do not contribute to a future mustering here).
Each player must resolve all his mustering (for all areas containing his Castles and Strongholds) before the next player in turn order can start his mustering.
Mustering Ship Units
Ship units, like other units, are mustered by an area containing a Castle or Stronghold. Unlike other unit types, however, Ship units may only be placed in a port connected to the mustering area or in an adjacent sea area.
Ship units cannot be mustered into sea areas that contain one or more enemy ships. If a Castle or Stronghold area has no port or eligible adjacent sea areas, no Ship units can be mustered there.
Remember that two or more Ship units in the same sea area are considered an army, and must conform to a House's supply restrictions like any other army. (While it would be more accurate to call multiple Ship units a fleet, the term army is used for simplicity).
Unlike Ship units, Footmen, Knight, and Siege Engine units may never be mustered in ports or sea areas.
Westeros Card: Clash of Kings
From the invasion of the First Men to the reign of the Andal kings; from the fiery conquest of the Targaryens to the rebellion of Robert Baratheon, the continent of Westeros has known constant military upheaval. Yet, the game of thrones is not always played on the battlefield. Intrigue, betrayal, and assassinations have felled many a contender, and so has lack of support from the minor houses of Westeros. A House that dares set its eyes on the Iron Throne must turn many wheels within wheels to achieve its ends.
The "Clash of Kings" Westeros card simulates the intrigue and plotting quietly taking place behind the curtain of war, affecting it in many subtle (and some not-so-subtle) ways.
To resolve "Clash of Kings", first remove all Influence tokens from the three Influence tracks on the game board. Players then bid available power for position on the three tracks. The bidding is resolved one track at a time, starting with the Iron Throne track, followed by the Fiefdoms track, and ending with the King's Court track.
Bidding on the Influence Tracks
When bidding on each Influence track, players first hide all their available power tokens behind their player screens. Then each player secretly places any number of his available power tokens into his hand, hiding them in a closed fist. Once all players have made their selections, everyone simultaneously reveals their bid by opening their hands.
The player with the highest bid places one of his Influence tokens on the "1" position of the track being bid upon. The player with the second highest bid places one of his Influence token on the "2" position of the same track, the third highest player on the "3" position, etc.
The outcome of all ties in bidding is decided by the player holding the Iron Throne token. This player places the Influence tokens of tied players on the highest (i.e., left-most) available positions on the track, in the order of his choice. All power tokens bid by players, regardless of outcome, are discarded to the Power Pool.
After all Influence tokens have been placed on the track undergoing bidding, the player occupying the track's "1" position is awarded its Dominance token (Iron Throne, Valyrian Steel Blade, or Messenger Raven token), then players proceed to bid on the next Influence track.
After bidding for the King's Court track is completed and the Messenger Raven awarded, the Clash of Kings Westeros card has been resolved and the game continues. All remaining Power tokens are returned to the front of each players' screen.

The Influence Tracks and Dominance Tokens
The game board features three different Influence tracks: The Iron Throne track, the Fiefdoms track, and the King's Court track. The player in the highest position on each track receives a specific Dominance token: The Iron Throne, the Valyrian Steel Blade, or the Messenger Raven. The effects of each Influence track and its respective Dominance token are described below.
The Iron Throne Track

The order of Influence tokens on the Iron Throne Influence track determines the turn order. When resolving anything in turn order, always start with the player whose token is in the "1" position on the track, followed by the player whose token is in the "2" position, etc.
The player whose token is in position "1" of the Iron Throne Influence track holds the Iron Throne token.
The player holding the The Iron Throne Token decides the outcome of all ties that occur in the game, with the exception of ties in combat (which are resolved by a player's position on the Fiefdoms track) and ties in determining the winner of the game.
Note: The Iron Throne token does not change hands until bidding for the Iron Throne track has been resolved and all Influence tokens have been placed on that track. Thus, the player controlling the Iron Throne token still breaks ties when bidding on the Iron Throne track, even though he may lose the Iron Throne token after the bidding is over.
The Fiefdoms Track
The player with a higher position (i.e., closer to "1") on the Fiefdoms track wins ties in combat against a player in a lower position.
The player whose token is in position "1" of the Fiefdoms Influence track holds the Valyrian Steel Blade token.
Remember, all ties outside of combat and determining the winner of the game are decided by the holder of the Iron Throne token, including ties in bidding for the Fiefdoms track.

The player holding the Valyrian Steel Blade token may, once per game round, use the token in combat to grant himself a +1 Combat Strength bonus.
Whenever a player uses the Valyrian Steel Blade, he flips the token over to its faded side, indicating it has been used this game round. At the end of every Action Phase (and thus the end of that round), the holder of the Valyrian Steel Blade flips the token back to its fully colored side, indicating it is available to be used again in the next game round.
The King's Court Track
A House's position on the King's Court track determines the number of Special Order tokens available to that House during the Planning Phase. The higher a House's position (i.e., closer to "1") on the King's Court track, the greater the number of Special Order tokens available to that House.
The player whose token is in position "1" of the King's Court Influence track holds the Messenger Raven token.
The number of special orders provided by the King's Court track is indicated by the number of stars printed by each position on the track (some lower positions award no special orders).
In three and four player games, the King's Court overlay token is placed over the King's Court track to alter the number of special orders awarded by each position.
The player holding the Messenger Raven token may perform one of the following actions at the end of every Assign Orders step of the Planning phase:
Replace an Order Token: The holder may swap one of his Order tokens on the game board for one of his unused Order tokens.
Look in the Wildling Deck: The holder looks at the top card of the Wildling deck. After looking, he may choose to return the card to the top of the Wildling deck, or place the card at the bottom of the Wildling deck. He may share the information found on the card with other players (or even lie), but may not show the card.
Whenever a player uses the Messenger Raven, he flips the Messenger Raven token over to its faded side, indicating it has been used. At the end of every Action Phase, the holder of the Messenger Raven flips the token back to its fully colored side, indicating it is available to be used again during the next game round.
II. The Planning Phase
During this phase, players secretly issue orders to areas on the game board.
The Planning Phase consists of the following steps:
- Assign Orders
- Reveal Orders
- Use Messenger Raven
1. Assign Orders
During this step, each player must place exactly one Order token facedown (i.e., secretly, his house insignia facing up) on each area he controls that contains at least one of his units (Footman, Knight, Ship, or Siege Engine). All players place their orders simultaneously. An area cannot be assigned more than one Order token.
While players may not reveal placed orders to other players, they are free to plead, cajole, and/or suggest strategies to each other during this step.
There are five different types of Order tokens:
 March Orders
 Defense Orders
 Support Orders
 Raid Orders
 Consolidate Power Orders
The Order tokens depicted above are regular Order tokens. Each player also has five Special Order tokens - stronger variants of each order type, marked by a star. Special orders are described here.
A player may use any of his 10 regular Order tokens during the Planning Phase, but may only use a number of Special Order tokens equal to the number of stars printed next to his position on the King's Court Influence track.
The game effects of each regular order type is described here.
After all players have completed placing their orders, proceed to the "Reveal Orders" step. Be sure that every area containing at least one unit has been assigned an Order token before proceeding. If not, then one or more players have not placed all required Order tokens.
Not Enough Order Tokens?
In very rare circumstances, a player will have fewer eligible Order tokens than he needs (i.e., he is unable to assign an order to each area containing one or more of his units). In this case, all players must take the Assign Orders step in turn order (rather than simultaneously). The first player places all of his orders (facedown as normal) on the game board, followed by the next player in turn order, etc. The player(s) with insufficient number of eligible Order tokens must place all his eligible Order tokens during his turn, but as an exception to the normal rules, is allowed to leave areas (of his choice) without an order. A player may never, under any circumstance, place more Special Order tokens than allowed by his position on the King's Court Influence track.
2. Reveal Orders
All orders assigned to the game board are now simultaneously revealed. Simply flip all orders faceup, revealing their order types. They will later be resolved during the Action Phase.
3. Use Messenger Raven
The Messenger Raven token may perform one of the following actions:
- Replace an Order Token: Swap one of his Order tokens on the game board for one of his unused Order tokens.
- Look at the Top Wildling Card: He looks at the top card of the Wildling deck. After looking, he may choose to return the card facedown to the top of the Wildling deck, or place the card facedown at the bottom of the Wildling deck. He may willingly share the information found on the card with other players, but may not show the card to others.
If desired, the holder of the Messenger Raven may choose not use either of these abilities during this step.
Whenever a player uses the Messenger Raven, he flips the Messenger Raven token over to its faded side, indicating it has been used. At the end of every Action Phase, the holder of the Messenger Raven flips the token back to its fully colored side, indicating it is available to be used again during the next game round.
After resolving this step, the Planning Phase is now over, and play proceeds to the Action Phase.
III. The Action Phase
During the Action Phase, players resolve all orders that were assigned to the game board during the Planning Phase. The Action Phase is resolved by performing the following steps:
- Resolve Raid Orders
- Resolve March Orders (and resulting combat)
- Resolve Consolidate Power Orders
- Clean Up
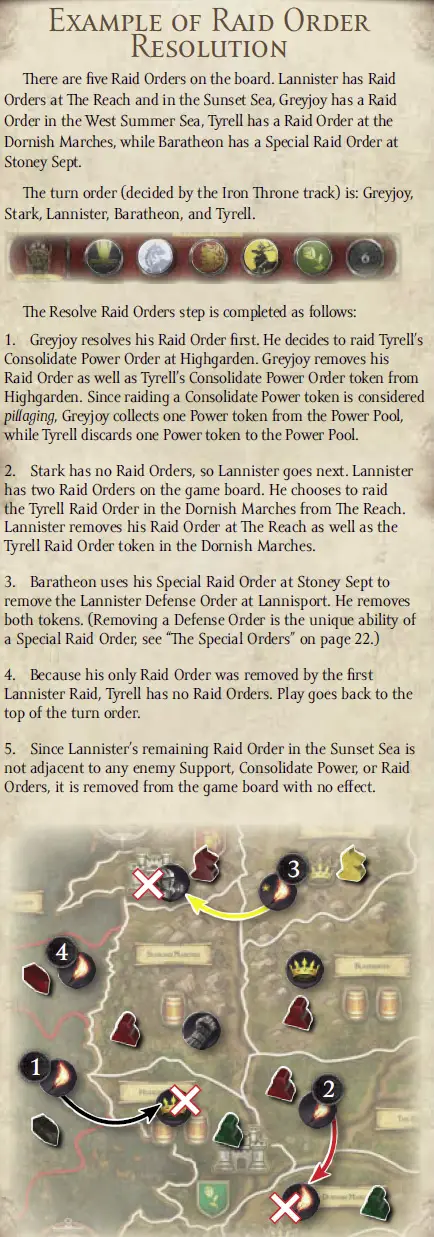
1. Resolve Raid Orders
In turn order, each player resolves one of his Raid Orders on the game board. If a player has no such orders remaining, he simply skips any further action during this step.
Keep cycling through the turn order, with each player resolving one of his Raid Orders, until no Raid Orders remain on the game board. Play then proceeds to the "Resolve March Orders" step.
When resolving a Raid Order, a player simply chooses one enemy Support, Raid, or Consolidate Power Order adjacent to the Raid Order. The chosen order and the resolved Raid Order are both removed from the game board.
By raiding enemy orders, players are effectively canceling opponent's orders, leaving the raided areas without Order tokens.
If a Raid Order is used to remove an opponent's Consolidate Power Order token, the raiding player is said to be pillaging his opponent. After resolving the Raid Order, the pillaging player receives one Power token from the Power Pool and the opponent discards one of his available power tokens to the Power Pool, if able. The pillaging player always gains one token from the Power Pool, even if the opponent has none available to lose.
A Raid Order placed on a land area can never raid an adjacent sea area. A Raid Order placed on a sea area, however, may raid either an adjacent land or sea area.
Raid Orders can remove adjacent Special Order tokens, as long as they match the legal type (i.e., Support, Raid, or Consolidate Power tokens).
If there are no eligible adjacent enemy Orders tokens when resolved, the Raid Order is removed from the game board with no effect.
When resolving a Raid Order, the player may choose for the order to have no effect (simply removing it from the game board), even if there are one or more eligible adjacent enemy orders.
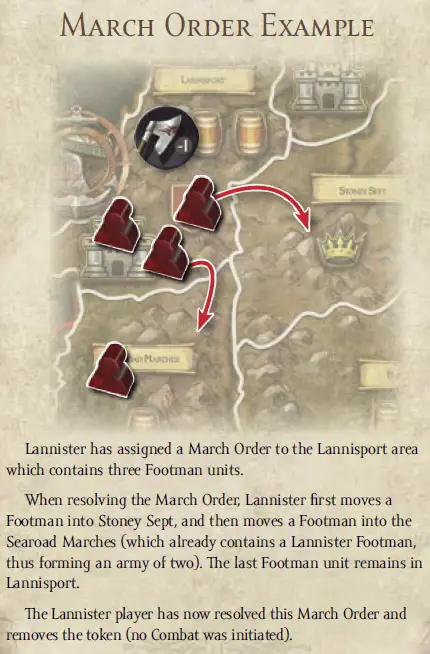
2. Resolve March Orders
In turn order, each player resolves one of his March Orders on the game board. If a player has no such orders remaining, he simply skips any further action during this step.
Keep cycling through the turn order, with each player resolving one March Order at a time, until no March Orders remain on the game board. Play then proceeds to the "Resolve Consolidate Power Orders" step.
Resolving March Orders is perhaps the most important aspect of A Game of Thrones: The Board Game. It is during this step that players move units on the board, engage in combat against their opponents, and gain crucial territory needed to fulfill their ambitions.
When resolving a March Order, the following rules apply:
A player may move all, some, or none of his units from the area assigned the March Order.
Units may move together or separately into several adjacent areas, and/or remain in the area assigned the March Order.
A player may only move units into adjacent areas (unless using ship transport).
Footmen, Knights, and Siege Engine units may never move into sea areas or ports. Ship units may move into friendly connected port areas or into adjacent sea areas, but may never move into a land area.
For each March Order, a player may move units into only one area containing units of another House. In other words, while the marching player may split his units and move them into several adjacent areas, only one of those areas may contain units from another house.
When a player moves one or more units into an area containing units from another house, he starts a combat as the attacker.
Before resolving combat, all other non-combat movement from the area assigned the March Order must be completed.
The number printed on each March Order token signifies the Combat Strength modifier provided to the attacking player when a combat is initiated with that March Order.
If a player vacates (i.e., leaves no unit behind in) an area, he loses control of that area unless he establishes control by placing a Power token from his available power on the vacated area.
Advanced Strategy Tip
A player can "stagger" movement by placing several March Orders in adjacent areas. In this fashion, a unit is able to move more than one area in a turn. This is accomplished by marching units into an area containing another friendly March Order, and later (when resolving that second March Order) moving that area's units into a new area (potentially containing the third friendly March Order, which would allow the units to move again when that last March Order is later resolved).
This can be a difficult trick to accomplish, however, since a successful enemy attack could remove one of the March Orders in this chain.
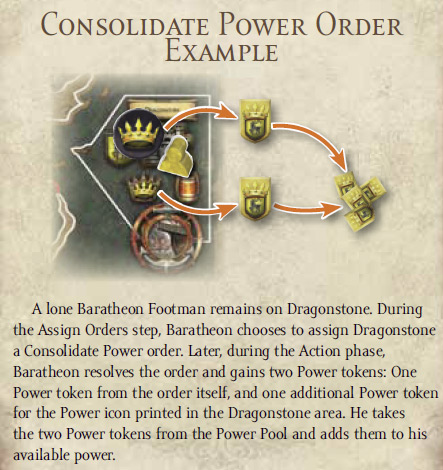
3. Resolve Consolidate Power Orders
In turn order, each player resolves one of his Consolidate Power Orders on the game board. If a player has no such orders remaining, he simply skips any further action during this step.
Keep cycling through the turn order, with each player resolving one of his Consolidate Power Orders until none remain on the game board. Play then proceeds to the "Clean Up" step.
When a player resolves a Consolidate Power Order, he removes the Consolidate Power token to gain one Power token from the Power Pool, plus one additional Power token for each Power icon printed on the area in which the Consolidate Power Order was assigned.
4. Clean Up
All remaining Support and Defense Orders are now removed from the game board and all routed units are stood to their upright position. The Messenger Raven and the Valyrian Steel Blade tokens are both flipped to their available (non-faded) side.
The Action Phase is now over. If this was the end of game round 10, the game is over and a winner is determined. Otherwise play proceeds to the next game round starting with a new Westeros Phase.
Removing/Resolving Orders
Whether an Order token is resolved normally or removed from the game board by other means, it is simply returned to its House's available orders, ready for use during the next Planning Phase.
End of the game
A Game of Thrones: The Board Game ends in one of two ways:
The game reaches the end of the 10th game round.
Immediately after a player controls his seventh area containing a Castle or Stronghold.
Each player must, at all times, record the number of areas he controls containing a Castle and/or Strongholds on the Victory track located on the game board.
At the end of the 10th game round, the player with the highest position on the Victory track (i.e., controls the most areas with a Castle or Stronghold) wins the game. If two (or more) players are tied for the highest position, the tied player who holds the greater number of Strongholds win. If there is still a tie, the tied player with the higher position on the Supply Track wins. If there is still a tie, the tied player with the most available power wins. In the extremely rare case there is still a tie, the tied player with the higher position on the Iron Throne track wins.
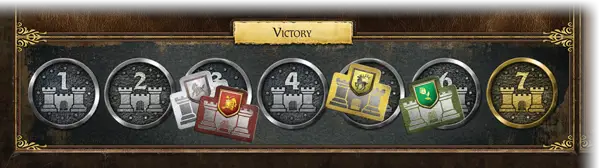
If a House, at any time, reaches the seventh position on the Victory Track (i.e., gains his seventh area containing a Castle or Stronghold) the game immediately ends and that player is the winner.
Please read also our beginners' guide.
Continue Reading

