The Commands & Colors: Ancients game system allows players to portray important engagements of ancient history. The battles, included in the scenario booklet, focus on the historical deployment of forces and important terrain features on the scale of the game system. The scale of the game is flexible and varies from battle to battle. For some scenarios, an infantry unit may represent an entire legion of soldiers, while in other scenarios, a unit may represent just a few brave warriors.
The Command card system drives movement, creates "fog of war", and presents players with many interesting challenges and opportunities, while the battle dice resolve combat quickly and efficiently. The battlefield tactics you will need to execute to gain victory conform remarkably well to the strengths and limitations of the various ancient unit types, their weapons, the terrain, and history.
In this core game of the series, we focus on battles involving Rome and Carthage, with a few additional scenarios that pit Carthage against other historic enemies.
Components
- 1 Battlefield Gameboard
- 3 Sheets containing 45 double-sided Terrain Tiles
- 60 Command cards
- 7 Battle dice
- 5 Block and Dice Label sheets
- 2 Reference Cards
- 1 Core Series Rule Book
- 1 Scenario Book containing 15 battle scenarios
- 345 Blocks: gray Roman units, brown Carthaginian units and black Victory Banners, comprising:
If you are new to this game, we advice you first to read details of the different game elements.
Setup
Select a battle from the scenario section of the booklet. If this is your first game of Commands & Colors: Ancients, we suggest you use Akgragas to begin, as that battle has a small number of units and no terrain rules involved.
Place the board in the center of the table. Each scenario specifies which army is at the top or bottom of the battlefield, and players should sit on the side closest to the army they will command.
Place the terrain hexes as indicated by the battle scenario map.
Separate the blocks by Victory Banners, Carthaginian forces (brown blocks) and Roman forces (gray blocks). Place the unit blocks onto the board, matching the various units' positions to the scenario's battle map. Note: Each unit symbol represents an entire unit.
Shuffle the Command card deck thoroughly and deal Com- mand cards to each side per the selected scenario's War Council notes. Keep your Command cards a secret from the opposing player. Place the remainder of the deck face down, alongside the battlefield, within easy reach of both players.
Place the seven battle dice within reach of both players.
Review any special rules or victory conditions that apply for the battle.
The starting player, as indicated in the scenario's War Council notes, begins play.
Object of the Game
The object of the game is to be the first to capture a set number of Victory Banners (usually 5 to 8), depending on the selected battle scenario's victory conditions.
A Victory Banner is gained for each enemy leader or enemy unit entirely eliminated. When the last block of a unit, or a leader, is eliminated, collect one Victory Banner block. In some scenarios, additional Victory Banners may be gained by capturing certain terrain hexes or other battlefield objectives.
Victory is decided the instant the last banner required is gained.
Game Play
The War Council notes state which player goes first. Players then alternate taking turns, until one of the players reaches the number of Victory Banners indicated in the scenario's victory conditions.
During your turn, follow the sequence shown below:
- Play a Command card
- Order units and leaders
- Move
- Battle (combat between units)
- Draw a new Command card
Note that all movement must be completed before any battle (between two units) is fought, and that each battle must be fought to completion before another battle is begun.
1. Play A Command Card
At the start of your turn, play one Command card from your hand. Place it face up in front of you and read it aloud.
Command cards are normally used to order units (and possibly leaders) to move and/or battle. The card you play will indicate in which section or sections of the battlefield you may issue orders, and how many units (and possibly leaders) you may order.
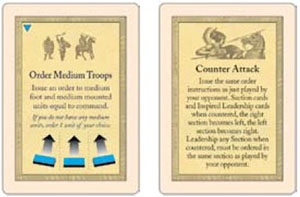
Check here for the descriptions of all the Command cards.
2. Order Units And Leaders
After playing a Command card, announce which eligible units or leaders you choose to order. Only those units or leaders chosen to receive an order from the played card may move, battle, or take a special action.
A leader in the same hex as a friendly unit is considered to be "attached" to the unit. If the unit is ordered to move, the attached leader must move with the unit. An attached leader must move to the same hex as the unit. Note that it still costs only one command to order a unit with an attached leader.
Units or leaders on a hex with a dotted line running through it may be ordered from either section.
You may not give more than one order to each unit or leader. If the Command card allows you to issue more orders in a given section of the battlefield than you have units or leaders in that section, those additional orders are lost.
When a Section Command card, the 'Order Mounted Troops' Command card or the 'I am Spartacus' Command card is played, a leader in the same hex as a unit may be ordered to detach from the unit and move by himself. It costs one order for each attached leader that is detached from its unit and moved separately, and the unit itself is not considered ordered (but could be ordered by spending another command).
The remaining orders on the Command card may be used to order units (including the one from which a leader was detached), or unattached leaders. Section Command cards, plus the 'Order Mounted Troops' and the 'I am Spartacus' Command cards have a helmet symbol to remind players that one or more attached leaders may be ordered to move separately when playing these cards.
Command: Some cards allow you to order a number of units equal to your side's "Command". A player's Command is equal to the maximum number of Command cards that player is allowed to hold, as noted in the War Council section of the scenario being played. When the number of Command cards changes in a scenario, Command increases (or decreases) to the new maximum number of cards allowed to be held at the moment the card is played.
Read here the details about leaders.
3. Move
Unit movements are made sequentially, one ordered unit at a time, in the sequence of your choice. You must complete one unit's movement before beginning another. In addition, you must complete all unit movements before proceeding to Battle.
- A unit may only be ordered to move once per turn.
- A unit that is ordered does not have to move.
- Ordered units may move from one section of the battlefield into another section.
- An ordered unit may never move off the sides of a battlefield unless scenario special rules offer that option. Aside from special rules, units may not exit the battlefield, but leaders may evade or escape off the battlefield on their own side, at the owner's choice.
- Two units may not occupy the same hex. When moving a unit, you may not move onto or through a hex occupied by an enemy unit, an enemy leader, or a friendly unit. Light Foot Exceptions: see Command card 'Order Light Troops' and 'Move-Fire-Move' rules.
- A unit may move onto a hex with a friendly leader if the leader is alone in the hex. However, it must stop in that hex even if it has movement allowance remaining. The lone leader becomes attached to the unit.
- You may not split off individual blocks from a unit; the blocks in a unit must always stay together and move as a group.
- Units that are reduced through casualty losses (removing blocks) may not combine with other units.
- Some terrain features affect movement and may prevent a unit from moving its full allowance or battling during that turn (see Terrain).
- Leaders are not units, and follow different movement rules
Retreat movement rules vary slightly from regular movement.
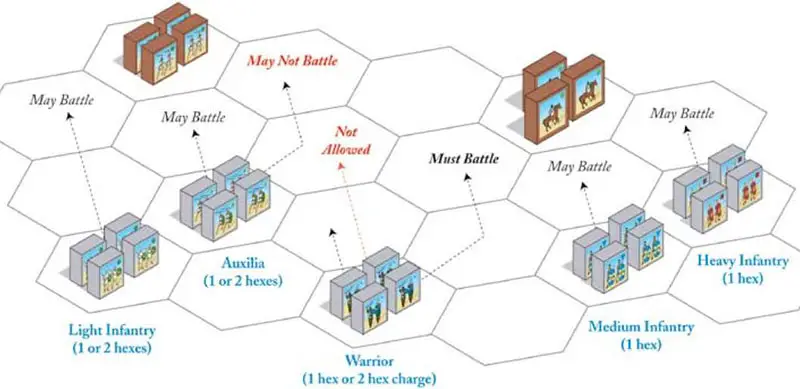
The example above shows the movement rates of foot units. Note the auxilia unit cannot battle if it moves two hexes. Also note how the warrior unit may only move two hexes if it battles after moving.
Read here the detailed rules about the movement rules of leaders, foot and mounted units.
4. Battle
Battles are checked and resolved one ordered unit at a time, in the sequence of your choice. You must announce and resolve one unit's battle entirely before beginning the next one.
- A unit that is ordered does not have to battle.
- A unit may normally battle only once per turn. Note: In some situations, a unit may make a Momentum Advance after a successful Close Combat and then make a bonus Close Combat attack (see Special Actions-Momentum Advance). This advance and bonus combat must be completed before beginning another battle.
- A unit may not target and split its battle dice between several enemy units.
The number of casualties a unit has suffered does not affect the number of battle dice the unit rolls in combat. A unit with a single block retains the same combat strength as a unit at full strength. Exception: Warriors battle with more dice at full strength.
There are two types of battle:
- Ranged Combat
- Close Combat
An ordered unit may only engage in one type of battle when ordered, even if it is capable of both types of battle.
Note again, combat sequence is purely at the owner's choice and he may freely switch between Ranged Combat and Close Combat from one unit to the next during the battle phase.
Both types of battle are optional. Ordered units do not have to engage in Close Combat, even when adjacent to enemy units. Exception: Warriors units.
Read here the detailed rules about range combat, close combat and retreats.
5. Draw a Command Card
After completing all movement, battles, and retreats, discard the Command card played and draw another card from the deck. Your turn is now over.
If the draw deck runs out of cards, shuffle the discards to form a new draw deck. (The discards are also shuffled back into the draw deck after the play of the 'I am Spartacus' card).
When a defending player has used the 'First Strike' card, he draws to replace the card before the active player draws.
Continue Reading