
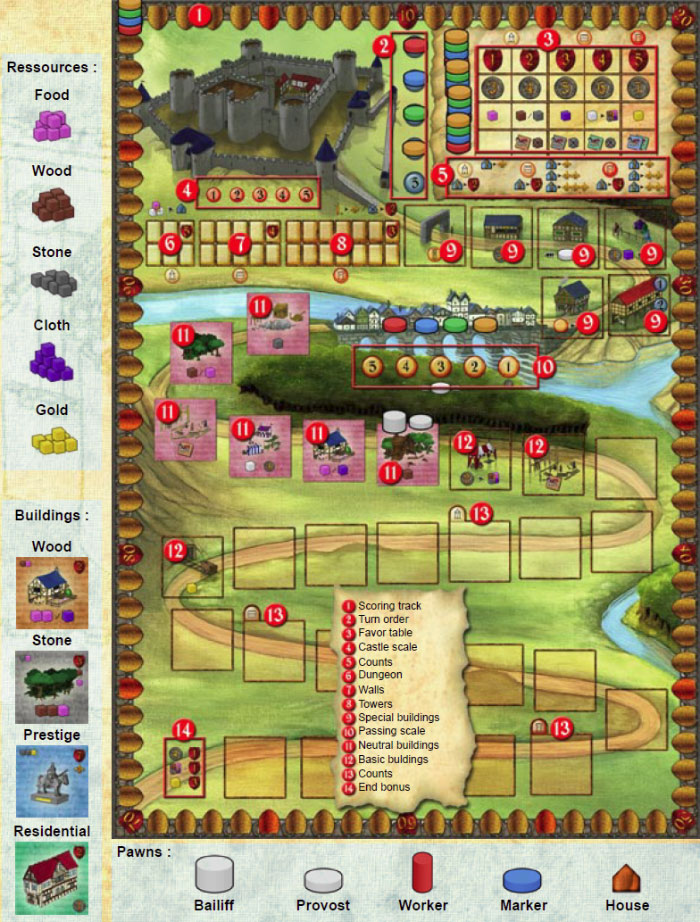
Game Components
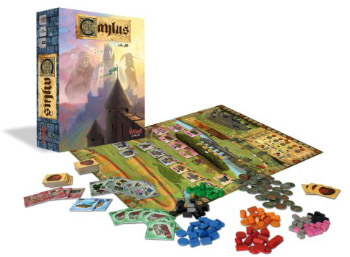
- 1 board
- 1 white 'bailiff' cylinder and 1 white 'provost' disc
- 30 one denier coins and 10 five denier coins
- 30 'worker' cylinders (6 for each color: blue, red, green, orange and black)
- 100 houses (20 for each color: blue, red, green, orange and black)
- 35 marker discs (7 for each color: blue, red, green, orange and black)
- 140 resources cubes (30 pink, purple, brown and gray cubes; 20 yellow cubes)
- 40 building tiles (6 neutral tiles, 8 wooden tiles, 9 stone tiles, 8 residential tiles, 9 prestige tiles)
- this booklet
Object of the game
The players embody master builders. By building the King's castle and developing the city around it, they earn prestige points and gain the King's favor. When the castle is finished, the player who has earned the most prestige wins the game.
Setup
The board is placed at the center of the table. The brown, gray and blue building tiles are sorted out by color, and placed face up on the side of the board. The green tiles are piled up close by. A player mixes the six pink tiles and puts them randomly on the first six spaces of the road.
Resource cubes and coins are sorted out and placed next to the board (this is going to be the stock). Reminder: the small coins are worth 1 denier; the big coins are worth 5.
Each player chooses a color and takes all the corresponding wooden pieces. Each player puts one marker next to the turn order scale 2, and another on the bridge, close to the passing scale (10), and places a marker on each of the four fleur-de-lises symbolizing the King's favor 3. The last marker is placed on space 0 of the score track.
One of the players takes all the markers which have been next to the turn order scale 2 and puts them randomly on the numbered spaces to determine the order of play for the first turn.
The player whose marker is on space 1 takes 5 deniers from the stock. The players whose markers are on spaces 2 and 3 both take 6 deniers. The players whose markers are on spaces 4 and 5 both take 7 deniers. Each player also takes 1 wood cube and 2 food cubes from the stock. The players' deniers and cubes remain visible throughout the game.
The bailiff and provost pawns are placed on the last neutral tile of the road (see the diagram opposite).
Game Principles
Each player plays the part of a master builder and has a team of 6 workers, some resources and a little money (deniers). The workers can be placed either in the city or in the castle:
The City
At the beginning of the game, the city is nothing but a small village. Apart from special buildings (an inn, a stable,..)., there are only a few resource buildings (a farm, a sawmill, a quarry, …), a small marketplace and carpenters who can build wooden buildings. However, players have to develop the economic activity along the road, because huge resources are needed to build the castle. They must therefore install better production sources, and maybe find a mason who will help them build stone buildings, or even reach that remote gold mine...
But those things are very expensive, and the master builders will have to watch their purse carefully! Indeed, every time a worker goes to work, his master must pay him. Moreover, if his master sends him to work in another master's building, the latter will gain prestige. To win the game, you must take advantage of the other players' resources without uselessly giving them an advantage.
Slowly but surely, the village is developing into a town. Old production buildings are becoming obsolete, unless the lawyer transforms them into residential buildings, whose rent brings you additional income. If an architect enters your service, you may embellish the city with some prestige buildings (a statue, or even a cathedral). But of course, master builders do not lay down the law in town; they must abide by the orders of two royal agents: the bailiff and his assistant, the provost.
The provost is a powerful and zealous officer. According to his position along the road, he decides which buildings may be activated and, consequently, which workers will be able to work during this turn. Fortunately, the provost is corruptible. For a few deniers, it is easy to help him reach a specific building, or even have him go backward along the road to prevent another master's workers from working.
As for the bailiff, he's only interested in the castle building's progress. He always moves forward along the road, forcing the masters to build faster...
The Castle
The castle is composed of 3 sections: a dungeon, walls, and towers. The bailiff's movement along the road determines the advance of work in the castle, and the shift from one section to the other. By advancing quickly (and well!) in the building of the castle, the masters accumulate prestige. If you are shrewd, you will also be able to gain the King's favor!
At the end of the game, each player adds up the prestige points they have earned since the beginning. The master who has the largest number of points wins. His future at the King's service will be glorious!
Game Play
The game is divided into turns. Each turn is divided into 7 phases.
Phase 1 - Collecting the incomes
Each player gets 2 deniers from the stock. Furthermore, each player also gets:
- 1 denier per residential building (green background) they own,
- 1 denier if they have built the Library,
- 2 deniers if they have built the Hotel.
The income a player may get is not limited.
Phase 2 - Placing the workers
Following the turn order, the players carry out an action. They may choose to:
- a) pass,
- b) put a worker on a special / neutral / basic (fixed) building,
- c) put a worker on one of another player's buildings,
- d) put a worker on one of their own buildings,
- e) put a worker in the castle.
Phase 2 lasts until all the players have passed.
Putting a worker on a prestige building (blue), on a residential building (green) or on an unbuilt space is forbidden. Placing a worker on a space where there already is another worker is also forbidden, except in three cases (stable, inn, castle - see below). Passing is free, but placing a worker costs some deniers.
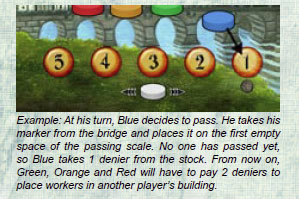
a) passing
If a player wants to pass or must pass because of a lack of workers or money, they put their color marker (located on the bridge) on the first available space (that is, on the smallest unoccupied number) of the passing scale. The first player who passes gets 1 denier from the stock immediately.
Once a player has passed, they can't place workers until the end of the phase.
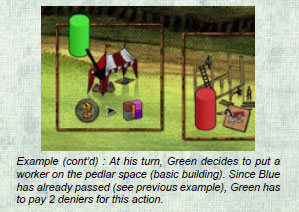
b) placing of a worker on a special / neutral / basic building
The player gives the stock a sum of money that is equal to the smallest unoccupied number on the passing scale (between 1 and 5 deniers according to the number of players who have already passed). Then, the player places one of their workers on the space of a special / neutral / basic building of their choice.
If the worker is placed in the stables, the player puts him on the smallest number available. Up to 3 workers can be placed in the stable, but a given player can place only one.
If the worker is placed in the inn, the player puts him on the circle on the left. As a consequence, this worker will possibly spend some time with another worker placed on the other circle on the right (one player may have two of their workers in the inn simultaneously).
c) placing a worker on another player's building
The player who places the worker gives the stock a sum of money that is equal to the smallest unoccupied number on the passing scale (between 1 and 5 deniers according to the number of players who have already passed). Then, the player places one of their workers on the opponent's building of their choice. The owner of the building instantaneously earns one prestige point.
d) placing a worker on of your own buildings
The player pays 1 denier to the stock. Then, the player places his worker.
NB: Placing a worker in one of your own buildings does not yield a prestige point.
e) placing a worker in the castle
The player gives the stock an amount of money that is equal to the smallest unoccupied number on the passing scale (between 1 and 5 deniers according to the number of players who have already passed). Then, the player places the worker on the castle space with the smallest number available.
The castle may contain several workers, but each player can only place one.
Phase 3 - Activating special buildings
Special buildings are activated in order:
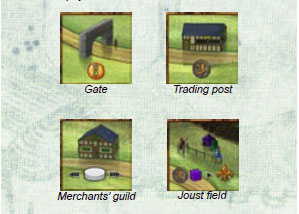
a) the gate
If a worker has been placed on this space, his master may place it on any unoccupied space at no cost. Thus, the worker can be placed in another unoccupied special building, in the castle, the inn or in the stable (if the player doesn't already have a worker there) or in any other building.
If the player chooses to put his worker on another player's building, the latter immediately earns 1 prestige point. If the player does not want to move his worker (or cannot do it), they just get their pawn back.
b) the trading post
The player takes 3 deniers from the stock and gets the worker back.
c) the merchants' guild
The player may choose to move the provost 1 to 3 spaces backward or forward along the road. The player then gets the worker back.
d) the joust field
The player may choose to give the stock 1 denier and 1 cloth cube in order to get a royal favor (see below). The player then gets the worker back. NB: You cannot pay 1 denier and 1 cloth several times to gain a favor more than once a turn.
e) the stables
The turn order changes: if a player places a worker on circle 1, they become player number 1; the second circle grants you rank 2; the third circle grants rank 3. The other players' positions are changed accordingly on the turn order scale. Then, the players get their workers back from the stable.
f) the inn

If a player has placed a worker during this turn, the worker is now moved to the circle on the right (the worker will remain there for the next turn). The worker who previously occupied this circle is driven out and gets back to his master.
If a player put a worker on the inn in a previous turn and if the worker hasn't been driven out (that is, if nobody has played in the inn during this turn), they can either get the pawn back or leave it where it is for the next turn. If the pawn is not removed, its owner will still be able to use the power granted by the inn in the next turn.
The player who occupies the circle on the right always pays 1 denier to place their workers, no matter how many players have passed (the player's opponents still gain 1 prestige point every time the former uses their buildings).
Phase 4 - The provost's move
Following the passing order of phase 2 (that is, the first player who passed speaks first), the players now have the opportunity to move the provost. The latter's final position will determine which buildings will be activated.
Each player can move the provost 1 to 3 spaces forward or backward by paying 1 denier per space. It is also possible to pass.
The provost's move may raise discussions among the players, but agreeing to exchange something is forbidden. Furthermore, a player doesn't have to keep their word when their time to move the provost has come. The provost can neither go backward to the area before the bridge (that is, to the special buildings), nor go beyond the last space of the road. The provost can move to empty spaces.
When each player has spoken or passed once, move on to phase 5.
Phase 5 - Activation of the buildings
Buildings are activated in order (following the road) from the first space after the bridge to the space the provost is now occupying. The buildings beyond the provost's current location will not be used. The players who have workers on these unused buildings get them back without a compensation (the prestige points granted by these workers are not canceled).
A player doesn't have to apply the effect of a building, unless it is a production building. Once a building has been activated, the player gets their worker back, and the next building is activated.
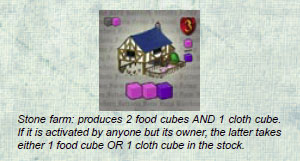
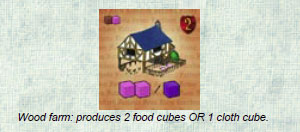
a) production buildings
These buildings allow the player who activates them to take cubes from the stock. The cubes are placed before the player.
Furthermore, if a stone production building (gray background) is activated by anyone but its owner, the latter takes one resource cube (chosen among the resources produced by the building) in the stock. If the building is activated by its owner, the latter takes the normal income granted by the building, but no additional cube.
b) construction buildings

They allow you to build new buildings on the board:
- the carpenter allows you to build wood craft buildings only (tiles with a brown background).
- the mason allows you to build stone craft buildings only (tiles with a gray background).
- the architect allows you to build prestige buildings only (tiles with a blue background).
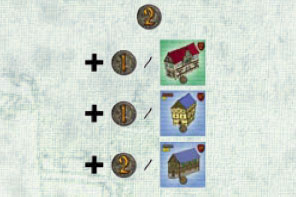
It is only possible to build a building if it is still available in the stock. To build a craft building, the player has to pay its price in cubes (the price is given in the top left-hand corner of the tile) with their own stock.
Then, the new building is placed on the first free (unbuilt) space on the road, and the owner puts one of his houses on the top left corner of the tile. The player immediately scores the number of prestige points for the construction of this building (the number of prestige points is shown in the top right corner of the tile).
Prestige buildings follow the same rules, but they can only be built on the sites of the residential buildings owned by a given player (see the lawyer below). In such a case, the green building is discarded and replaced with the chosen prestige building. The construction of some prestige buildings give some advantages to their owner:
- the statue, the theater, the university: the builder immediately gains 1 royal favor.
- the monument: the player who builds the monument immediately gains 2 royal favors.
c) the lawyer
The lawyer allows the player to transform a neutral building (with a pink background) or one of their own craft buildings into a residential building (with a green background).
To transform a building, the player must give the stock 1 cloth cube and 1 denier. Then, the player replaces the chosen building with a residential building and immediately gains 2 prestige points.
The player must put one of his houses on the tile of the residential building. From now on, during phase 1, this building will yield 1 denier of additional income for its owner. If the residential building is changed into a prestige building at some point, this additional income is lost.
NB: Whenever a player's building is transformed, it goes back into the stock and can consequently be rebuilt. Neutral buildings are permanently discarded. The number of residential buildings available is theoretically limitless. If you run short of them, you can put your houses on empty spaces instead. The lawyer can't transform a prestige building, a basic building or a residential building. Furthermore, the lawyer can never be transformed. If there is a worker in the building the player wants to transform, the latter pays immediately, but the lawyer's action will be delayed until the building has been activated.

d) marketplaces
Marketplaces allow you to sell 1 cube to the stock and get deniers in return (the price depends on the market). It is not allowed to sell several cubes at once.
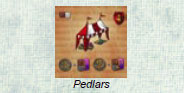
e) the pedlars
For a few deniers, pedlars allow you to buy 1 or several cubes from the stock. They don't allow you to buy gold. At the basic (fixed) pedlar's shop, you can't buy more than 1 cube.
The nonbasic pedlar (the wood building) allows you to buy 1 or 2 cubes of your choice.
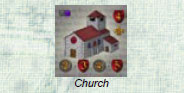
f) the church
The church allows you to exchange deniers for prestige points. The player can either pay 2 deniers and get 3 points, or pay 4 deniers and get 5 points.
NB: The player who builds this building gains 4 prestige points and a royal favor (see below) when he places it on the board.
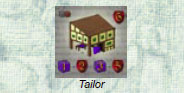
g) the tailor
The tailor allows you to exchange cloth cubes for prestige points. The player may either choose to pay 1 cube and get 2 points, or to pay 3 cubes and get 6 points.
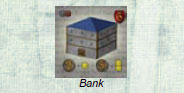
h) the bank
The bank allows you to exchange deniers for gold cubes. The player can either pay 2 deniers and get 1 gold cube, or pay 5 deniers to get 2 gold cubes.
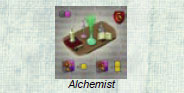
i) the alchemist
The alchemist allows you to exchange cubes for gold. A player can either pay 2 cubes (of any good) and get 1 gold cube, or pay 4 cubes (of any good) and get 2 gold cubes.
Phase 6 - Buiding of the castle
This phase only concerns those players who have placed a worker in the castle.
The castle is divided into three sections:
- the Dungeon (composed of 6 parts) is built before the first count.
- the Walls (composed of 10 parts) are built before the second count.
- the Towers (composed of 14 parts) are built before the third and last count.
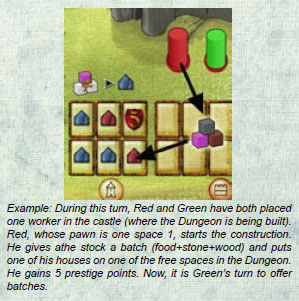
The players must build the castle according to their order on the castle scale (beginning with space 1). The player decides during their turn how many batches they will give the stock.
A batch must be composed of three different cubes, one of which must be a food cube.
Every time a player gives the stock a batch, he has the right to put a house in the section of the castle which is currently under construction (as we'll see below, it is the bailiff's progress on the board which determines which section is under construction). If there is no more room in this section, the player may start building the next section (nevertheless, if the players are building the Towers - which are the last section - it is possible that some of them will not be able to give batches).
Finally, the construction of a new section may begin before the previous one is finished (there are still free spaces left). In this case, the spaces will remain unoccupied until the end of the game.
If a player has placed a worker in the castle but won't or can't give a batch (for instance, if they don't have enough different cubes), they lose 2 prestige points (it is not possible to go below 0 point, though). This penalty does not apply if, during the building of the Towers, a player can't give a batch because there is no room left (if the player owns a batch, they keep the cubes and their prestige is not affected).
The players gains prestige points whenever they help build the castle:
- for each batch they provide to build the Dungeon, the player gains 5 prestige points,
- for each batch they provide to build the Walls, the player gains 4 prestige points,
- for each batch they provide to build the Towers, the player gains 3 prestige points.
Finally, you determine which player has provided the most batches during this turn (in other words, which player has placed the most houses). This player immediately gains 1 royal favor.
If several players are tied, the one who arrived first gains the favor.
The players now get their workers back from the castle.
Phase 7 - End of the turn
The bailiff moves along the road. He always moves forward (consequently, he moves away from the castle). He may move on empty spaces. His movement is determined by the provost's current position:
If the provost is located after the bailiff along the road (that is, farther away from the castle), the bailiff moves 2 spaces forward.
If the provost is located before the bailiff along the road (that is, closer to the castle) or on the same space, the bailiff only advances by 1 space.
Once the bailiff has moved, place the provost on the space the bailiff has just reached. Then, see if a count is necessary: if the bailiff, during his move, reached or went past Dungeon count, Walls count, Towers count spaces, or if a section has been completed during this turn, proceed to count (in any case, there will only be one count per section).
Then, a new turn begins.
Counts

According to the section (the Dungeon, the Walls or the Towers) you are counting, each player, following the turn order, counts the number of castle parts they have built (that is, the number of houses they have placed in the given section) and refers to the corresponding count table.
If you are counting a section while houses have already been placed in the next section because of the lack of room, the latter houses are not taken into account.
Dungeon
no house -> -2 prestige points
2 houses & more -> 1 royal favor
Walls
no house -> -3 prestige points
2 houses -> 1 royal favor
3 or 4 houses -> 2 royal favors
5 houses & more -> 3 royal favors
Towers
no house -> -4 prestige points
2 or 3 houses -> 1 royal favors
4 or 5 houses -> 2 royal favors
6 houses & more -> 3 royal favors
When the count is over, wherever the bailiff may be on the road, the player must now concentrate on the next section of the castle, even if there are some empty spaces left in the section that has just been counted. If the section of the Towers has just been counted, the game is over.
End of the game
The game ends right after the count of the Towers section (that is, after the bailiff has reached the Towers count space or when the 14 parts of the Towers have been built).
The players add the following points to the points they have already gained during the game:
- 3 points per gold cube they have left,
- 1 point per 3 cubes they have left (no Gold),
- 1 point per 4 deniers they have left.
The player with the most prestige points wins the game. In case of draw for the first place, all the players who are tied win.
Continue Reading

